This is a beginner’s guide to using FlashGet Kids. Discover the ultimate solution for modern parenting with FlashGet Kids! Keep a close eye on your children’s online activities, easily manage their screen time and app usage, set geofences for their safety, and stay informed of their whereabouts at all times.
Table of Content
Stage1: Install FlashGet Kids
Let’s start by installing the FlashGet Kids app. The app must be installed simultaneously on the parent’s and kids’ mobile phones.
Step 1
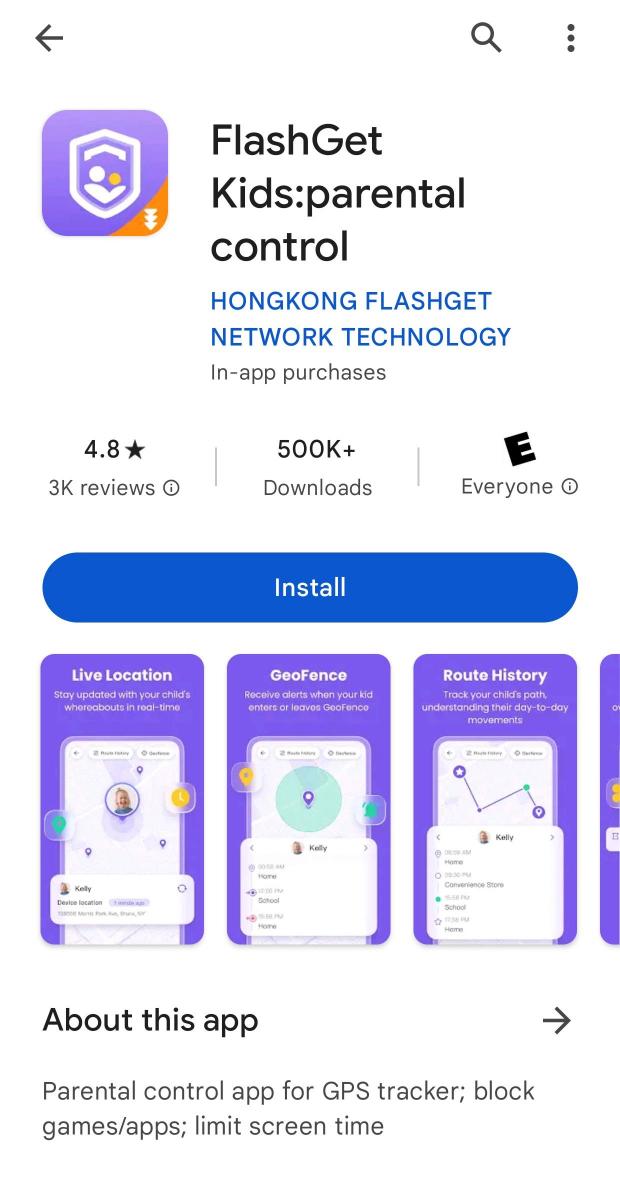
Download and install FlashGet Kids for parent on the parent’s device.
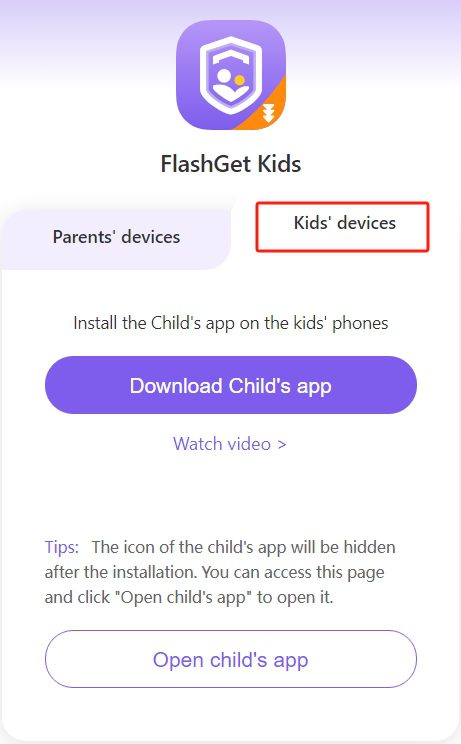
Open a browser on your kid’s device, and enter flashget.kids. Please be aware that it’s not flashget.com.
Click the download button to download the APK file.
Tips
If you see a popup prompt of “unknown sources,” tap on Settings > toggle on Downloads from Unknown Sources or something similar that contains “Unknown Sources.”
Because FlashGet Kids for child is not on the Google Play store, Google defines APK files installed from third-party channels as from unknown sources, and you need to allow installation from unknown sources in the settings to continue.
After installation, click “Done” to open FlashGet Kids (Child’s app) on your child’s device.
If you’re using Android 13 or later, you may fail to click open FlashGet Kids for child directly (The open button is grey or the open button does not work). You can go to phone browser on kid’s device and enter flashget.kids/openkids
Tips
Can’t find the FlashGet Kids icon after installation on your child’s device?
If you can’t find FlashGet Kids on your child’s device, follow the methods below:
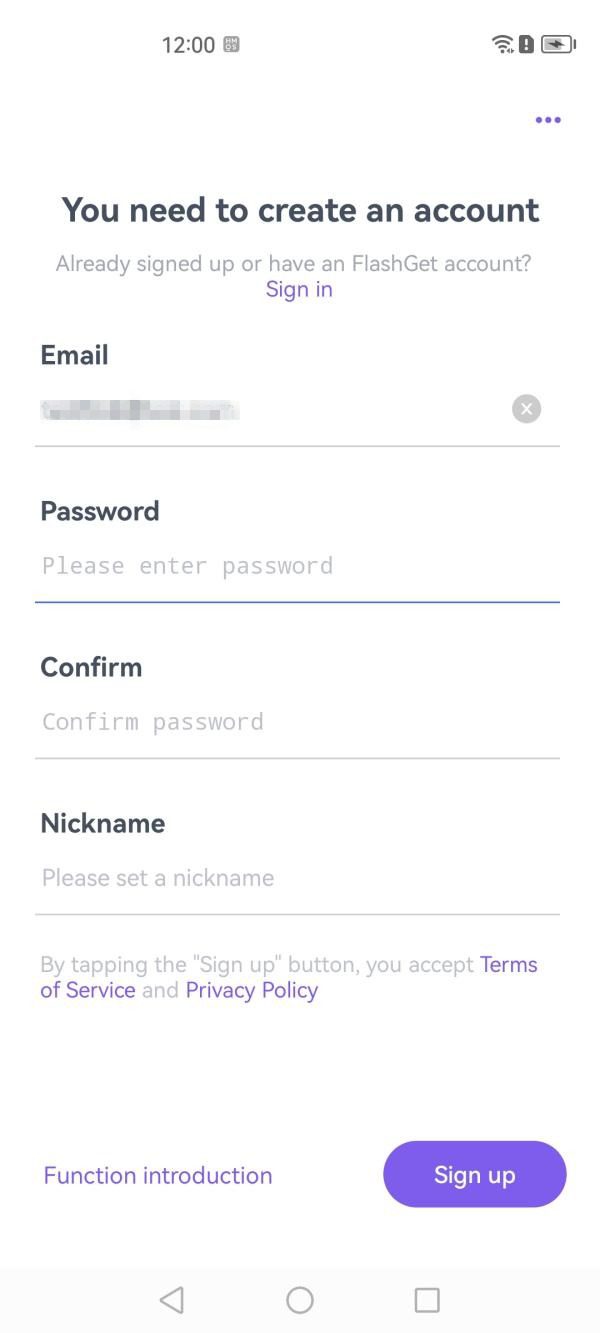
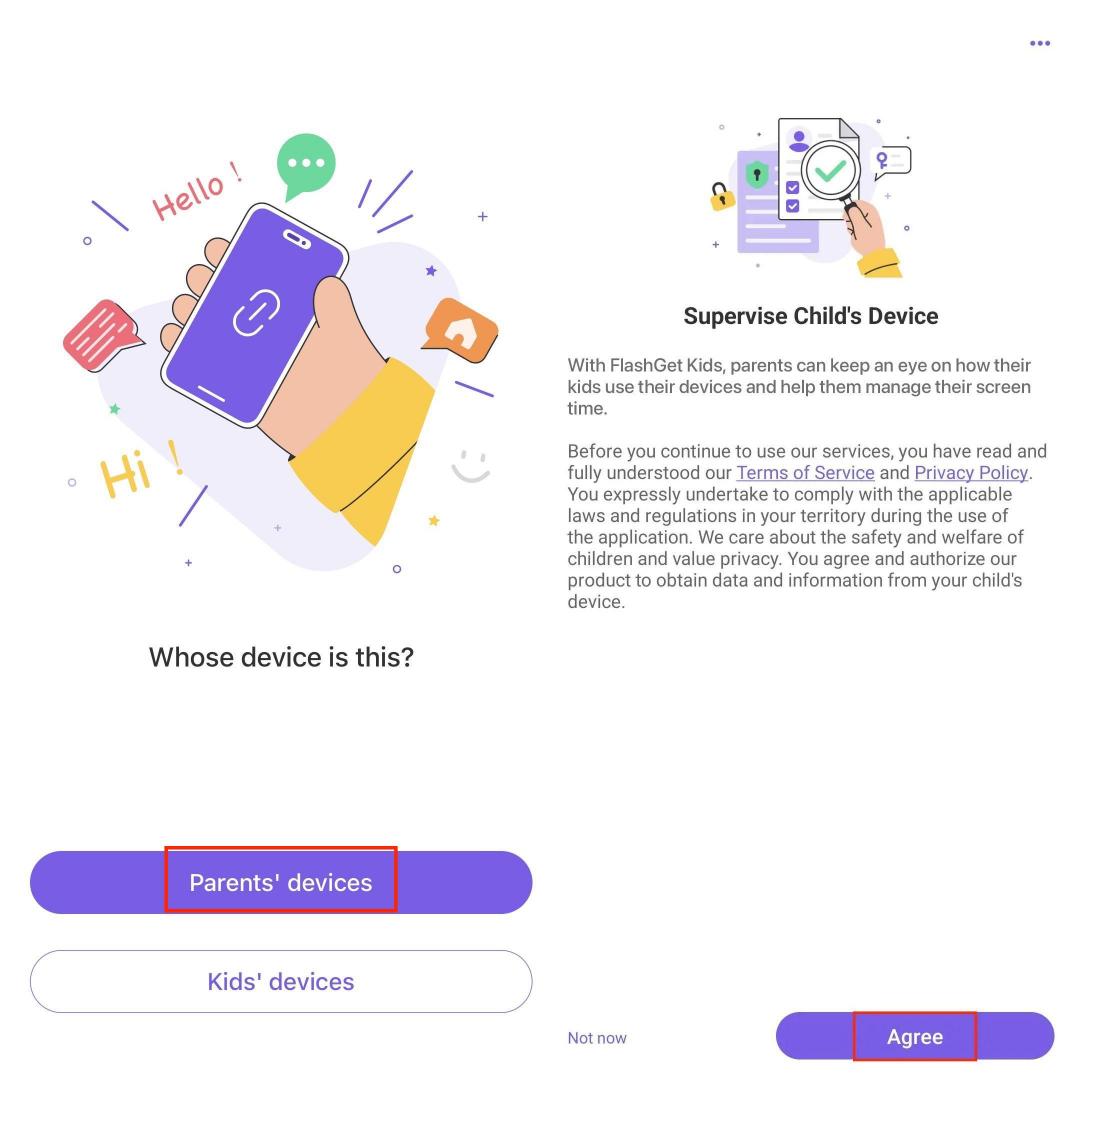
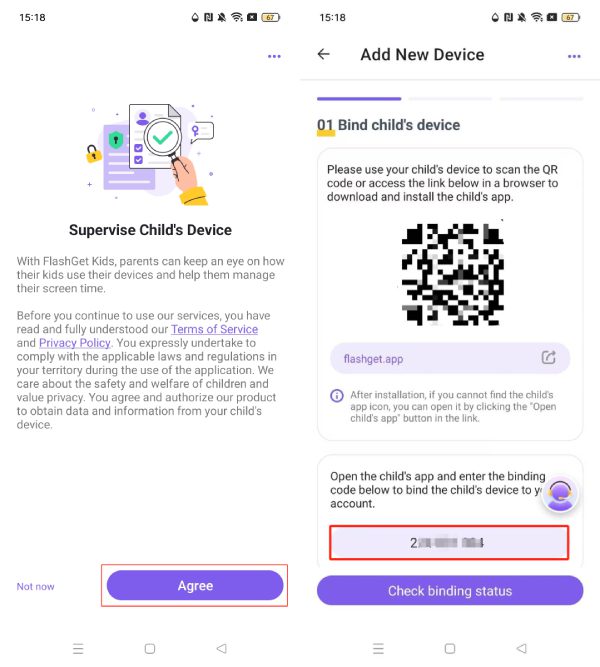
Open and sign in “FlashGet Kids for parent” on parent’s phone. Tap on “Parents’ devices,” and choose “Agree.”
Click “Next” to get a 9-digit code on the parent’s app.
Then enter the 9-digit code on the child app on Kids devices. Click “Next“> “Confirm.” Turn on the relevant permissions to keep FlashGet Kids running in the background. Check the video below to download and bind FlashGet Kids!
How to add another new device on FlashGet Kids for parent on parent’s device?
There are two ways to add a new kid’s device to FlashGet Kids for parent.
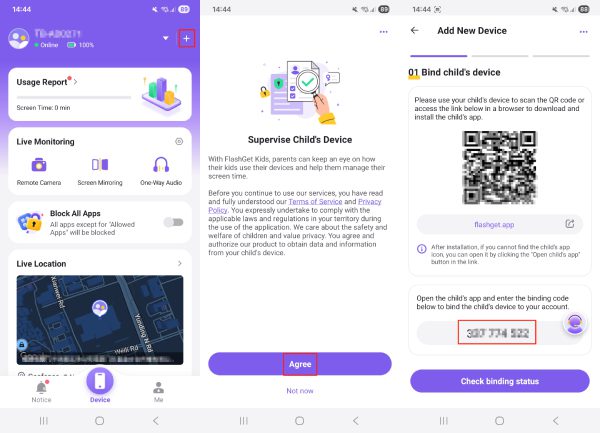
Method 1: Add from the “Device” page. Open FlashGet Kids on parent’s phone. Tap the Add icon at the upper right corner in “Device”, tap “Agree.” Then, you can see a 9-digit binding code. Enter the 9-digital binding code on FlashGet Kids for child (new device) to complete the connection.
Method 2: Add from “My Device” in “Me.” Open and sign in “FlashGet Kids for parent” on parent’s phone. Head to “Me” > “My Devices” > “+” > “Agree.” Next, get a 9-digit code on the parent’s app and copy the code. Enter the 9-digital binding code on FlashGet Kids for child (new device).
Once the child’s device is successfully added, you can start configuring parental control settings in FlashGet Kids for parents.
Stage2: Set Up FlashGet Kids for child
Step 1
Follow the on-screen instructions to allow the phone permissions on child’s device.
Step 2
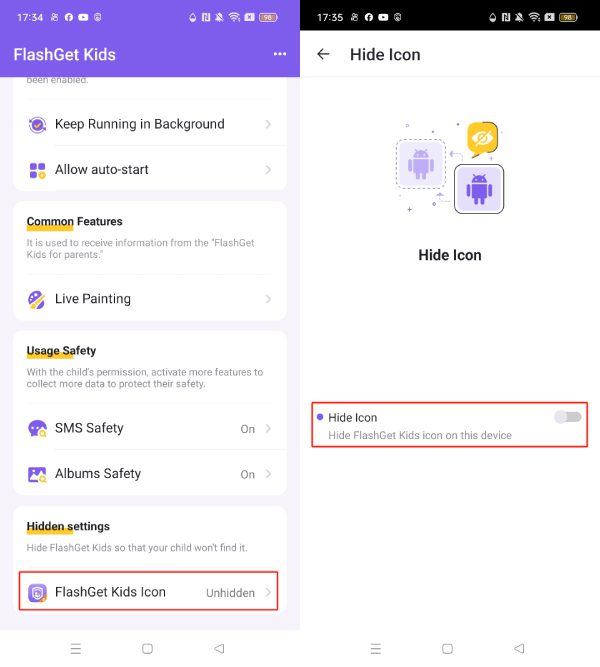
Open FlashGet Kids for child on your child’s device. Tap “Hide icon” on the dashboard. And then turn on “Hide Icon” Then the FlashGet Kids will disappear from the kid’s screen.
Step 3
Set up a keep running in Background setting to make FlashGet Kids for child run continuously in the background of a device. This ensures that FlashGet Kids for child remains effective at all times in protecting children.
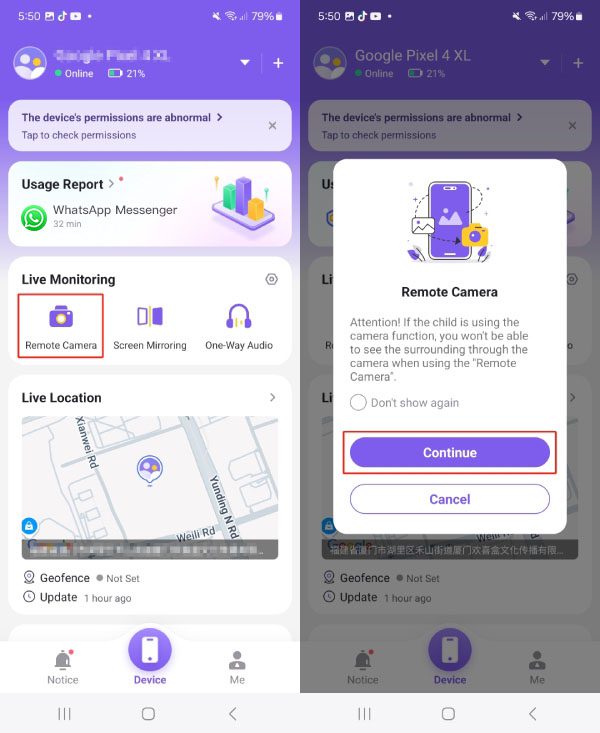
Monitor a child’s environment using the phone’s rear or front camera.
Remotely activate the camera on a child’s phone to observe their surroundings.
Tracks the devices and environment of your kids in real-time.
How-to-Use
Step 1
Go to Live Monitoring on the dashboard. Click “Remote Camera” > “Continue.”
Step 2
Then you can see your child’s current environment. Click “←” to go back to the dashboard.
One-Way Audio
Features
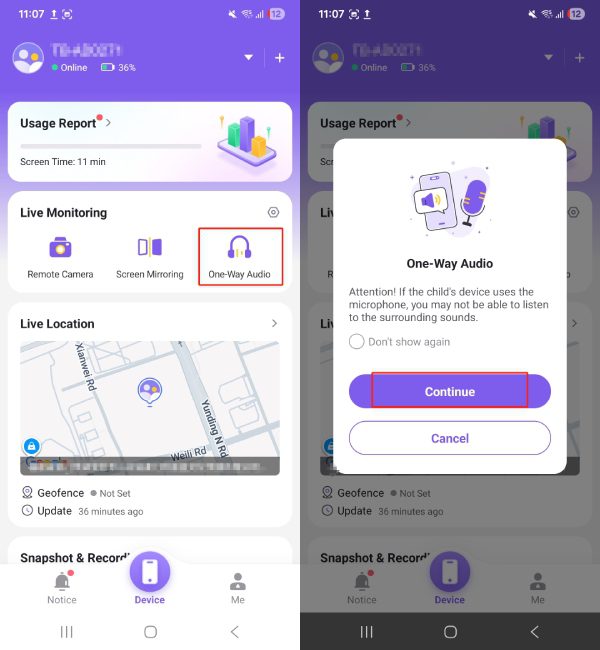
Keep track of the ambient surrounding the child to stay informed of their circumstances.
Record the environmental sound in the vicinity of the child.
How-to-Use
Step 1
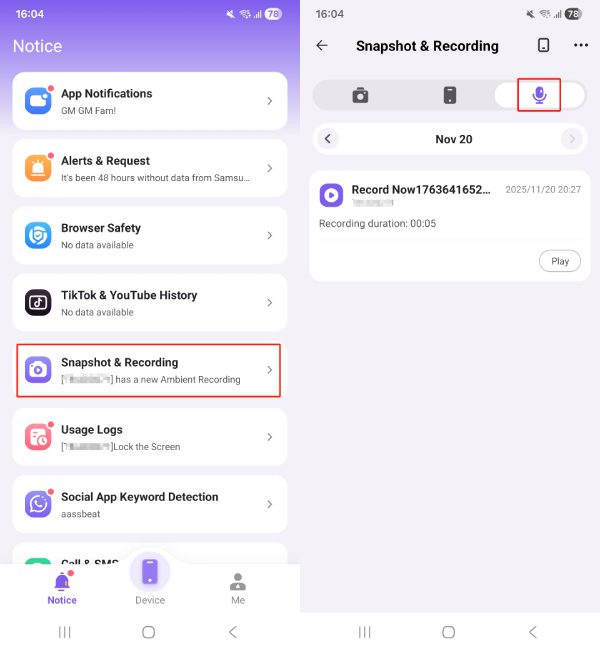
Head to Live Monitoring on the dashboard. Click “One-way Audio” > “Continue.” Then you can listen to the sound around the child.
Step 2
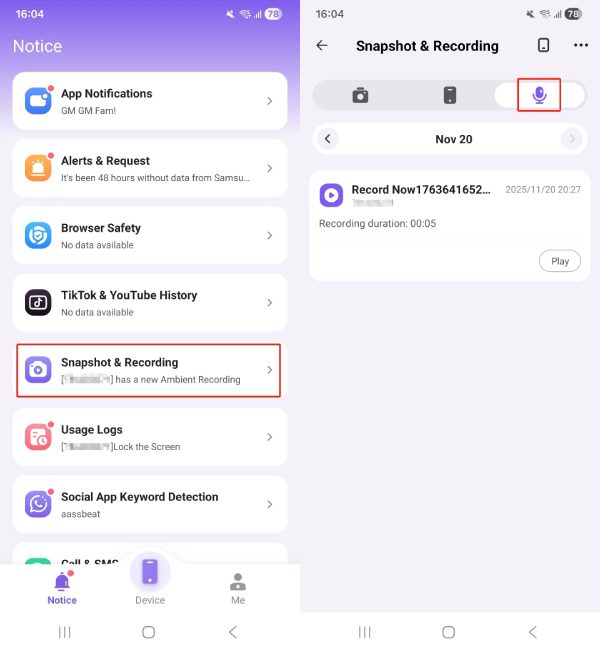
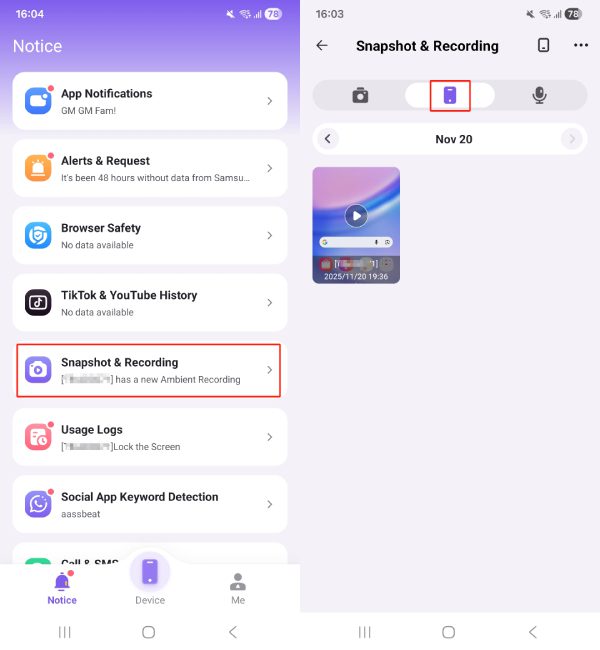
Tap “Record” to start recording. And all recordings will be saved in “Notice” > “Snapshot & Recording.”
Screen Mirroring
Features
Display the contents of your child’s screen on your own device in real-time.
Captures the contents that your kids are viewing.
How-to-Use
Step 1
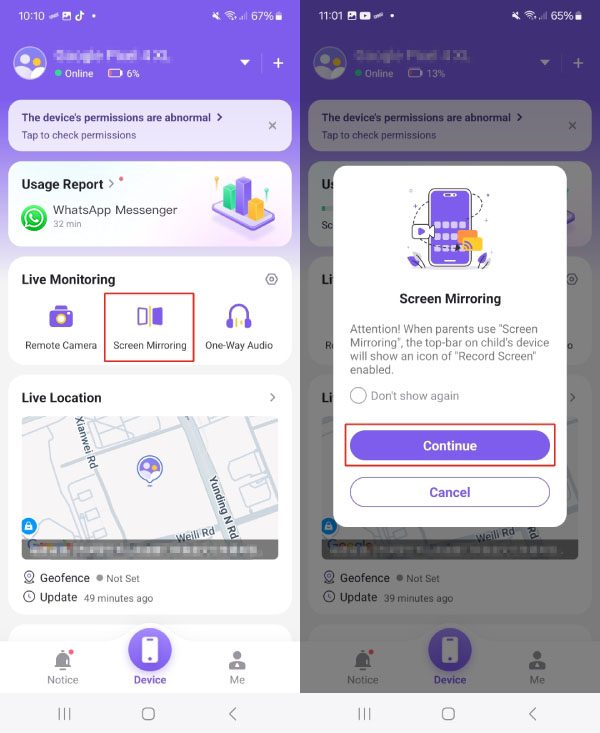
Go to Live Monitoring on the dashboard. Click “Screen Mirroring” > “Continue.”
Step 2
Then you can view your child’s phone screen. Click “←” to go back to the dashboard.
Snapshot
Features
Capture images of the child’s phone screen.
Get real-time images from the child’s camera,including front and facing camera images.
Camera Snapshot
Step 1
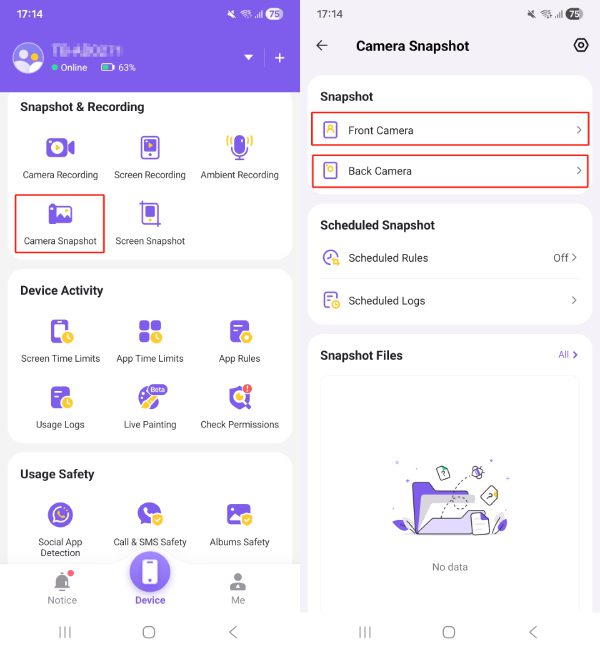
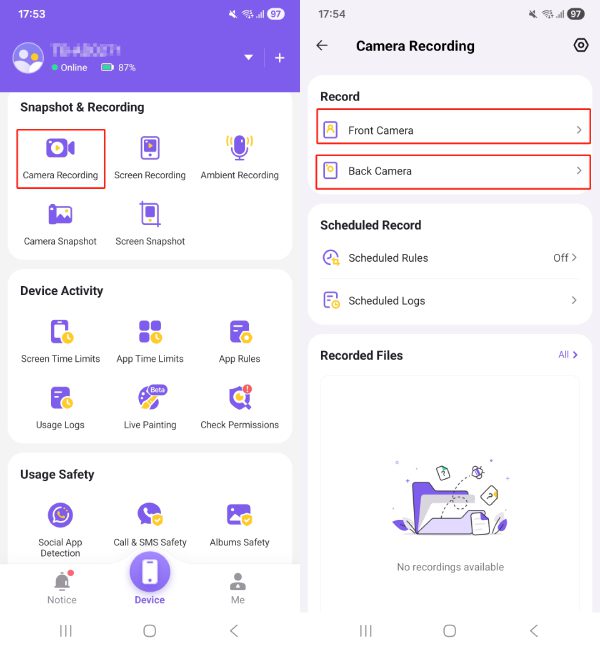
Open the FlashGet Kids app, and go to “Device” > “Snapshot & Recording” > “Camera Snapshot.”
Step 2
Tap “Front Camera,” you can get images taken by your child’s phone’s front camera. Tap “Back Camera,” you can get images taken by your child’s phone’s back camera.
Step 3
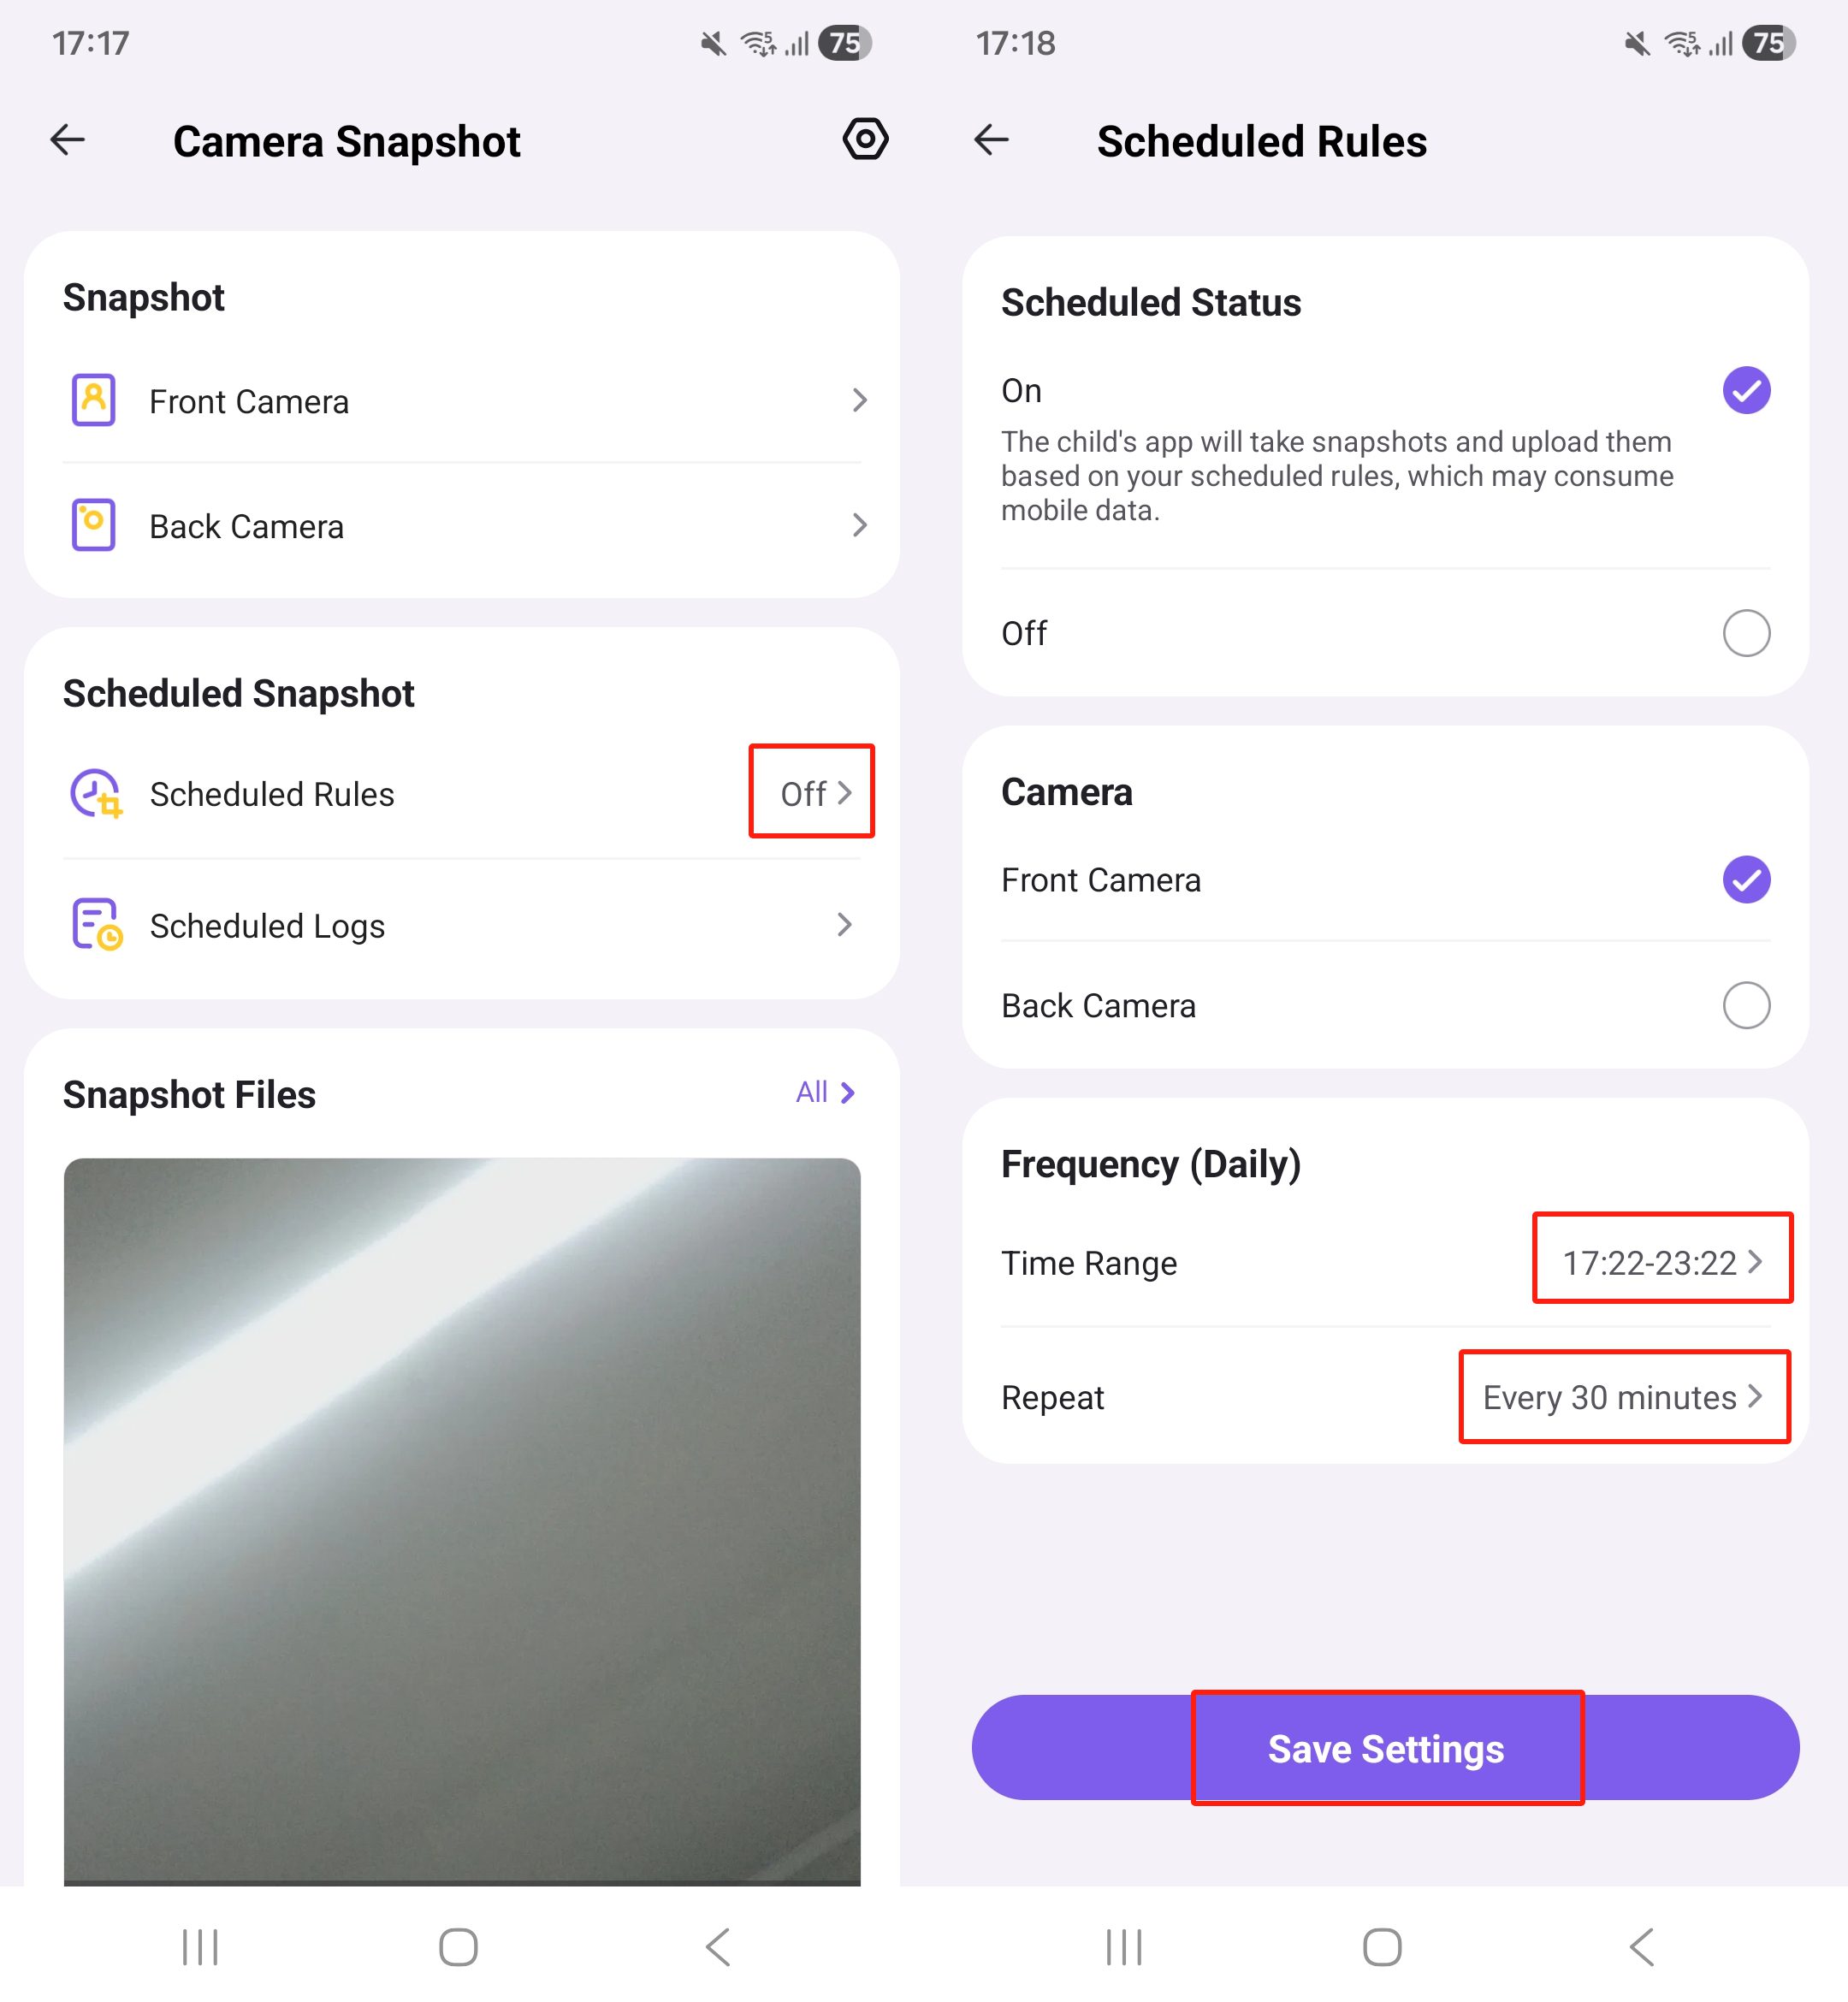
Click “Scheduled Rules”, and turn “Scheduled Status” to “On.” Select either “Front Camera” or “Back Camera.” Then choose the “Time Range”, “Repeat”, and “Frequency (Daily)” options based on your needs. Finally, click “Save Settings.” Once saved, the child’s device will automatically take snapshots according to your schedule.
Step 4
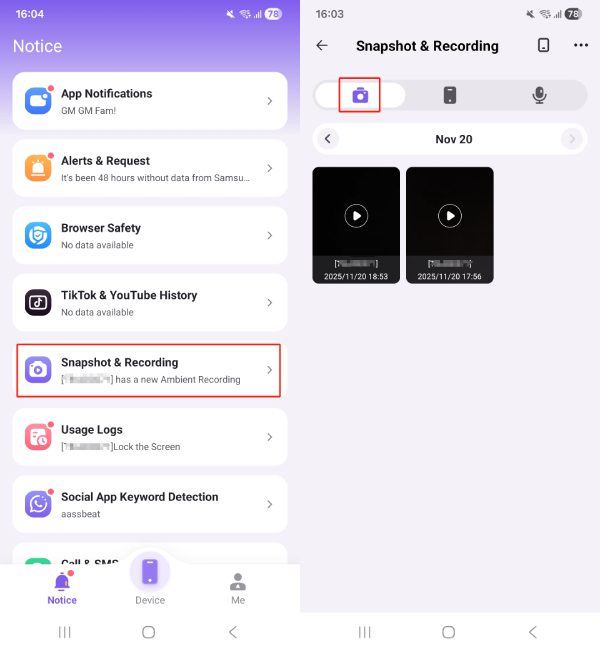
You can view the recorded files in two ways: tap “All” under Snapshot Files to see all images, or access them via “Notice” > “Snapshot & Recording.”
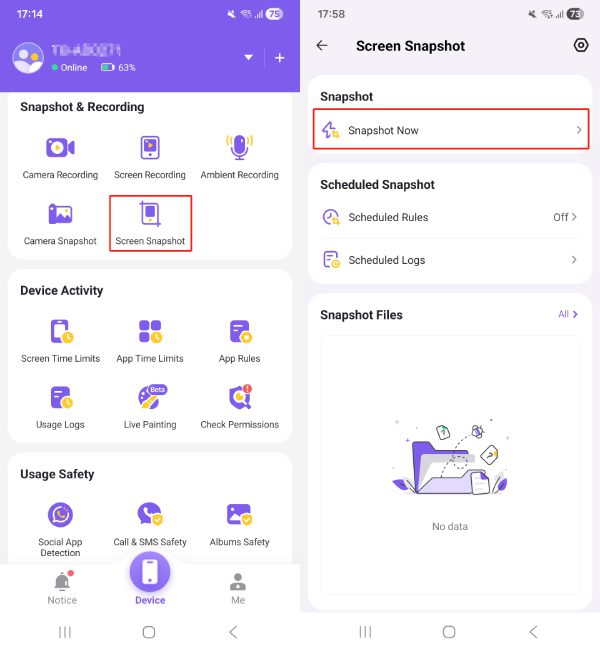
Screen Snapshot
Step 1
Open the FlashGet Kids app, and go to “Device” > “Snapshot & Recording” > “Screen Snapshot.”
Step 2
Tap “Snapshot Now” and you can get images of your child’s screen image instantly.
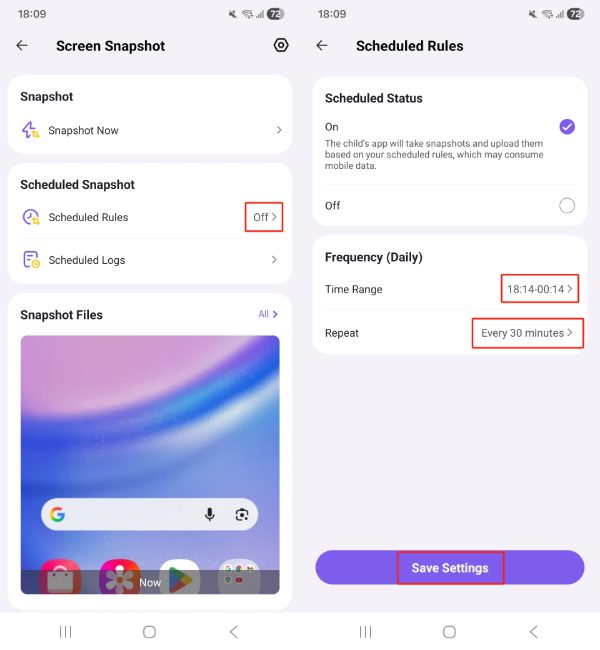
Step 3
Tap “Scheduled Rules”, then switch “Scheduled Status” to “On.” Select the “Time Range” and “Repeat” under the “Frequency (Daily)” according to your own preferences. Finally, click “Save Settings.” Once saved, your child’s device will automatically take screen snapshots according to your schedule.
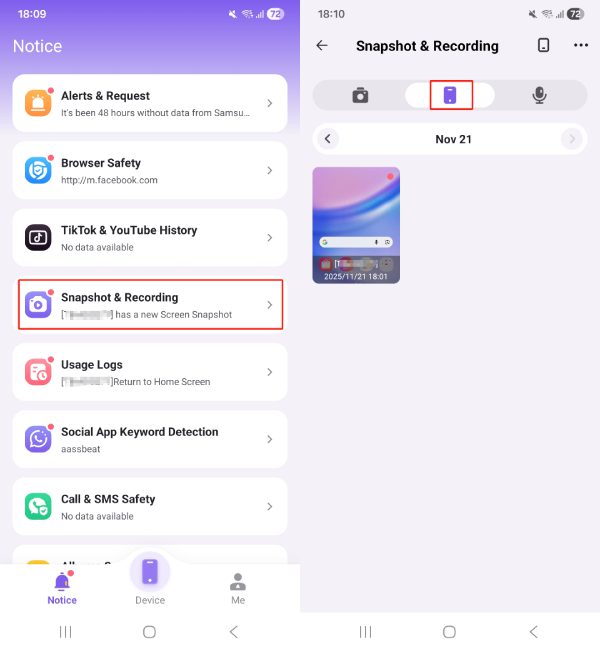
Step 4
You can view the recorded files in two ways: tap “All” under Snapshot Files to see all images, or access them via “Notice” > “Snapshot & Recording.”
Recording
Features
Recording the kid’s phone screen, camera and the ambient sound around them.
Camera Recording
Step 1
Open the FlashGet Kids app, and go to “Device” > “Snapshot & Recording” > “Camera Recording.”
Step 2
Tap “Front Camera,” and select recording time to click “Start Recording.” You can get recordings taken by your child’s phone’s front camera. Tap “Back Camera” to record recordings taken by your child’s phone’s back camera.
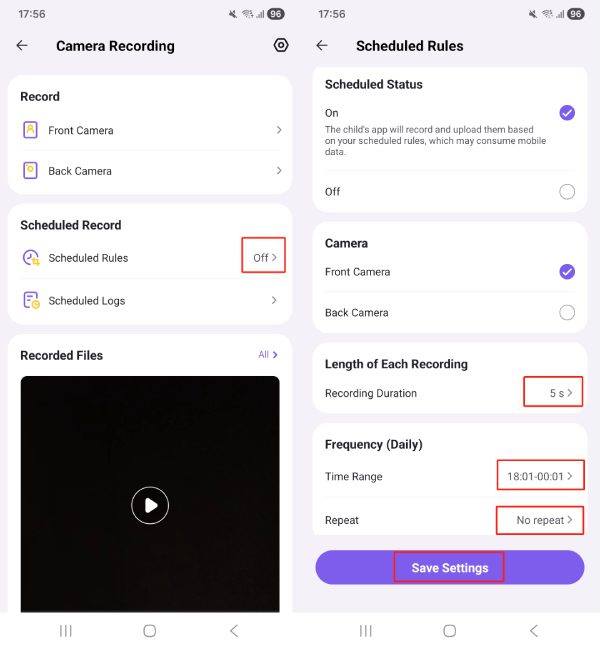
Step 3
Click the “Scheduled Rules”, and turn “Scheduled Status” to “On.” Select either the Front or Back camera, then choose your preferred Recording Duration under “Length of Each Recording.” Next, set the “Time Range” and “Repeat” options under “Frequency (Daily)” based on your needs. Finally, click “Save Settings.” Once saved, the child’s device will automatically record video according to the schedule you set.
Step 4
Finally, you can view the recorded files in two ways: tap “All” under Recorded Files to see all camera recordings, or access them via “Notice” > “Snapshot & Recording.”
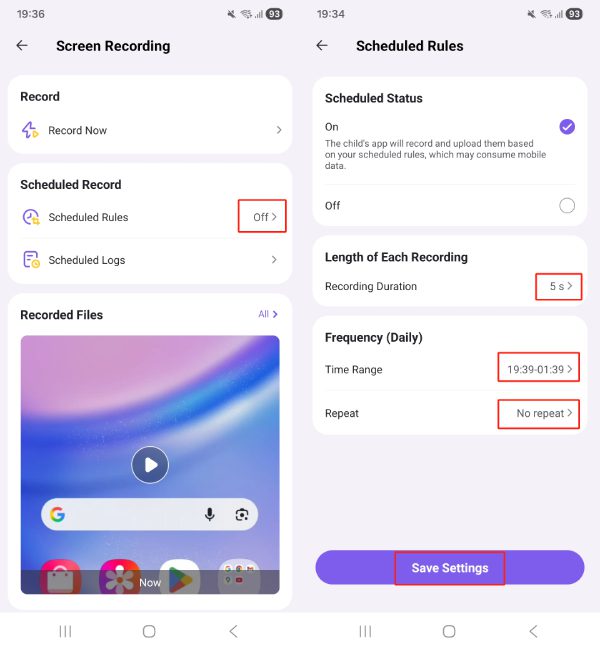
Screen Recording
Step 1
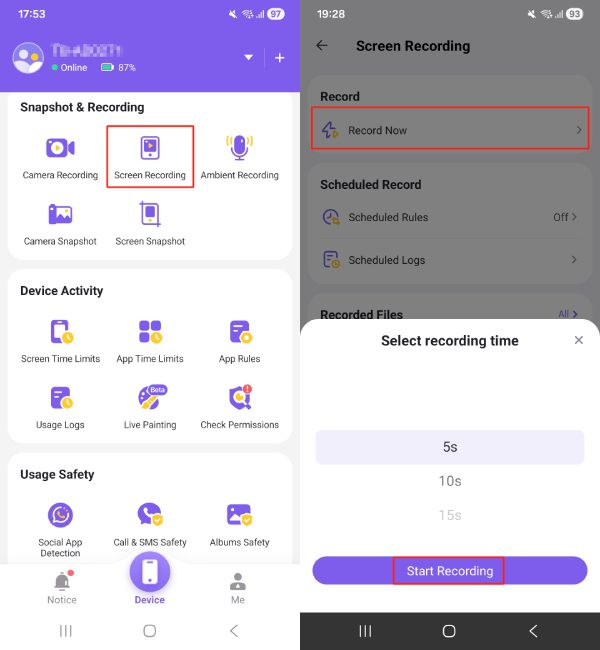
Open the FlashGet Kids app and go to “Device” > “Snapshot & Recording” > “Screen Recording.”
Step 2
Tap “Record Now” under “Record.” Then select a recording time you like, in “5 s”, “10 s”, or others to click “Start Recording.” You can get recordings taken from your child’s phone’s screen.
Step 3
Click “Scheduled Rules,” and turn “Scheduled Status” to “On.” Choose your preferred Recording Duration under “Length of Each Recording.” Then set the “Time Range” and “Repeat” options under““Frequency (Daily)” as needed. Finally, click “Save Settings.” Once saved, the child’s device will automatically record video according to the schedule you set.
Step 4
You can view the recorded files in two ways: tap “All” under Recorded Files to see all screen recordings, or access them via “Notice” > “Snapshot & Recording.”
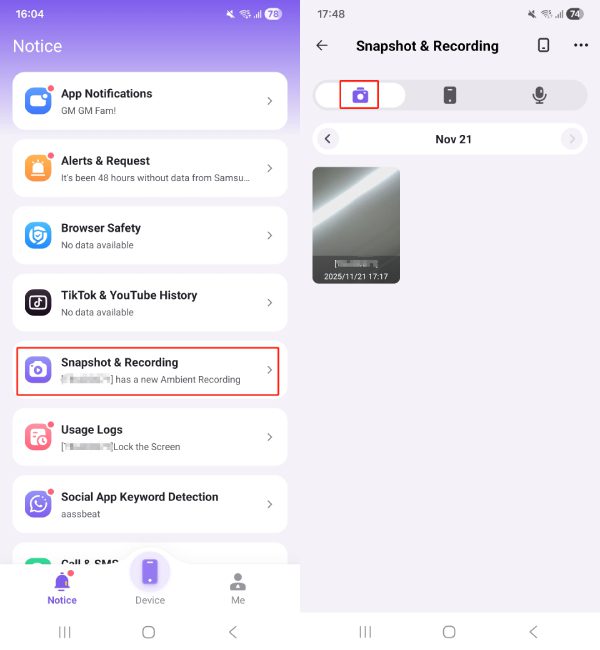
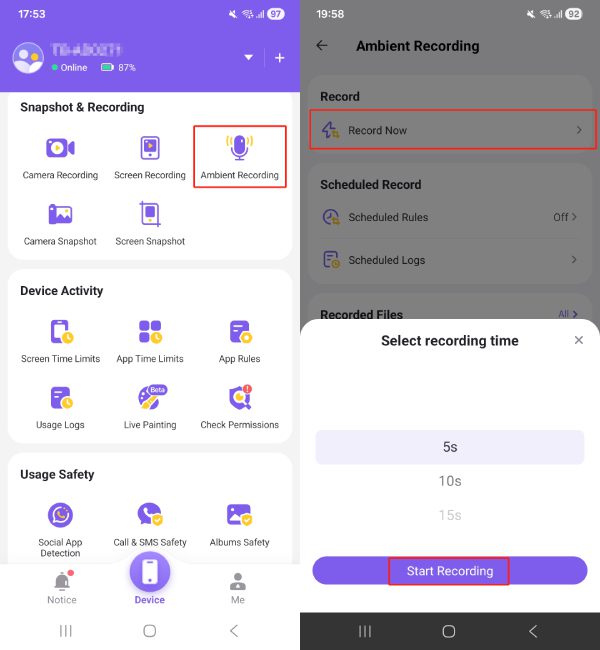
Ambient Recording
Step 1
Open the FlashGet Kids app and go to “Device” > “Snapshot & Recording” > “Ambient Recording.”
Step 2
Tap “Record Now” under “Record.” Then choose a recording time you like, in “5 s”, “10 s”, or others to click “Start Recording.” You can get ambient recordings taken from your child’s phone’s.
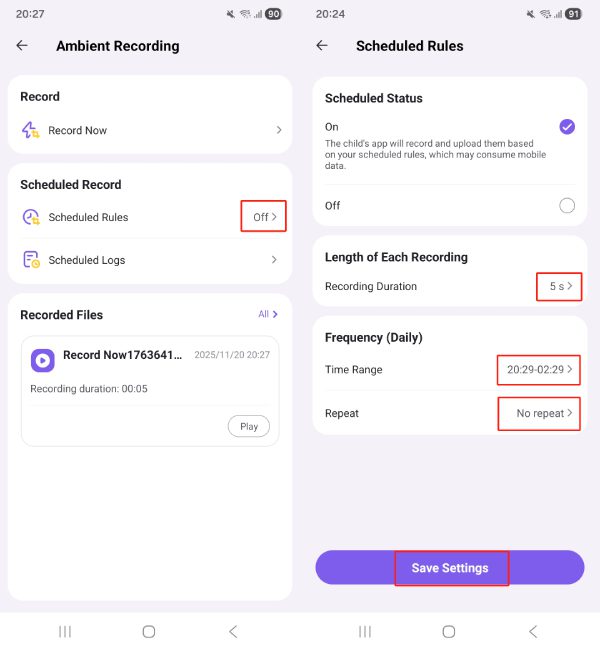
Step 3
Click the “Scheduled Rules”, and turn “Scheduled Status” to “On.” Select either the Front or Back camera, then choose your preferred Recording Duration under “Length of Each Recording.” Next, set the “Time Range” and “Repeat” options under “Frequency (Daily)” based on your needs. Finally, click “Save Settings.” Once saved, the child’s device will automatically record video according to the schedule you set.
Step 4
You can view the recorded files in two ways:tap “All” under Recorded Files to see all ambient recordings, or access them via “Notice” > “Snapshot & Recording.”
App Notifications
Features
View the instant notifications from your child’s phone.
Understand which apps your child frequently engages with.
Assess your child’s digital footprints through the context of their notifications.
How-to-Use
Step 1
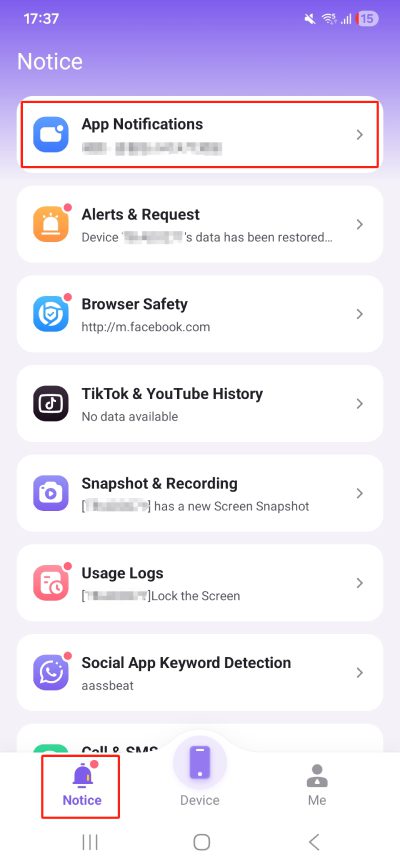
Open FlashGet Kids for Parent on parent’s device, then head to “Notice.”
Step 2
Tap on “App Notification” to view the notifications from the apps on your child’s phone.
Screen Time
Features
Set limits for children’s screen time and apps.
Set specific times and locations remotely.
Set up a time limit for an app and block the app when the limit is reached.
Screen Time Limits
Step 1
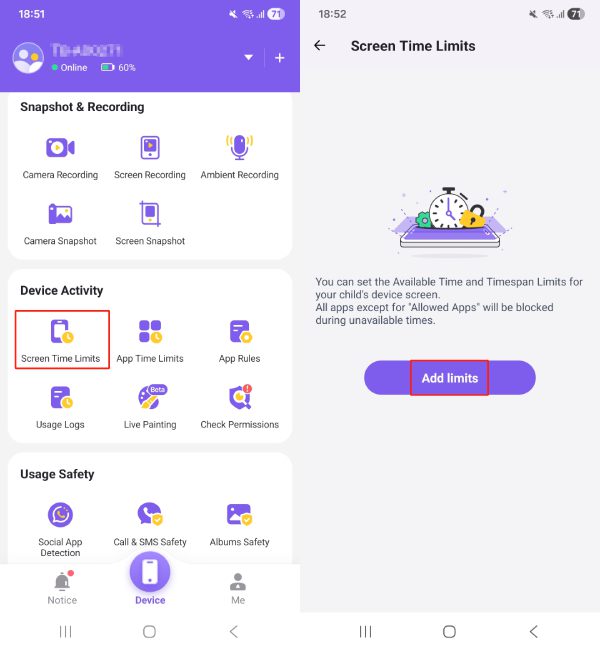
Head to the “Device Activity” on “Device.” Then tap on “Screen Time Limits”> “Add limits.”
Step 2
Choose the “Limit Type” you want to configure. You can set “Available Time Limits” and “Timespan Limits.” Choose “Available Time Limits” to set up the time that child can use. Choose “Timespan Limits” to set the timespan the child can not use.
Step 3
Go to Limit settings. Set the limits name. You can customize the time, “Every day” or “Customize everyday timespan.” After this, tap on “Save.” Once saved, the screen time limits will take effect on your child’s device according to the schedule you set.
App Time Limits
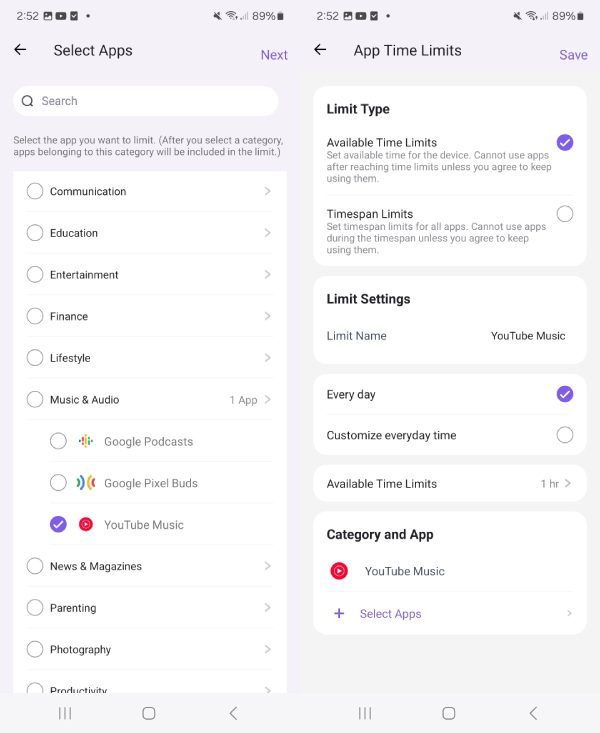
Step 1
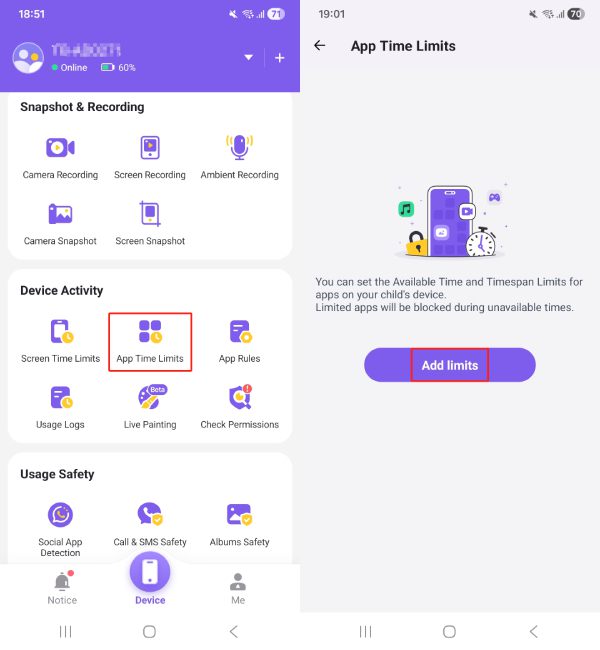
Head to the “Device Activity” > “App Time Limits” > “Add Limits” > Search or Select App.
Step 2
Choose the “Limit Type” you want to configure. “Available Time Limits” used to set up the time that child can play. “Timespan Limits” used to set the timespan the child can not play. Tap “Available Time limits” or “Time Span Limits” > “Every day” or “Customize everyday timespan.” > “Save.” Once saved, the app will be blocked automatically when the limit is reached.
App Rules
Features
Block all apps with one tap by using the Disable All Apps feature.
Manage the block list and set the category.
Set up blocking time and blocking zones.
Block access to some apps or a certain app and set strict mode on kids’ phones.
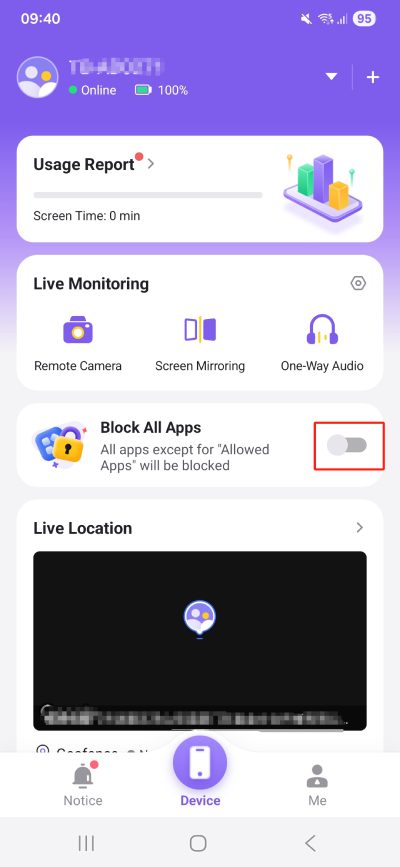
Method 1: Block All Apps or Block New Apps in Quick Settings.
Go to “Device” and enable “Block All Apps” to quickly block all apps from accessing your child’s device.
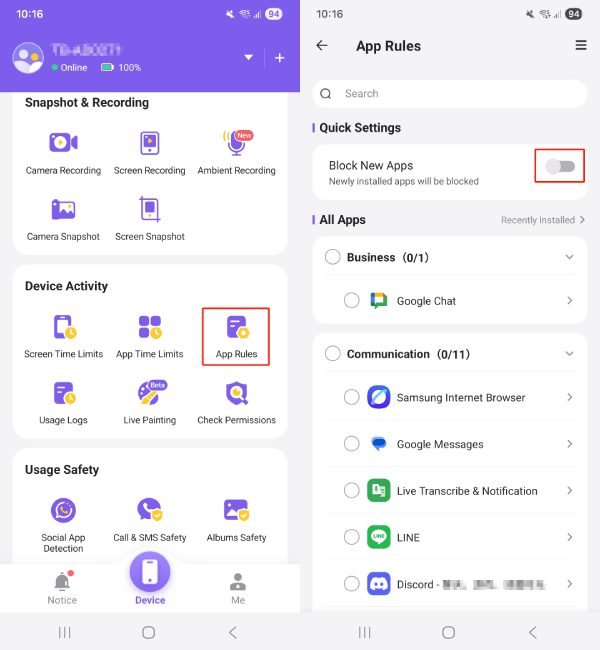
Go to “Device Activity” > “App Rules” and enable “Block new apps” in “Quick Settings” to automatically block newly installed apps.
Method 2: Set App whitelist or blacklist individually.
Step 1
Head to “Device Activity” > “App Rules.” Select multiple apps by category in “All Apps,” and then set up a blacklist or whitelist at the bottom.
A whitelisted app is always available (unrestricted). A blacklisted app is always unavailable (restricted).
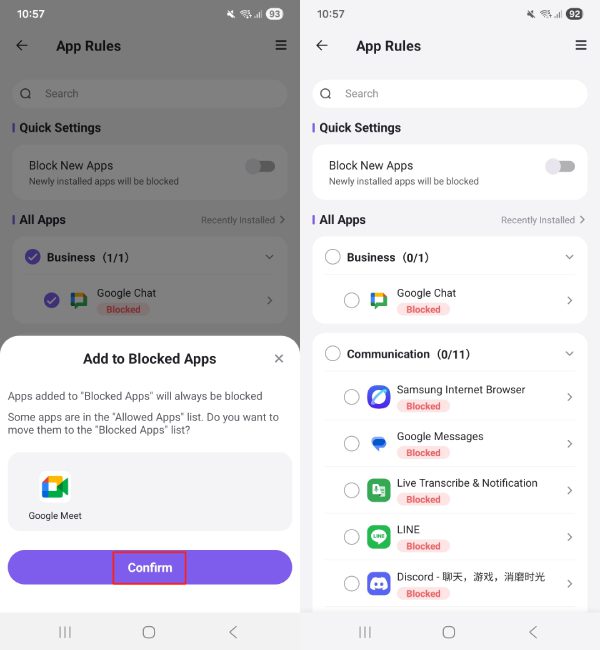
Step 2
Click “Confirm” to add these apps to Blocked Apps. Then, the settings results will then be displayed in the list of “All Apps.”
Tips
When all apps in a category are set to Allowed or Blocked, newly installed apps in that category will automatically follow the same rule.
Alerts
Features
Receive alerts for potential toxic content.
Get alerts even when the phone is off.
Identify unapproved application installations or downloads.
How-to-Use
Step 1
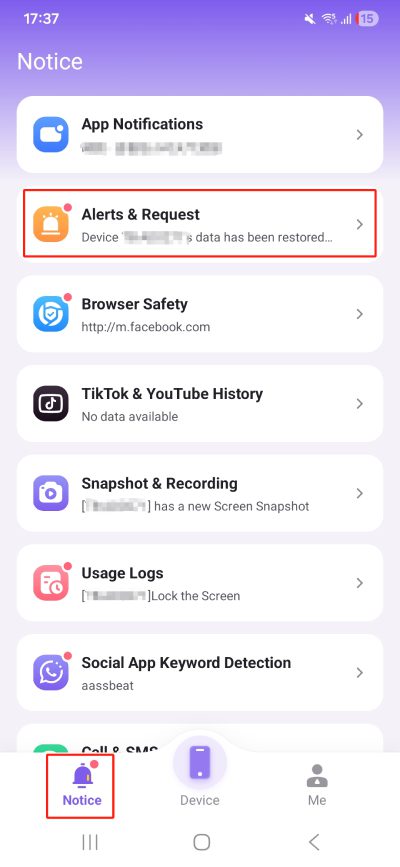
Open FlashGet Kids for parent on parent’s device, then head to “Notice.” And we can view all function notifications, including App Notifications, Browser Safety, Social App Keyword Detection, Usage Logs, and more.
Step 2
Click “Alerts & Request” to your child’s phone activities. Such as the device’s online and offline status, low battery reminders, and more. And child’s requests will also be displayed here, such as requests to use apps or access URLs.You can scroll down to view their phone activity history.
Location Tracker
Features
Check the current location of your kid’s device.
View route history to see your child’s location history.
How-to-Use
Step 1
Go to the “Live Location” on the dashboard. Then you can see a map and your child’s device location.
Step 2
Tap on “History.” Choose the latest 15 days you want to see. Then you will get the history of your child’s location.
Geofence
Features
Set up a specific area to get notified when kids enter or leave the area.
How-to-Use
Step 1
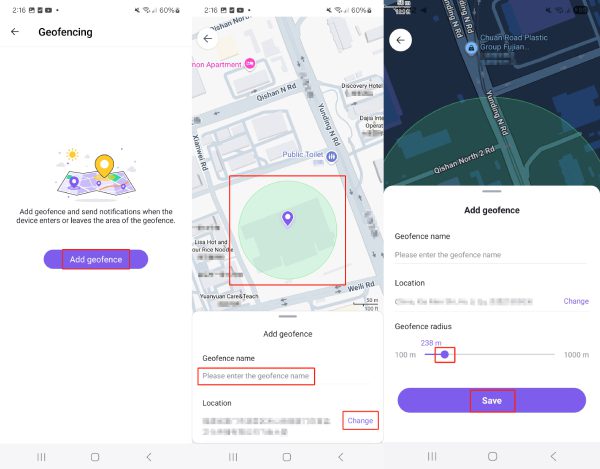
Click “Live Location” on the “Device”, then click on “Geofence.”
Step 2
Next, tap “Add geofence,” enter a name for the geofence. You can choose to set the current location as the geofence or click “Change” and search for another place. Swipe the purple dot left or right to adjust the geofence range, then tap “Save.”
Step 3
Once set up, you will receive alerts whenever your child enters or leaves the geofence. You can view these alerts under “Notice” > “Alerts & Requests.”
Usage Report
Features
Monitor your child’s daily and weekly app usage, including screen time, usage time of different app, call logs, etc.
Analyze the usage report and provide you with detailed and pratical suggestions.
Know the app notifications and mobile data usage throughout the day.
Step 1
Step 1
Open FlashGet Kids and click “Usage Report” to view your kid’s app and phone usage.
Step 2
“<”: go back to the previous day. “>”: go to the next day. Click “Weekly” to view weekly phone usage.
Step 3
Then, scroll down to the bottom to view more, including detailed app usage, call logs, and notification logs.
Social App Detection
Features
View your kid’s TikTok & YouTube browsing history.
Keep track of your teens activities on social media, including WhatsApp, Instagram, TikTok and more.
Set up keywords and monitor the risky content that your teen may be exposed to. Parents will receive an alerts every time your teens try to engage in risky conversations.
Social App Detection
Step 1
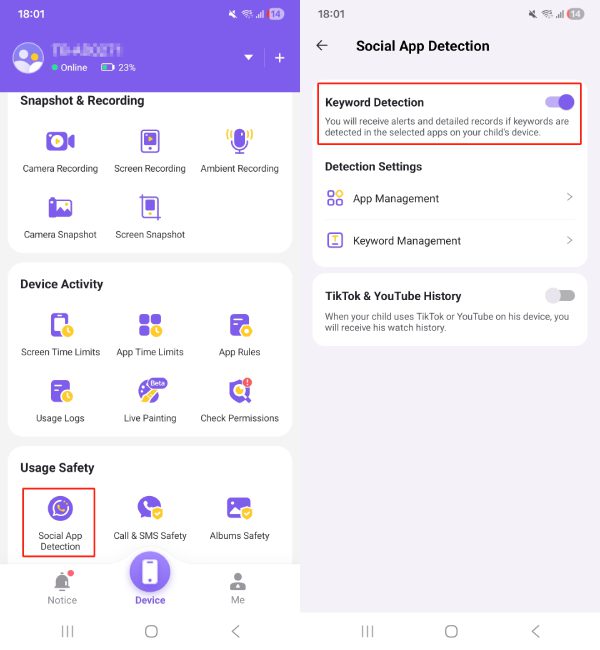
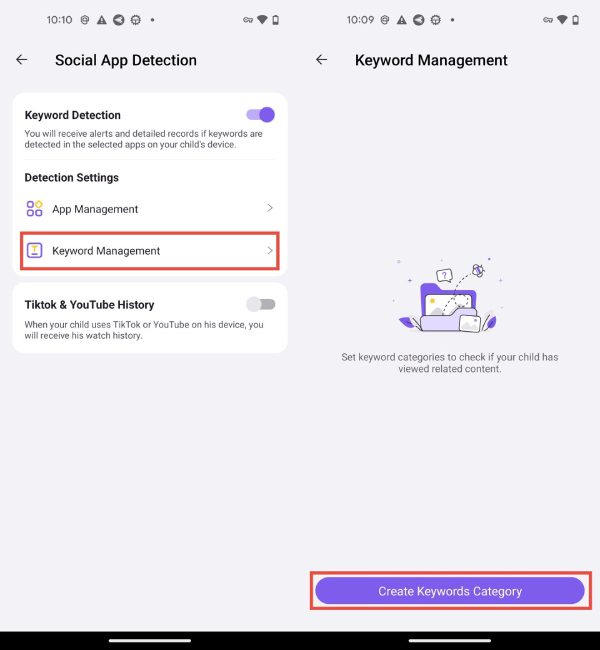
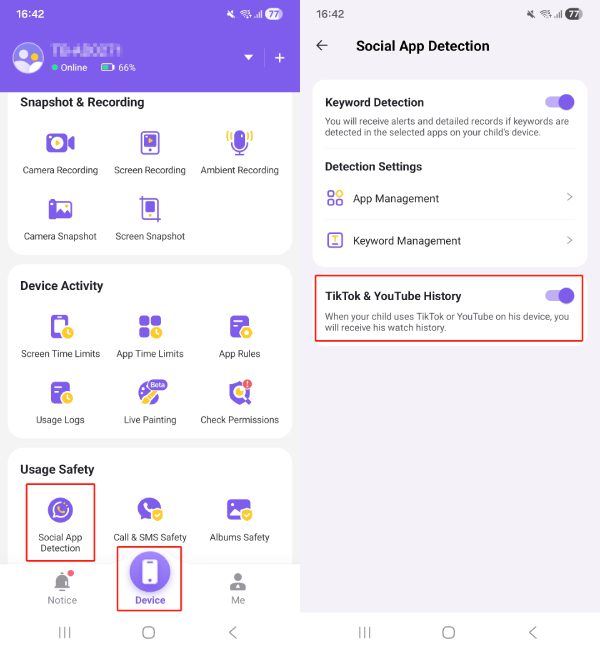
Head to “Usage Safety” on the dashboard. Click “Social App Detection” > “Keyword Detection.”
Step 2
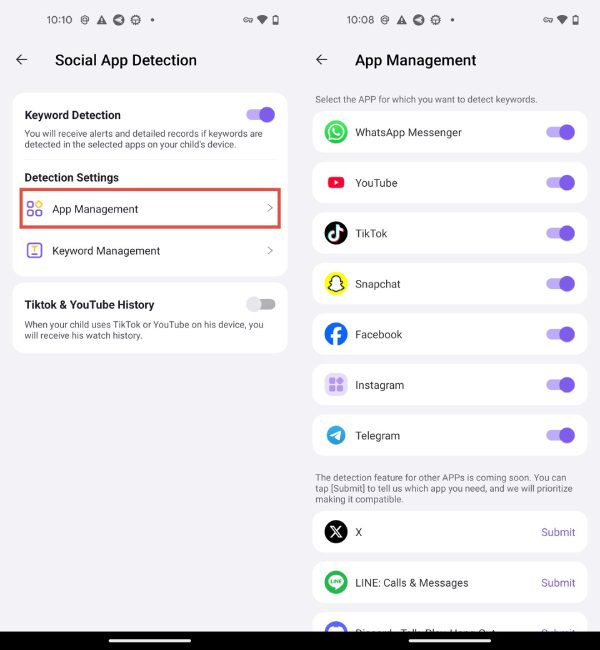
Tap “App Management” to select the app for which you want to enable keyword detection.
Step 3
Tap “Keyword Management” > “Create Keywords Category”.
Step 4
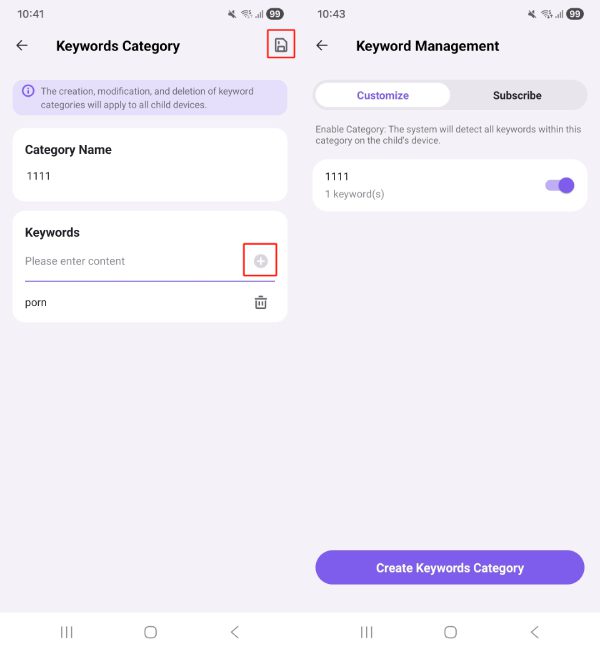
Then, provide a Category Name you like and set a specific word (like someone’s name, location, alcohol, adultery, porn, etc.). Turn on the Category.
Step 5
And you can also choose “Subscribe To Keywords” under the “Subscribe.” Select the language for the keywords you want to subscribe to, click “Complete.”
Step 6
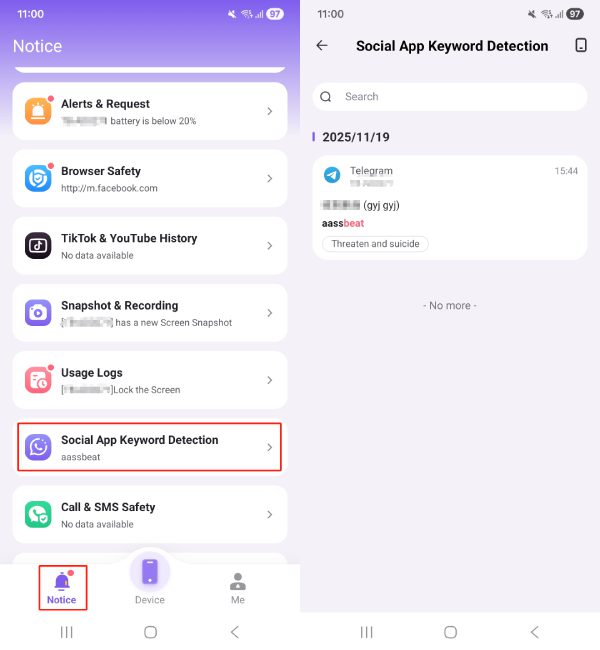
When your kid receives/sends a message including any of those keywords, you will instantly get a notification on your phone. You can check them from “Social App Keyword Detection” in “Notice.”
TikTok & YouTube History
Step 1
The records after the switch is turned on can be viewed in “Notice.” Click “TikTok & YouTube History” in “Notice” to view your child’s TikTok & YouTube history.
Step 2
The records after the switch is turned on can be viewed in “Notice.” Click “TikTok & YouTube History” in “Notice” to view your child’s TikTok & YouTube history.
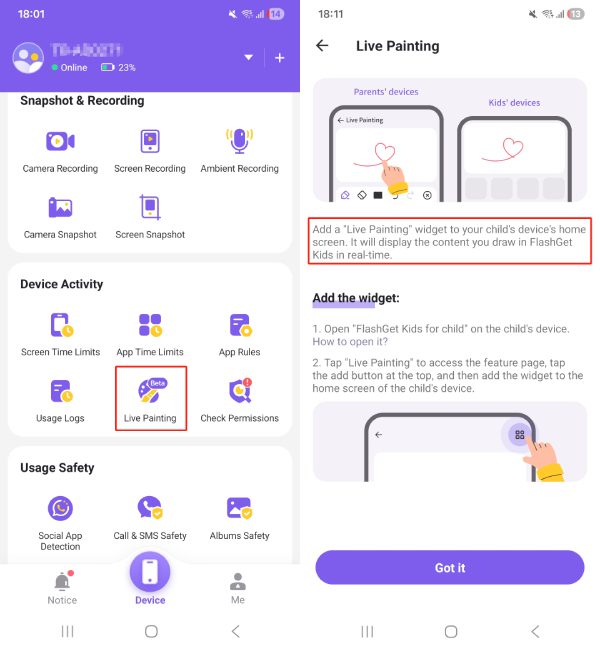
Live Painting
Features
Share information with your child in real-time. Improve parent-child relationship.
Parents can take photos or select images from the album to share with their children.
How-to-Use
Step 1
Open FlashGet Kids for Parent on the parent’s phone, and scroll down the dashboard to find Live Painting, and click on it.
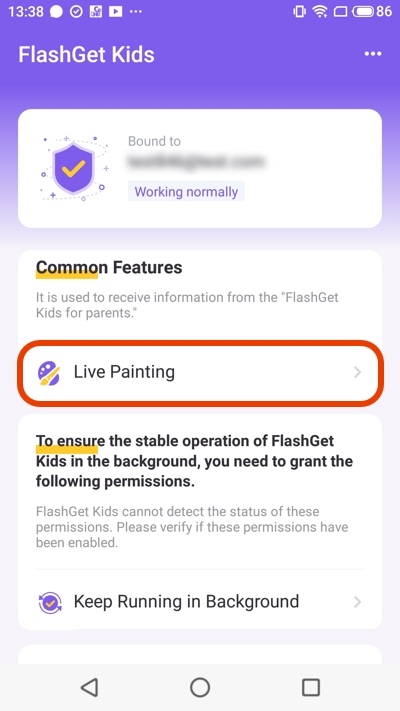
Step 2
After entering Live Painting, a prompt will notify you to oepn FlashGet Kids for Child on the child’s phone. You can click the “Open Child’s app” button to open FlashGet Kids on your child’s phone remotely.
Step 3
Click to enter “Live Painting” after you open FlashGet Kids for Child on your kid’s phone. Click the button in the upper right corner and select “Add Live Painting Area to the phone screen.” Drag the Live Painting Area to the desired position on the phone screen.
Step 4
Drawing or easing content is synchronized in real-time. Every time parents draws information on FlashGet kids, the child can see the content on their phone screen in real-time.
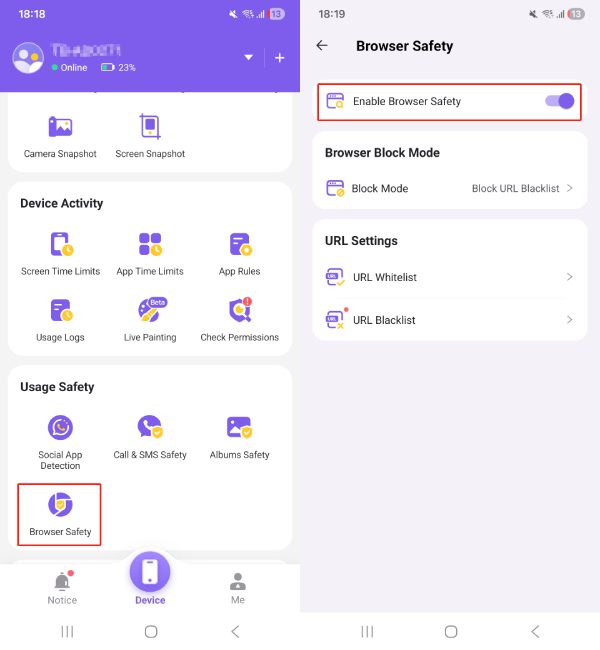
Browser Safety
Features
Monitor and control which websites your child can access on browser.
Customize settings to block certain websites and allow a safe browsing. Offer 2 URL lists: the “URL Whitelist” is a list of approved websites that the child is allowed to access and the “URL Blacklist” is a list of websites that are blocked or restricted for the child.
offer real-time alerts if your child attempts to visit restricted sites and allow you to view children’s browser history.
How-to-Use
Step 1
Open FlashGet Kids and click “Browser Safety” > “Enable Browser Safety.”
Step 2
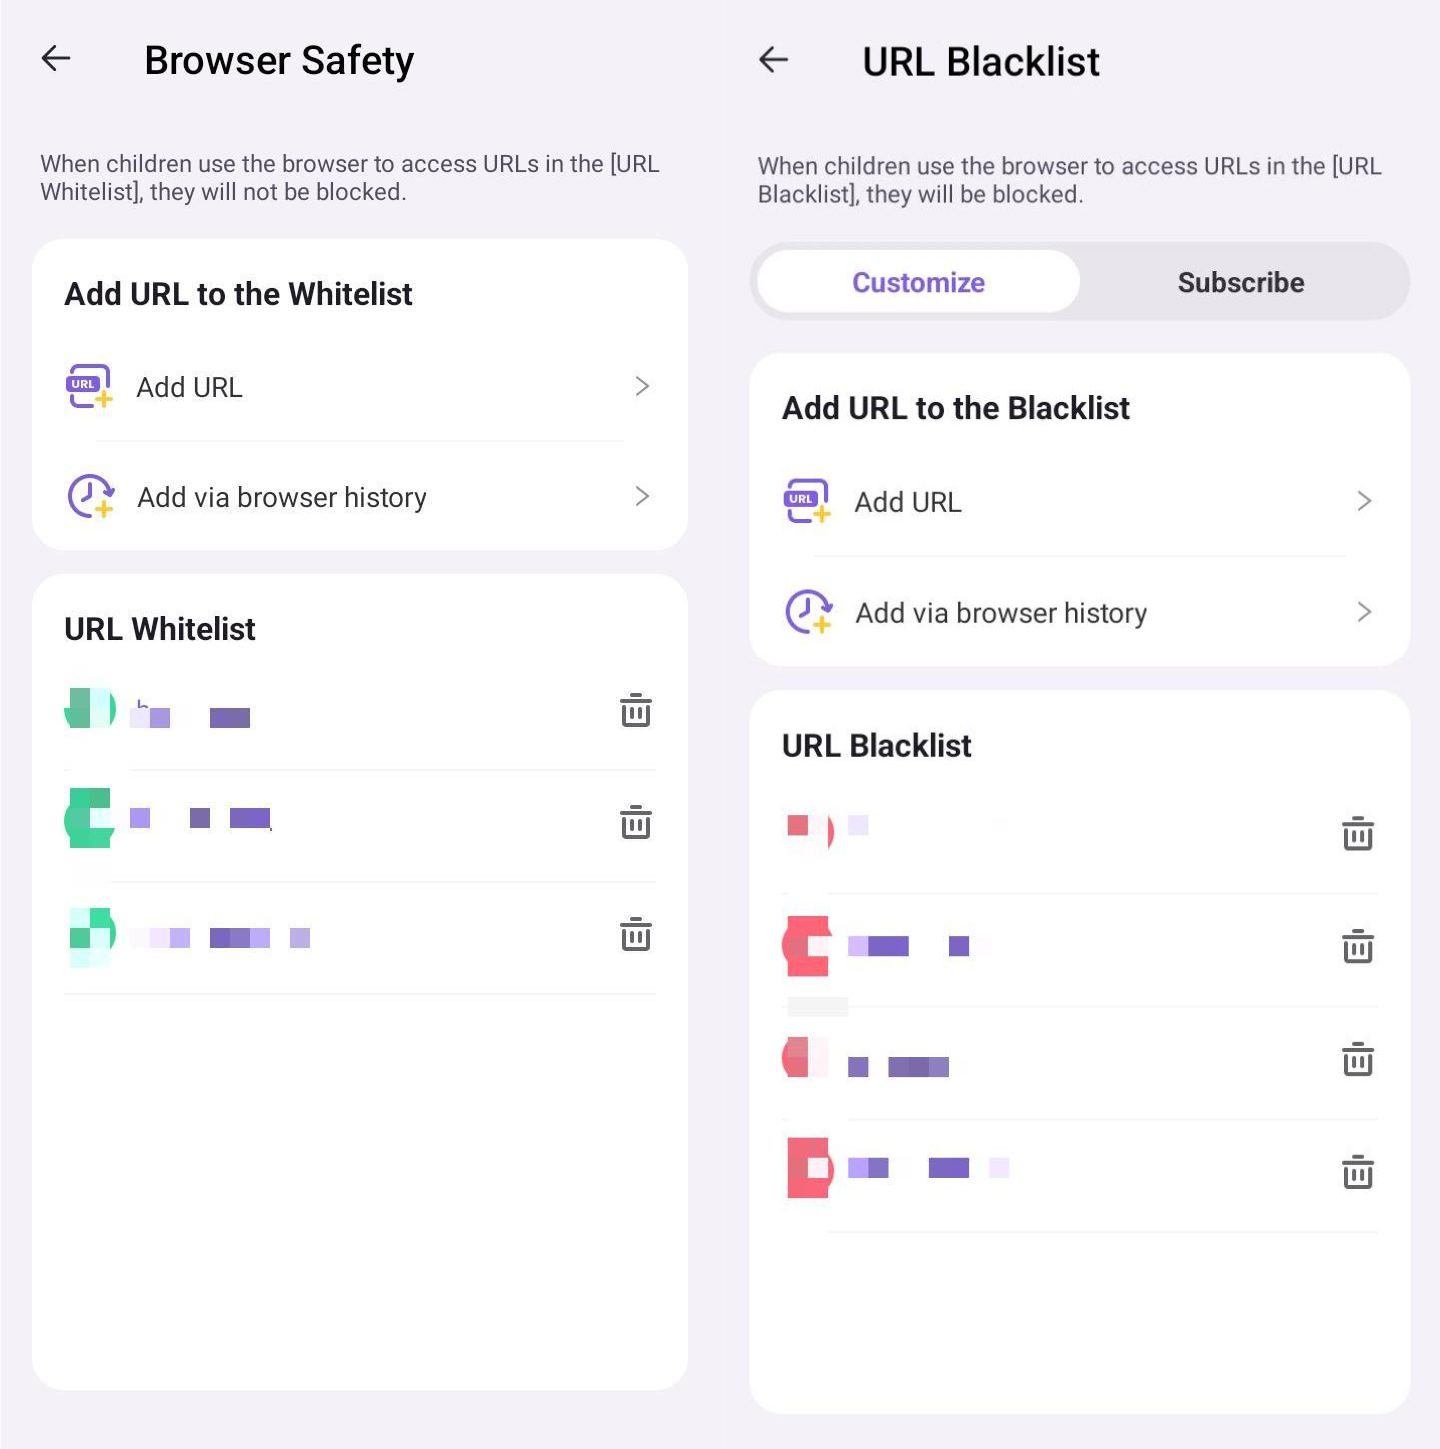
Go to the “URL Settings.” To add URL that you only allow kids to access, click “URL Whitelist” > “Add URL.” You also can choose “Add via browser history” to add URL based on kid’s browser history. To add URL that you want to block for kid, click “URL Blacklist” > “Add URL” or “Add via browser history.” Besides, after you add URL to “URL Blacklist”, you can go to the “Subscribe” feature that allows you choose certain website categories, such as illegal content or violence sites.
Step 3
Lastly, go to the “Browser Block Mode” > “Block Mode.” Then to decide a block mode, you can choose “Block URL Blacklist” or “Only Allow URL Whitelist” to protect kid online.
Step 4
Head to “Notice” > “Browser Safety” > “History” to see your child’s browser history. You also can click “Blocked” to know what sites have been block for kids.
Call & SMS Safety
Features
Monitor and review your child’s calls and text messages in real-time.
Block your child from making or receiving restricted phone calls.
Set keyword alerts to detect sensitive content in messages kids send and receive.
Call Safety
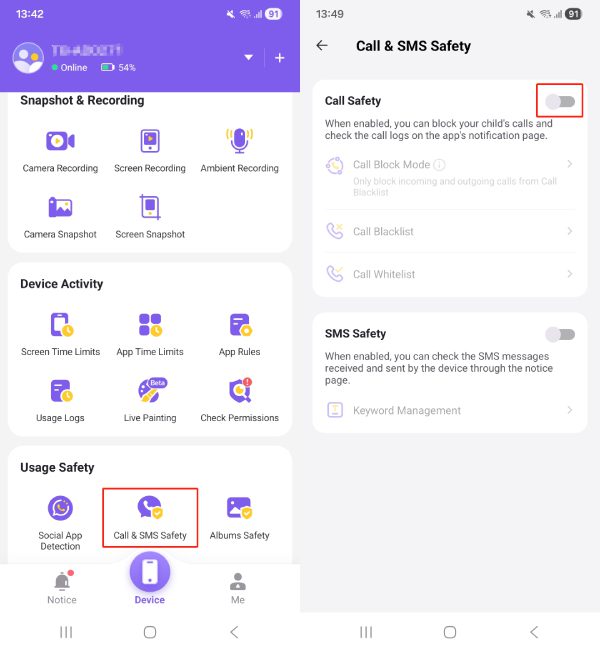
Step 1
Enable Call Safety.
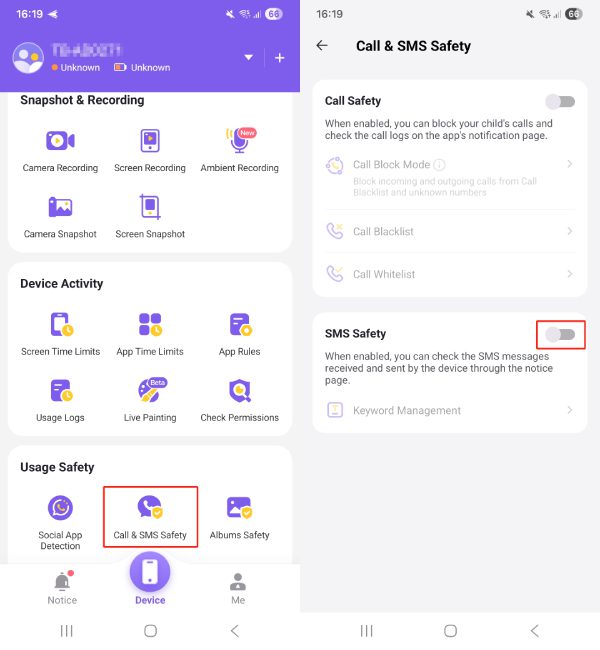
Head to “Device” > “Usage Safety”, then tap “Call & SMS Safety.” Toggle “Call Safety” to turn it on.
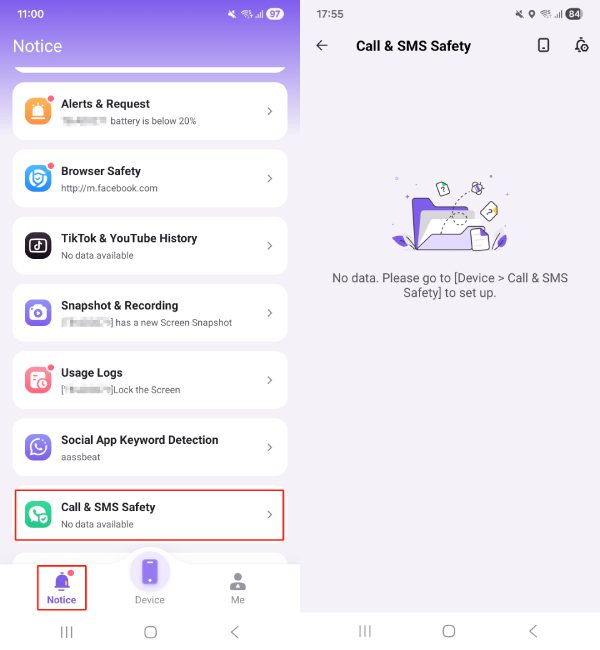
Once enabled, you can view your child’s call history and call logs in “Notice” > “Call & SMS Safety.”
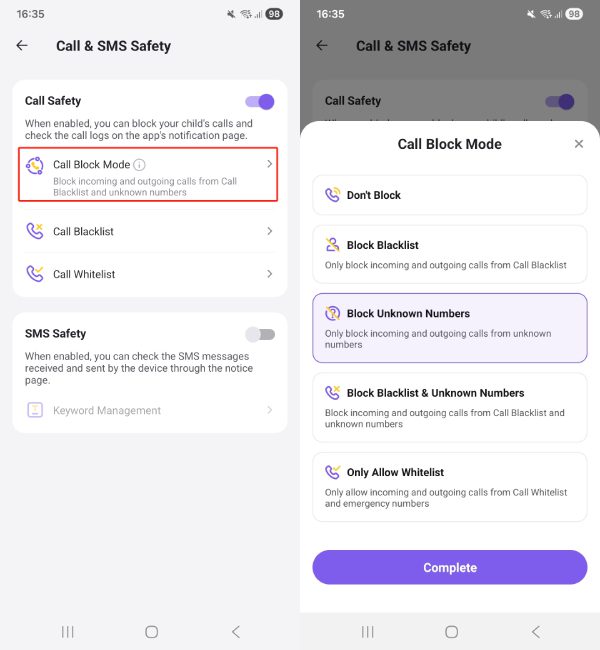
Step 2
Set Call Block Mode.
You can choose different blocking modes based on your needs. Once set, restricted calls will be blocked according to your configured rules.
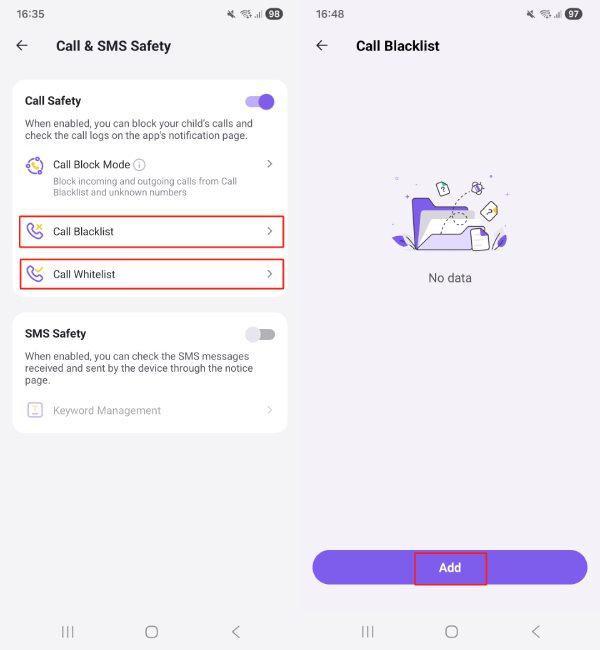
How to set Call Blacklist and Whitelist:
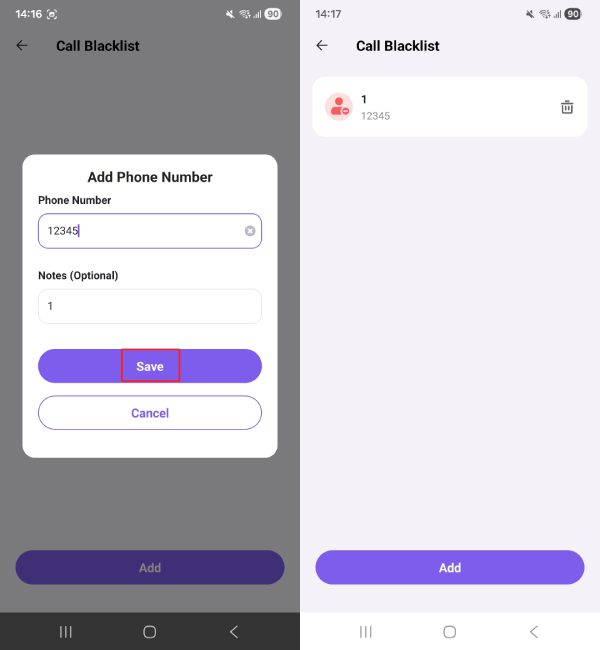
Method 1: Setting Call Blacklist and Whitelist in “Usage Safety.” Tap “Call Blacklist” or “Call Whitelist”>“Add.”
Add the Phone Number you want to add to blacklist or whitelist, tap “Save.” You can check them under “Call Blacklist” or “Call Whitelist”, and you can also add more.
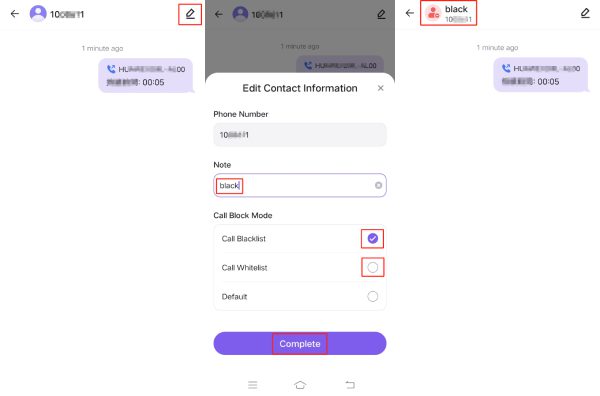
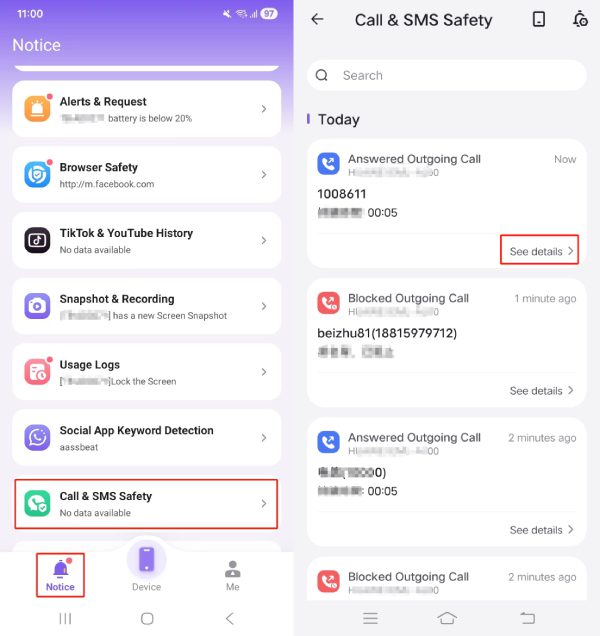
Method 2: Setting Call Blacklist and Whitelist in “Call & SMS Safety” of “Notice.” Head to “Notice”>“Call & SMS Safety.” Choose an Answered Outgoing Call you want to set for blacklists or whitelist, click “See details.”
Edit the contact information, choose the “Call Block Mode” you want , and do a “Note” for it; click “Complete.” Then, the Call Blacklist or Whitelist you want to set for kids have been saved.
SMS Safety
Step 1
Enable SMS Safety.
Head to “Device” > “Usage Safety”, then tap “Call & SMS Safety.” Toggle “SMS Safety” to turn it on.
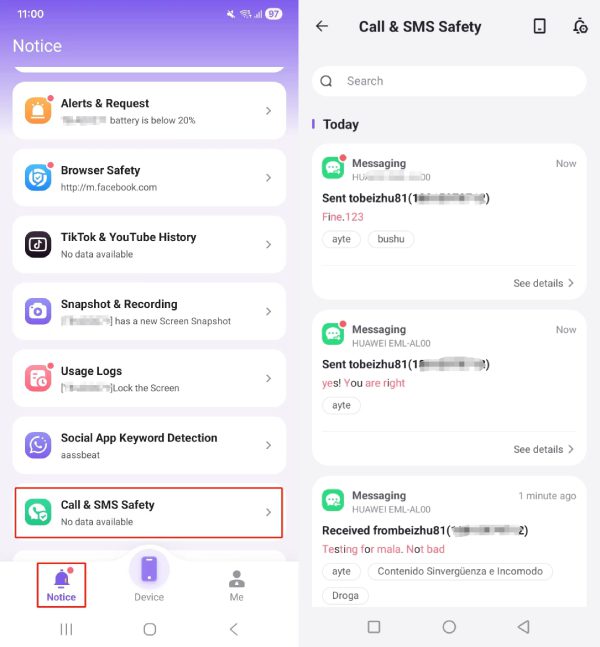
When the “SMS Safety” opens, you can check your kid’s SMS received through the “Call &SMS Safety” in “Notice.”
Step 2
Set SMS keyword detection.
There are two ways to manage keywords for “SMS Safety”:
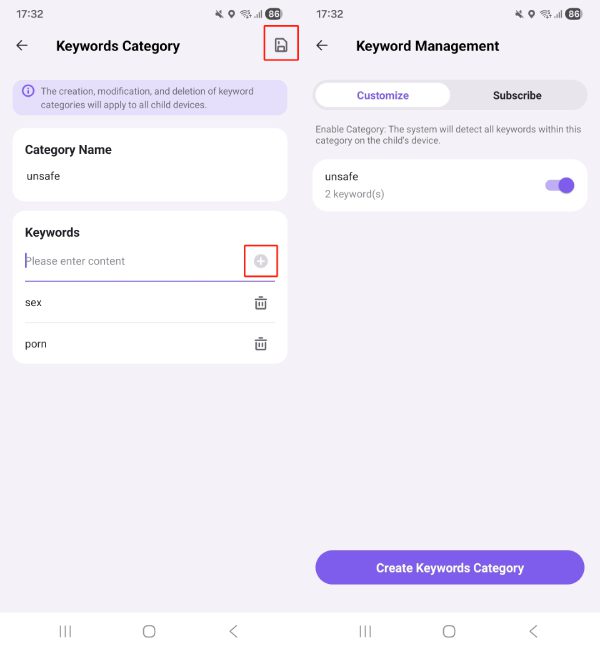
Method1: Create custom keyword categories. Toggle the purple button to turn on “SMS Safety.” Click “Keyword Management”, tap “Create Keywords Category” to set the keyword categories.
Provide a Category Name you prefer and set a specific word (like someone’s name, location, alcohol, adultery, porn, etc.). Turn on the Category.
Method2: Subscribe to preset keywords. You can also choose “Subscribe To Keywords” under the “Subscribe.” Select the language for the keywords you want to subscribe to, click “Complete.”
After setting the above, the system will monitor the SMS sent and received by the child with keywords, and the results can be viewed in “Call &SMS Safety” of “Notice.”
Album Safety
Features
Identify image content stored on your kid’s phone.
Flag inappropriate content and alert parents.
How-to-Use
Step 1
First, open FlashGet Kids for Child, and go to the “Albums Safety” on your child’s phone. Then turn on “Storage Permission.”
Step 2
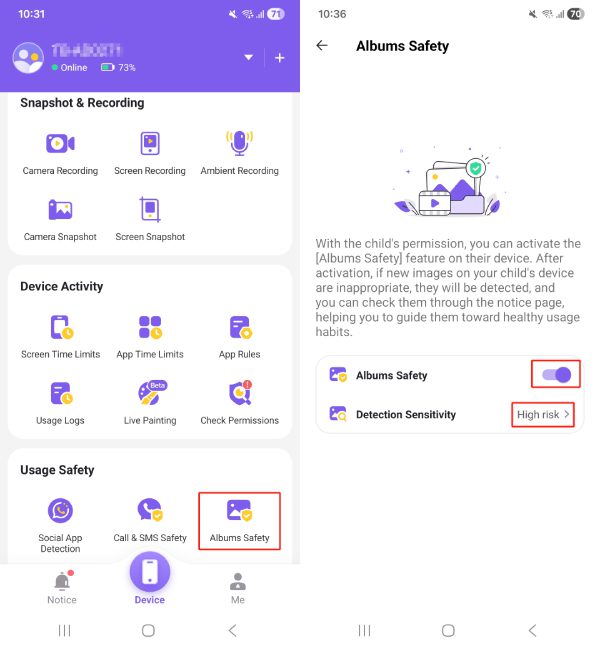
Go back to FlashGet Kids for Parent and head to “Usage Safety” on the dashboard. Click “Albums Safety.”
Step 3
Tap the purple button to turn on “Albums Safety.” And click “Detection Sensitivity” to choose “High.”
Step 4
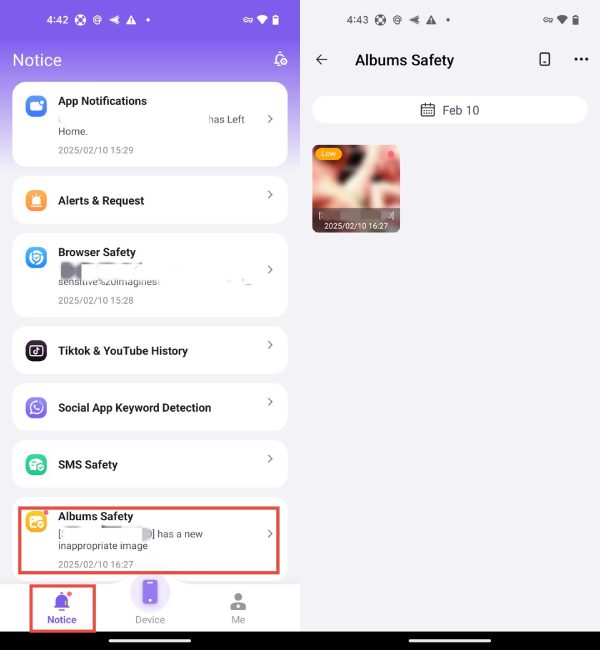
Head to “Notice.” You can click “Albums Safety” to review your child’s inappropriate images on their devices.
Stage4: Subscribe or renew FlashGet Kids
If your account premium has expired and you’d like to subscribe FlashGet Kid, you can subscribe on the dashboard as well.
Step 1
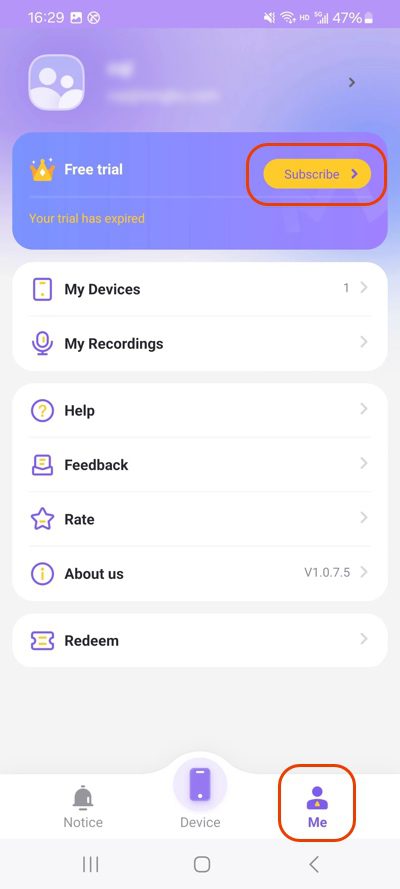
Open FlashGet Kids for parent, and tap “Me” under the right bottom.
Step 2
And then click “Subscribe” to continue your subscription.
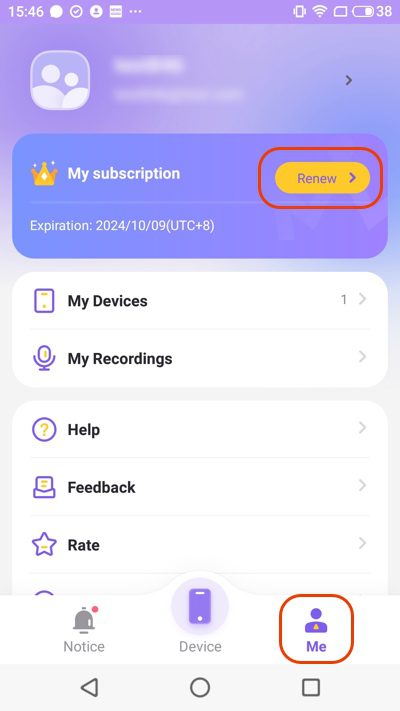
If you’d like to renew your premium plan on FlashGet Kids, you can also renew it on the dashboard.
Step 1
Open FlashGet Kids for parent > “Me” under the right bottom.
Step 2
Tap “Renew” to continue your premium plan on FlashGet Kids.
We use cookies to ensure you get the best experience. By using our website you agree to our Privacy Policy .


 When the parent uses an iPhone or iPad:
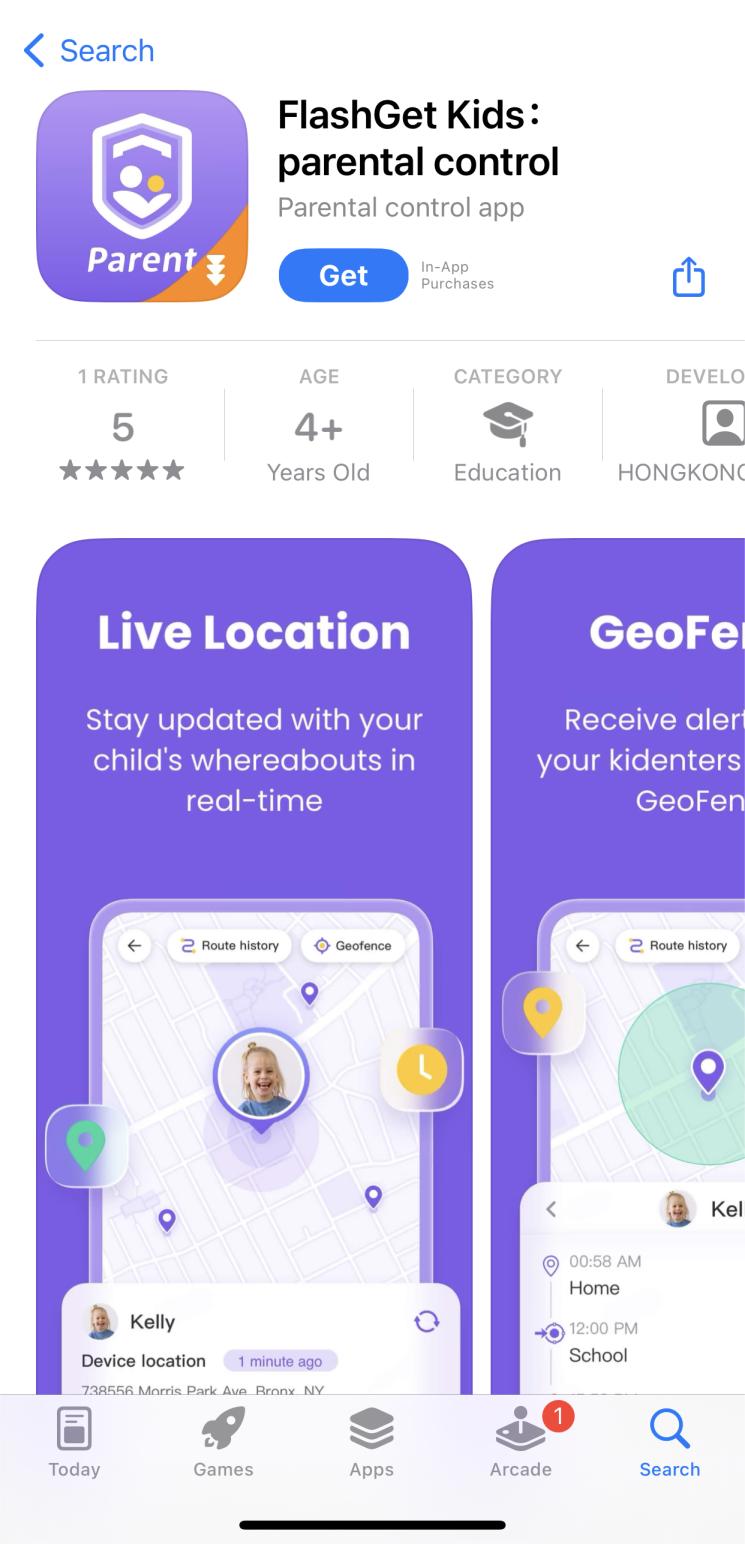


 Click “Next” to get a 9-digit code on the parent’s app.
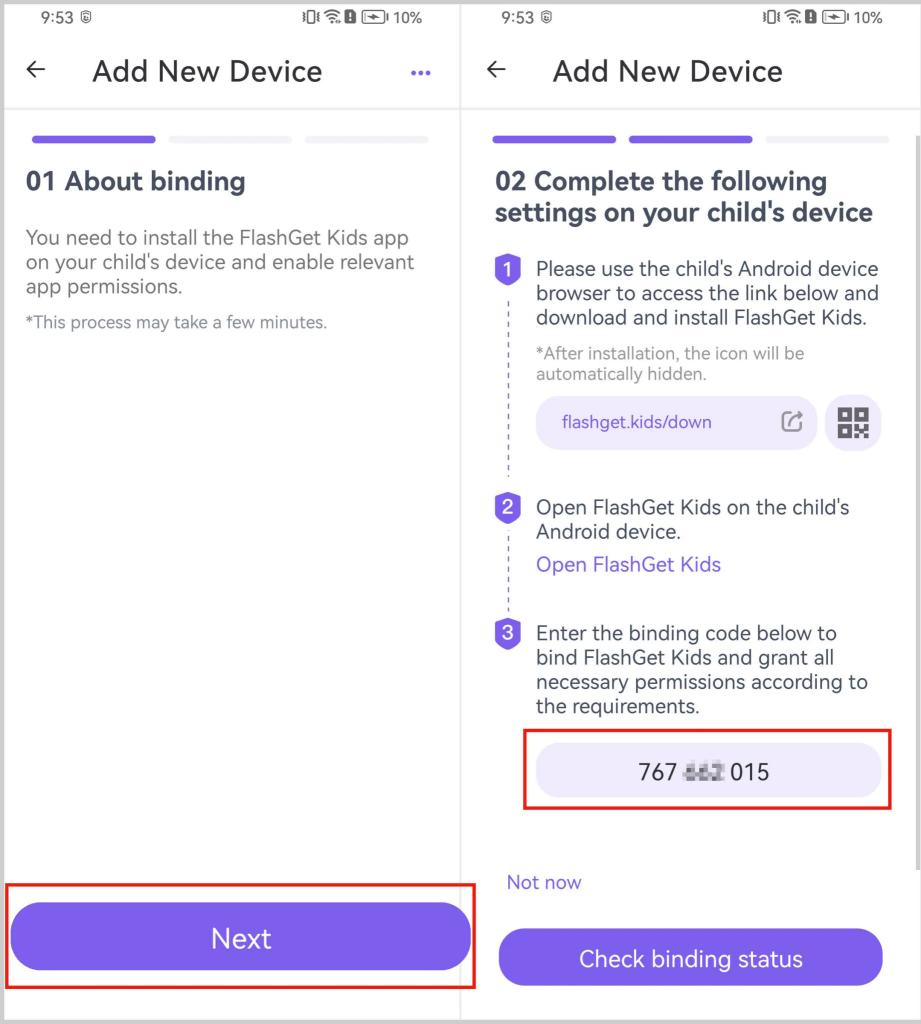
 Then enter the 9-digit code on the child app on Kids devices. Click “Next“> “Confirm.” Turn on the relevant permissions to keep FlashGet Kids running in the background. Check the video below to download and bind FlashGet Kids!

 Method 2: Add from “My Device” in “Me.”
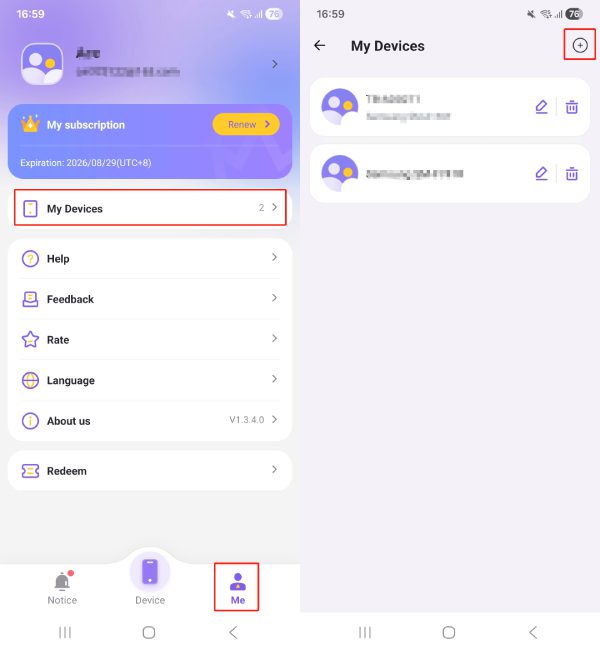

 Once the child’s device is successfully added, you can start configuring parental control settings in FlashGet Kids for parents.


 Edit the contact information, choose the “Call Block Mode” you want , and do a “Note” for it; click “Complete.” Then, the Call Blacklist or Whitelist you want to set for kids have been saved.