Your Twitch banner size is one of the key factors that determine how professional and engaging your channel looks on the biggest live-streaming platform in the world.
As more and more streamers enter the limelight, having a powerful image is vital and this begins with a perfect Twitch banner.
In this guide, we explore what the optimal size of a Twitch banner must be, why, and how it can be maximised for a sleek aesthetic.
Introduction: Why Twitch banner size matters
Your Twitch banner is the first thing that the viewers see when they visit your channel. And that is why its size and design are important for a professional look.
Now, what is the right size of Twitch banner? The standard size is 1200 x 480 pixels for your banners to fit on any device you use, including desktops, mobiles and tablets.
Using this size is important for several reasons.
1.Visual consistency across devices.
This specific Twitch banner size makes your channel look whole and complete. Regardless of whether the viewers open it on a desktop, laptop, or mobile device.
2. Professionalism.
This size eliminates distortion or cropping thus giving your channel that professional outlook, ensuring that you get noticed.
3. Engagement.
Good and well-fitted visuals capture the audience attention and also provide relevant information whether one is live or offline.
4. Optimal image quality.
The dimensions of the images give the best image quality while keeping the image size manageable.
A correctly sized banner contributes to making the material more readable, strengthens the brand, and makes your channel appearance neat.
Monitor your child’s Twitch interactions to prevent exposure to harmful content.
Ideal Twitch banner size and dimensions
When trying to look professional and presentable on Twitch, it is crucial to know what dimensions are suitable for different banners.
In addition to the 1200 x 480 pixels size of the Twitch banner for channel pages, there are other areas with different requirements. Here’s a breakdown.
Twitch offline banner size
Ideal Size: 1920 x 1080 pixels
Aspect Ratio: 16:9
The Twitch offline banner is a background that is placed over the video player when a streamer is not online. Used to keep the channel active.
The recommended Twitch offline banner size is 1920 x 1080 pixels. As it covers the entire space with no black bars or squashed images at the end.
Incorrect size may cause the text to be cut off or the image to be blurred. Which will not be useful for branding or communication to your audience.
Twitch profile banner size
Ideal Size. 1200 x 480 pixels
Aspect Ratio. 5:2
The Twitch profile banner is located at the top of the channel page. And serves as the main header image that gives the first impression of your channel to the visitor.
This banner is very important as it is one of the first things viewers come across. And helps to establish the nature of the content and personality of the channel.
The reccommended Twitch profile banner dimension is 1200 by 480 pixels. Ideal to fit the channel’s banner across devices ranging from computers, tablets, to phones.
Twitch video player banner size
Ideal Size: 1920 x 1080 pixels
Aspect Ratio: 16:9
The Twitch video player banner is the banner that is displayed in the video player portion of the website when you are not live.
The recommended size of a Twitch video player banner is 1920 x 1080 pixels. That makes it blend perfectly with the player’s dimensions to give it a full-screen high definition look.
This banner is important because it helps to keep the channel active during periods when there is no active content. Which will help to promote the brand or bring viewers to other platforms.
Choosing the right size helps to avoid any distortions such as stretching or incomplete designs. That may have a negative impact on the channel’s reputation and viewers.
Tools for creating Twitch banners
To make the process of creating Twitch banners with the suitable Twitch banner size easier, the following tools offer templates that wold help.
- Canva. This free, easy-to-use tool has Twitch banner templates set to 1200 x 480 pixels for profile banners and 1920 x 1080 pixels for offline/video player banners.
- Snappa. Designed specifically for streamers, Snappa offers ready-made Twitch banners with dimensions 1200 x 480 pixels and 1920 x 1080 pixels and a set of tools for editting banners quickly.
- Fotor. With Fotor’s Twitch banner maker, there is a collection of templates that are sized appropriately for Twitch banners, as well as AI technology to create visuals.
- Adobe Express. This tool is easy to use and still gives enough creative freedom for streamers seeking to make their stream visually appealing.
- Photoshop. For power users, Photoshop offers full control with detailed settings that enable the Twitch banner dimensions to be set to 1200 x 480 or 1920 x 1080 pixels.
These tools ease the process, and guarantee that your banners are of the correct Twitch banner dimensions while giving you room to be creative.
Tips for designing an effective Twitch banner
To create a compelling Twitch banner that will be easy to navigate. One needs to combine creativeness and practicality to engage the audience and establish brand identity.
Below are ideas on how you can make your banner communicate your intended message by making it appealing and catchy:
1. Focus on branding
Your Twitch banner is basically an extension of your channel identity and so you should include features that represent your channel.
Ensure that your logo is easily visible (if you have one). Limit yourself to a particular color scheme that corresponds to your streams or overlays, and select fonts that suit you.
This cohesion helps viewers immediately identify your brand, whenever they are tuned in to Twitch.
2. Keep messaging clear and concise
Audiences get distracted by too much and too messy banners, so make it concise.
It should contain basic information like your channel name, a catchy phrase or your streaming timetable. Do not overload the image with text.
When it comes to font choice, use fonts that are easily readable at a glance. Given the Twitch banner size reduces when viewed on a small screen.
3. Use high-quality graphics
Low-quality banners look grainy and pixelated, which is not professional looking. Therefore, choose high-quality images within the Twitch banner size limit.
If you are going to include any forms of artwork, photos or icons make sure they are clear and are not distorted in any way.
For the 1200 x 480 pixel profile banner, do not upscale low-res images as the quality will be visible on Twitch.
4. Balance visual elements
Do not overcrowd your Twitch banner with too many graphics or colors. Use negative spaces purposely to guide attention towards specific areas, for instance, names or the call to action.
For example, a simple design containing a logo printed on one side and the schedule on the opposite side. Would be more efficient than a mishmash of designs.
This balance makes your banner uncluttered and ensures that your audience will not get bored with what they are seeing.
5. Align with your content theme
Ensure that the message on your banner aligns with the niche you have chosen to stream on.
This association of the Twitch banner size with your theme makes your design easily recognizable to your viewers and therefore memorable.
For banners displayed on offline or video players, it is advisable to incorporate slight animation to suggest your style without overloading the audience.
How to upload and update your Twitch banner
After creating the perfect Twitch banner size, the next thing to do is to upload it properly so that it looks clean and professional.
Here are the steps that will guide you through the process of changing your Twitch banner.
Step 1. Log into Your Twitch account
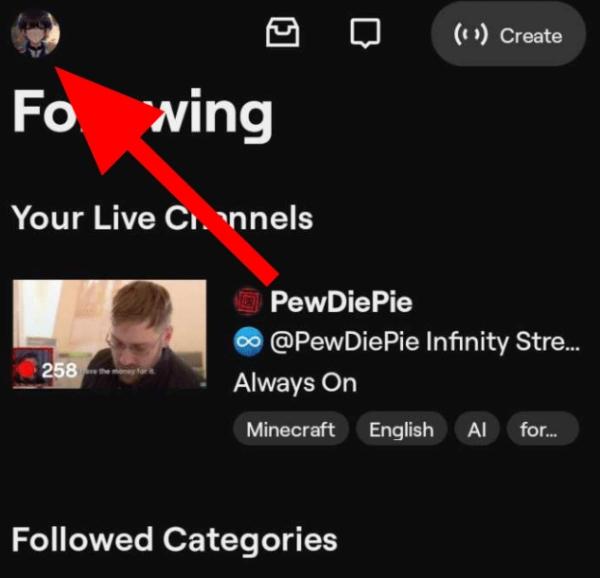


- Visit the Twitch website, twitch.tv, and log into your account.
- Go to the top right corner of your page and click on the profile icon.
Select “Creator Dashboard.”
Step 2. Go to your channel Settings
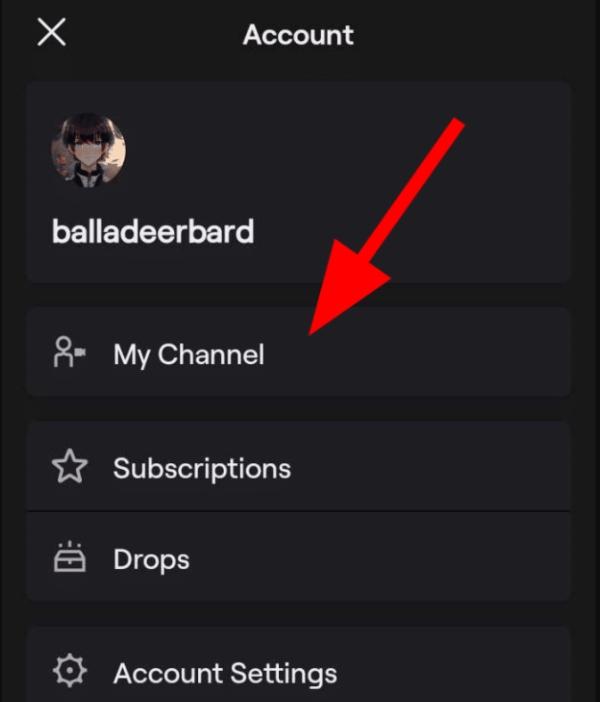


- On the Creator Dashboard, go to the left-side panel and select “Settings”.
- Select “Channel” from the dropdown options.
- To configure the appearance of your page, go to the “Brand” tab.
Step 3. Upload Your Twitch profile banner
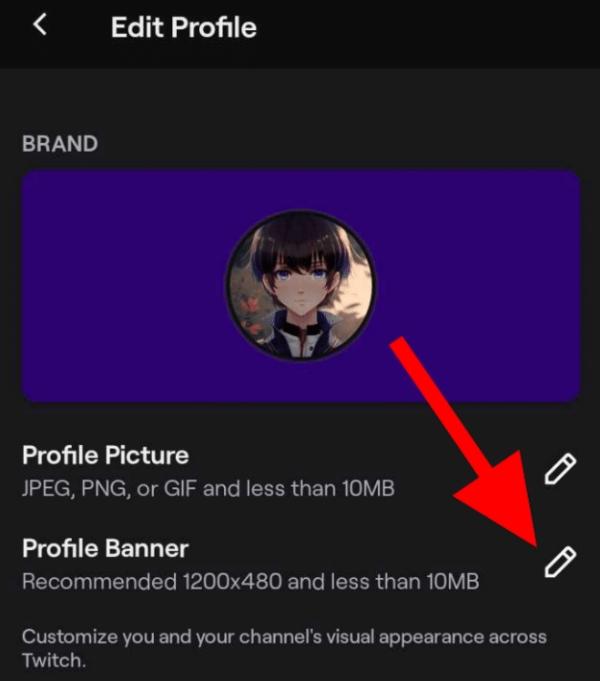


- Navigate to the Profile Banner section.
- Click the “Update” or “Upload” button at the right of the text box.
- Choose your 1200 x 480 pixels banner image from your device.
- Once uploaded, Twitch will automatically change the banner of the profile to the new one.
After uploading, check if your Twitch banner size looks good on different devices it will be viewed on. Check for pixelation or blurriness.
In case the image looks stretched or distorted, then adjust the size to the recommended size of the image.
In this way, you can easily upload a Twitch banner size that complements your branding and makes your channel look polished.
How to set up parental controls on Twitch
Twitch itself does not have a set of multi-layered, tightly integrated, and fully granulated parental controls in the strict sense of the term.
In its Terms of Service, Twitch states that the website is for people above 13 years, and children below 18 should be supervised by their parents.
While the app has some options that can be used to control what users can see and with whom they can communicate. These options are not really parental controls.
The following are the steps you will need to follow in order to configure these privacy settings:
1. Enable mature content filtering
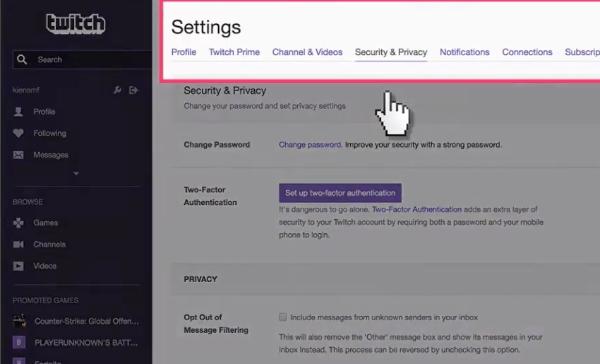


- Click on the “Security and Privacy” tab.
- Under “Content Preferences,” turn on “Hide Mature Content” to exclude the streams that are marked as mature.
2. Block whispers from strangers
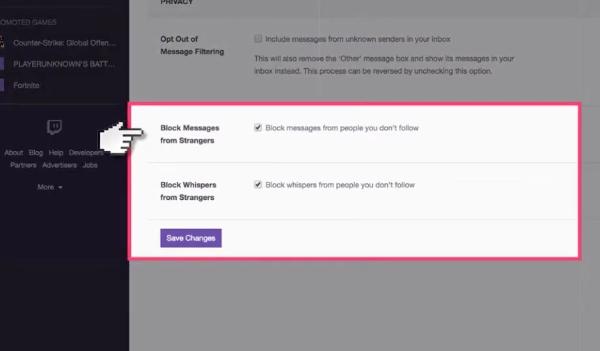


- Click on the “Security and Privacy” tab and then look for the “Privacy” option in the list.
- Enable ‘Block Direct Messages from Non-Followers’ to block users that your child does not follow or is not connected with.
3. Set chat filters
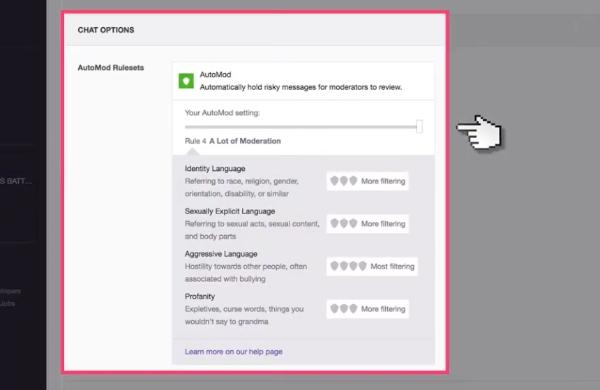


- While watching the stream, look for the chat bar located beneath the video.
- There is a gear icon (Settings) next to the chat box, click on it and then select “Chat Filters.”
- Turn on the filters for discrimination, sex, violence, and obscene language. These will not eliminate all the unpleasant comments but they will help to minimize them.
With limited control features on Twitch, parental monitoring apps could be vital in helping protect your child from the wrong kind of experiences online.
These apps offer additional or more extensive monitoring and control features.
FlashGet Kids is one such parental control app that can prove useful in improving your chances of keeping an eye on your child’s Twitch activity. Here’s how it can help.
- Screen mirroring. This feature enables you to monitor your child’s device screen in real-time. Which gives you a first-hand look into their Twitch usage.
- Screen time. Limit the amount of hours in front of the screen every day so that Twitch use is not excessively long. And keeps a balance between online and real life.
- Usage reports. Get comprehensive reports on your child’s Twitch app activity so that you can monitor their streaming activities and detect any problems.
- App blocking. FlashGet Kids gives the parent an option of completely blocking the Twitch application or putting certain time restrictions on the app.
With FlashGet Kids, parents can have more control over what their child is watching on Twitch and thus make the online experience more responsible.
Conclusion
Having the right Twitch banner size is crucial to maintaining a professional and visually appealing channel.
It is important to use the right dimensions of profile banners, offline screens, and video player banners. To ensure a better and more engaging experience for the viewers.
However, when optimizing the Twitch banner size, do not neglect online safety!
If your child is a Twitch user, FlashGet Kids is equipped with enhanced parental lock feature to ensure your child’s streaming is safe.

