The process of making visually appealing videos can become very easy, especially if you have mastered how to green screen on CapCut.
This highly effective video editing software enables users to easily replace backgrounds, and thus improve the level of imagination and narration.
In this article, we will learn all the necessary steps to add elements in green screen projects within CapCut, making your videos exciting and interesting for your viewers.
What is green screen and how does it work?
The green screen or chroma key is an optical effect that allows for overlaying images and videos streams based on color.
It operates by capturing a subject against a backdrop of a single color often green. And then swapping the back drop’s color for any other image or video.
The green color is selected because it is as far from the skin color of the people in the images as possible. Thereby simplifying the process of eliminating the background.
In CapCut, the green screen feature is an example of this professional technology being applied in a way that is overly convenient. Due to the simplicity of the app.
It has become especially interesting to young creatives. As it provides them with the opportunity to play with different narratives and digital communication.
With a green screen, a child can easily make a weather forecast, an adventure report, or simply make educational videos with CapCut.
Green screen tips for CapCut mastery!
How to add pictures to green screen on CapCut?
Adding images to green screen on CapCut is one of the most effective techniques used to make more engaging videos.
This feature makes it possible for you to replace the green screen with any image. Making the storytelling of your projects even better.
Here is how to add pictures to green screen on CapCut in a very easy and straightforward manner.
1. Launch CapCut and begin a new project. Open the picture you want to set as a background by choosing it from your device and dragging it onto the main track of the media timeline.
2. Click on the “Overlay” button on the bottom of the screen. Select “Add Overlay” and then add a green screen video or image from your gallery. Or pick one available in the CapCut library.
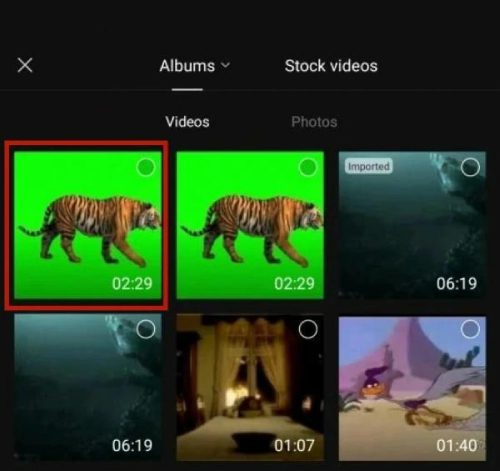


3. Once added, click on the green screen overlay in the timeline. You can easily drag its corners and change its size and position to fit in the layout you would wish for.
4. Choose the green screen overlay button and click on the “Cutout” option to turn the “Chroma Key” on. Using the color picker tool, choose the green color of the overlay.
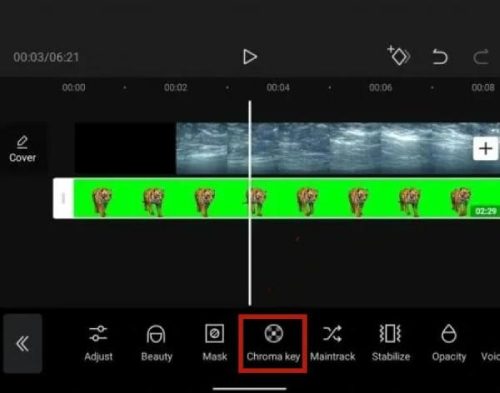


5. Subsequently, start changing the brightness and contrast values so you are able to remove the green screen background and blend with the image properly.
6. Also navigate to your principal picture layer and align it properly, so that it blends well within the new background.
7. Once you have set out the changes, go to the preview to see if everything is as expected. If everything is perfectly in order, export your video for sharing!
Following the above steps, one is able to add pictures to green screens within CapCut hence flexibly creating the best videos.
How to add background to green screen on CapCut?
Incorporating a background to a green screen in CapCut is a great way to improve your videos. And to make more interesting stories and effects.
This process is quite easy and friendly and thus the best for anyone who wants to venture into video editing.
Here is how you can add background to your green screen with CapCut.
- Launch CapCut application and start a new project. You need to import the background image or the video that you wish to include. And place it on the main timeline that is located at the bottom of the work area.
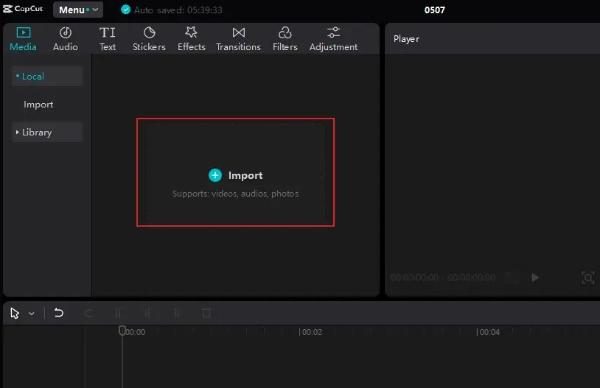


- Go to the “Overlay” tab and import your green screen footage. Select the option “Add Overlay” and then upload your green screen video or image and layer it over the background at the bottom.
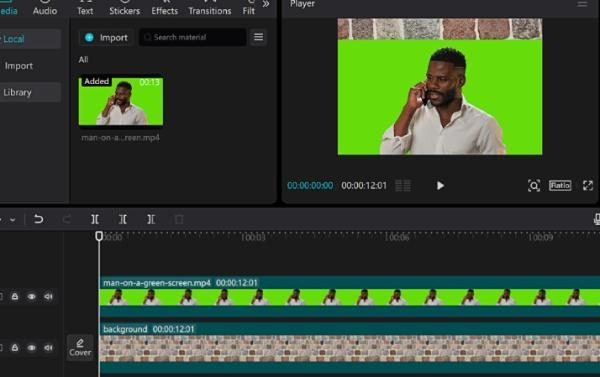


- Click on the green screen overlay icon in the timeline to choose it. This will enable you to get to the editing tools of this layer.
- Go to the “Cutout” option which is available at the top right of the interface. Turn on the “Chromakey” option which will help you to delete the green screen from the overlay.
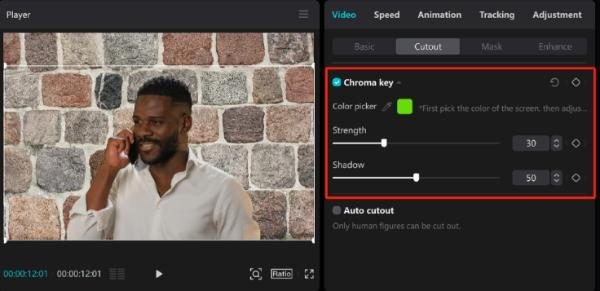


- Navigate to the color picker tool and choose the green part of your overlay. Fine tune the settings, changing the intensity until you notice that the green background is well erased.
- Also possibly fine tune how the overlay sits on top of the background. This is using shadow options and any other other parameters for that professional look.
- Once you have designed your video to your satisfaction, click on preview and check on how the two layers interact.
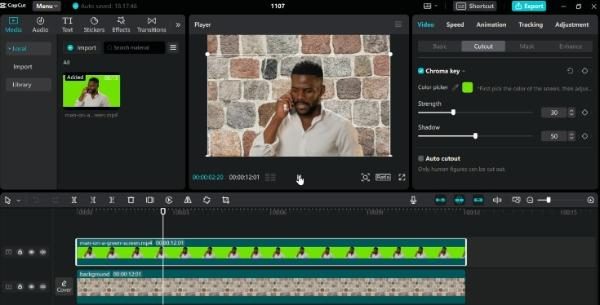


- If everything is ok, then click on the export button and choose the format and resolution of your project that you want to share!
With the help of these simple actions, anyone can add a background to a green screen in CapCut. And give their videos a new dimension!
Tips for perfecting green screen on CapCut
Understanding how to make the best out of this green screen feature in CapCut can revolutionize your videos and even your storytelling.
However, there are best practices that should be adhered to in order to get the best results. Here you will find some useful tips on how to become a true green screen editing master.
Proper lighting. Make sure your green screen background is properly illuminated to reduce areas on the page that are either too bright or too dark.
Distance from the green screen. It is advisable to stand your subject few feet away from the green screen to avoid green spill (reflected green light) on them.
Select proper backgrounds. Choose background that will harmonize with your subject and matches the lighting environments you had planned for the shoot.
Use high-quality footage. Capture images of higher quality so the subject and background of a scene can be as clear. With as much details as you want for your final video.
Smooth movements. Avoid rapid or random movement during the shooting process. This will only make keying and integration more difficult, and make the end product look less professional.
Adjust keying settings. Before you export your video in CapCut, adjust the fine-tuning parameters, such as intensity, shadow, and feathering. This is to create a natural pass between your subject and a new background.
Responsible editing: educating the next generation
When teaching children about video editing using CapCut, parents need to educate them about the proper choice of content on the internet.
Let children know it is necessary to select background images and videos that do not contain anything vulgar. Or that would not infringe on the copyright law.
To help parents find a balance in the use of apps such as CapCut. The use of a parental control app like FlashGet Kids would be ideal.


FlashGet Kids is intended to assist parents in supervising their kids’ activities on their phones efficiently. And at the same time guarantee a secure environment.
There are a number of features that make FlashGet Kids quite useful.
- Screen time management. Parents can set daily restrictions on how much time their children can spent on CapCut to prevent overuse.
- Live monitoring. This feature enables parents to track the activities of their child in real-time. It lets you see the kind of videos your child is editing on CapCut in real-time.
- Daily reports. Get daily analysis of usage indicating phone usage, thereby assisting parents in tracking their child’s behavior patterns based on their interests. You may notice if your child spends more time on CapCut.
- App blocking. Parents can block the use of specific applications where they consider the child may encounter prohibited materials. If your kid may be exposed to inappropriate content while using CapCut, you can block it on their phones.
Using the above tips in addition to parental supervision via FlashGet Kids, children can develop their green screen abilities on CapCut.
FAQs
It is recommended that green screen videos should be shot at 1080p or 4K in CapCut. Higher resolutions mean better quality and clearer picture. This would also help the chroma key effect to work at its best.
Yes, the Green Screen tool in CapCut is completely free of charged and anyone can use it. It is a good choice for anyone who wants to get good quality videos without having to spend more cash on software.
Absolutely! Green Screen in CapCut can be used on iPhone as well as Android phone. The app allows users to add and modify the green screen effects from their mobile devices making it more portable.
Conclusion
Learning how to properly green screen in CapCut, greatly increases the potential and versatility of your video creations.
With the proper approach, it is easy to incorporate backgrounds, images or videos into your green screen on Capcut to support your narrative.
Also, for parents, it is crucial to explain to their children what kind of content is correct to choose for their projects.
It is recommended to use FlashGet Kids to provide a balanced and safe approach to using CapCut for video editing. Let them be creative but do not forget about safety!

