In this digital era, we have become totally dependent on the Internet, whether for work or entertainment. However, everything has both bright and dark sides. Similarly, the Internet, although it has made our lives comfortable, also poses risks to our privacy. Thus, to cope with the issue, you might be wondering how to change the IP address, right?
If so, then keep reading this blog. In this guide, we’ll provide you with a detailed step-by-step procedure enabling you to change the IP address on mobile phones ( Android, iOS ) and also on a computer ( Windows, Mac).
What is an IP address, and why change it?
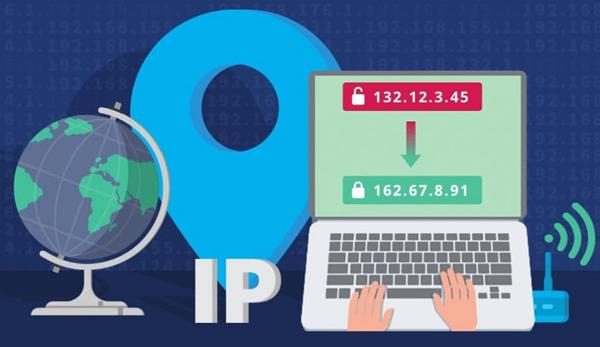
“An IP address is basically a numeric tag given to your device ( phone, tablet, computer), that helps it to get recognized and connected with online websites or other devices.”
Let’s take an example for better understanding! Suppose you contact someone, then your phone number is actually your IP address. This is because it helps others to recognize who you are, thus they would call you back using this phone number, right?
Similarly, your device IP address, which you basically see in the form, such as 192.0.2.1, works the same. Without this tag, you cannot watch your favourite videos, open websites, etc. This is because the Internet wouldn’t be able to know where to send data.
However, you can change your IP address to solve different problems and also preserve your privacy online. Let’s dive deeper and understand in detail!


Why do you have to change your IP address?
Privacy protection: First of all, if you are using the same IP address for a long time, then stay alert, as your digital privacy is in danger. I’m saying this because the moment you connect to different websites, apps, etc, they would instantly get your IP address.
Thus, using your IP address, they get to know important information regarding your online behavior. Like your current location, or which kind of websites you mostly visit, or how much time you spend on them. That’s alarming, isn’t it? That’s why you have to change your IP address regularly to make it difficult for others to track you.
Accessing blocked content: Do you want to access the content that is blocked in your country? If so, then changing the device IP address would be the solution. This is because it allows you to pretend that you are in another region. Thus, you can access blocked video games, apps, etc.
Fixing network issues: Furthermore, if you are having some Internet issues, such as pages not loading, apps not connecting, and many more. Then, these are mostly associated with your current IP address. Thus, by changing it, you get rid of all such hassles and enjoy your internet exploration smoothly.
Public IP address vs private IP address
| / | Public IP address | Private IP address |
| Communication | Connects your network to websites and devices across the internet | Connects devices within your home or office (like phone, laptop, printer) |
| Visibility | Visible to everyone online | Visible only inside your local network |
| Assigned by | Given by your Internet Service Provider (ISP) and may change over time | Given by your router for local use |
| How to check | Search “What is my IP” on Google | Check device settings → Wi-Fi or Network details |
| Example | 8.8.8.8 (Google’s public DNS, assigned by IANA range) | 192.168.0.0 (common local IP range) |
Ensure your child’s safety online while they change their IP address with peace of mind.
How to change your IP address on different devices?
Are you thinking of changing your IP address? If so, I’ll share a detailed tutorial with you to help in this regard, covering various devices such as PCs (Windows, Mac) and mobile devices (Android, iPhone).
How to change the IP address on Windows?
Method 1: Set your IP address manually
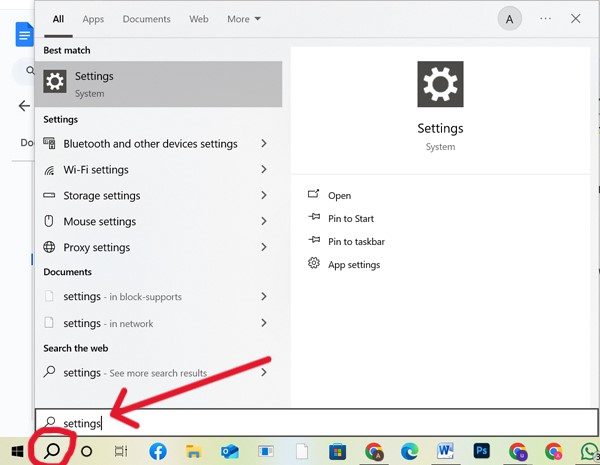
- Step 1. First of all, open your Windows PC, and at the bottom, you will see a search icon (magnifying glass). Just go for it, and in the search bar type “settings”.
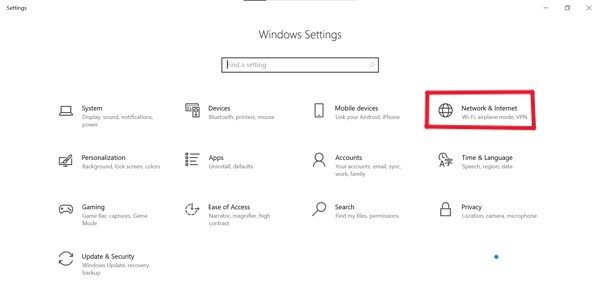
- Step 2. Now, the settings menu will open, and from there, search for the Network & Internet option.
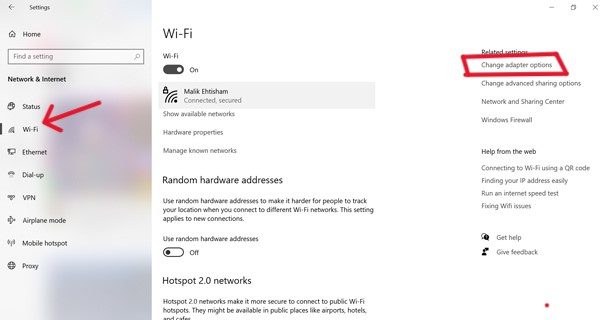
- Step 3. Next, a new page will open. And from the right side menu, you need to click on the Wifi connection for which you want to change the IP address. However, if you are connected to cable, then choose Ethernet. The choice is yours.
- Step 4. So, if you choose Wifi, then on the left side, you will see an option to change the adapter settings, just go for it.
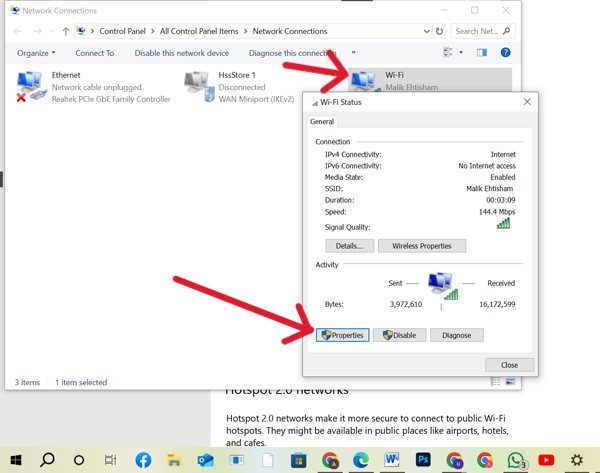
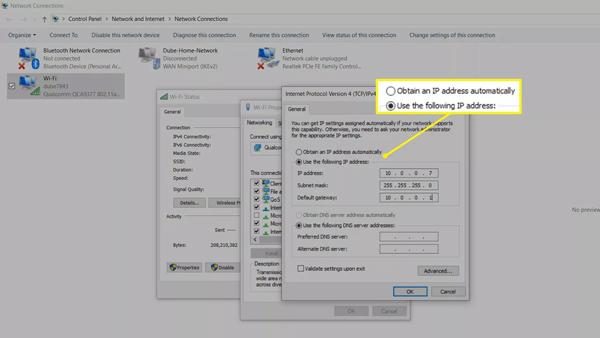
- Step 5. After this, you need to double-click the Wifi connection, and a small page will open before you. Here, you will see the properties option at the bottom, just click on it.
- Step 6. Now, again double-click the Internet Protocol Version 4 (TCP/IPv40 option from the drop-down menu list.
- Step 7. Finally, you need to click on Obtain an IP address automatically. Thus, it would automatically change the IP address.
Note: Also, here you will see the Obtain DNS server address automatically leave this option selected. Otherwise, your DNS server settings remain empty, which may cause other connection issues.
Method 2: Via Command Prompt
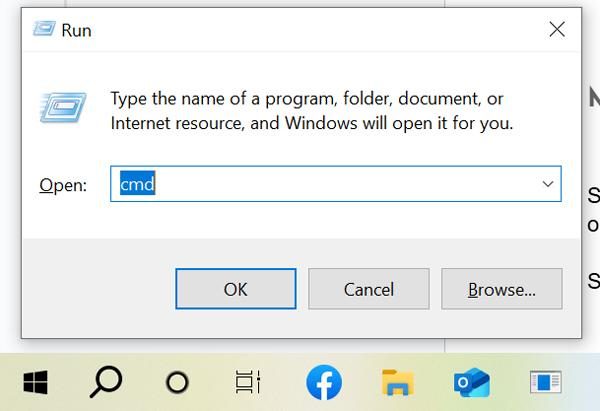
- Step 1. Open your PC and from the keyboard type Windows+R key. As you do, a small box will appear. Here, you will see a search bar; you need to type cmd and press OK.
- Step 2. After this action, instantly, a black page opens. Here, you need to type ipconfig /release and click Enter. This would give you the current IP address. Then, if you type ipconfig /renew and press Enter. Then, this command will ask your router for a new IP address.
How to change the IP address on a Mac?
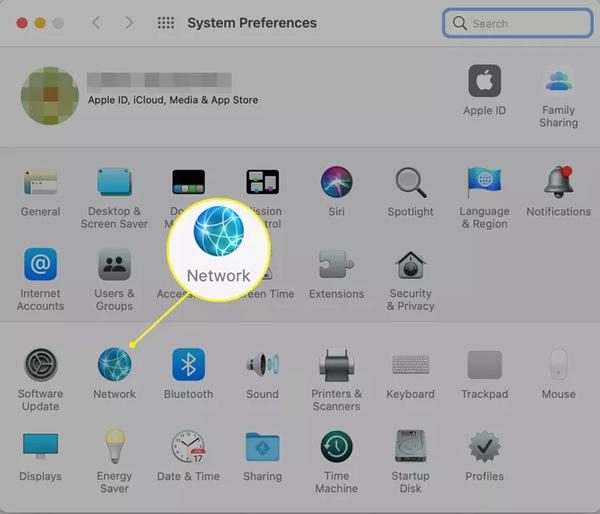
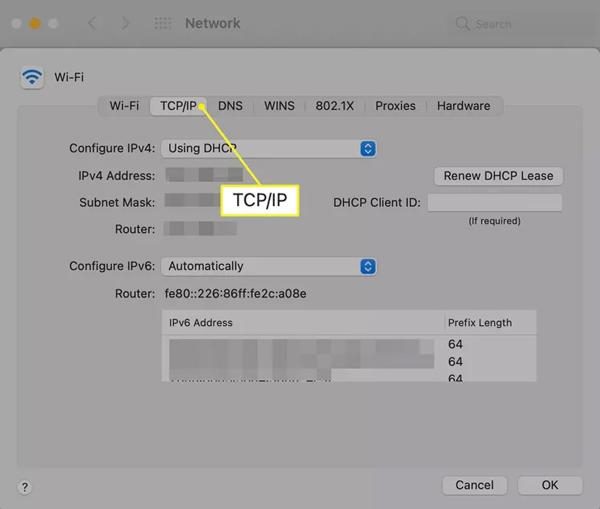
- Step 1. Now, in the case of Mac, you have to open your System Preferences app and from there select the network option.
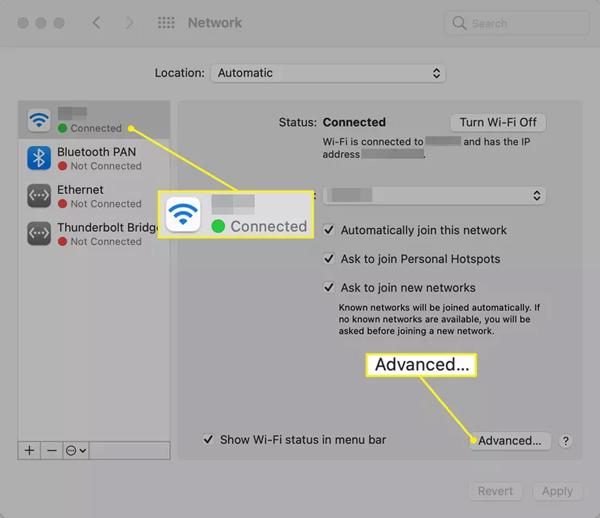
- Step 2. Next, just like Windows, you need to choose your network connection, like Wifi or Ethernet. If Wifi, then from the left menu, click on it. And also click the Advanced option, usually at the bottom left corner > Apply.
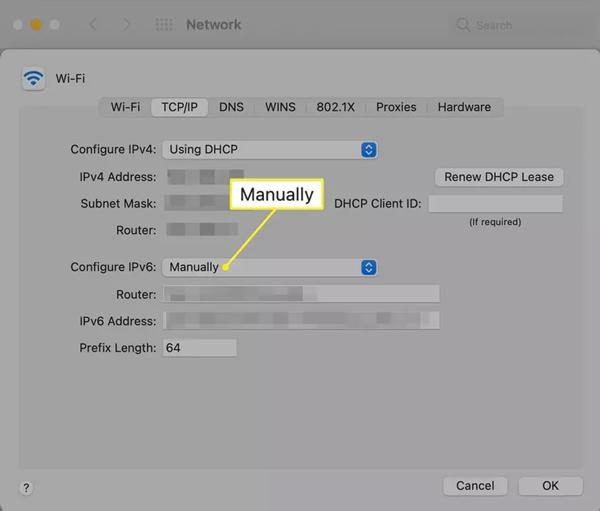
- Step 3. After this, the TCP/IP tab that you will find at the Top next to the Wifi.
- Step 4. Now, you need to go for the “Manually” option in the drop-down menu next to Configure IPv6 (or IPv4). Then enter the information for the new IP. That’s all!
How to change the IP address on mobile devices?
On iPhone:
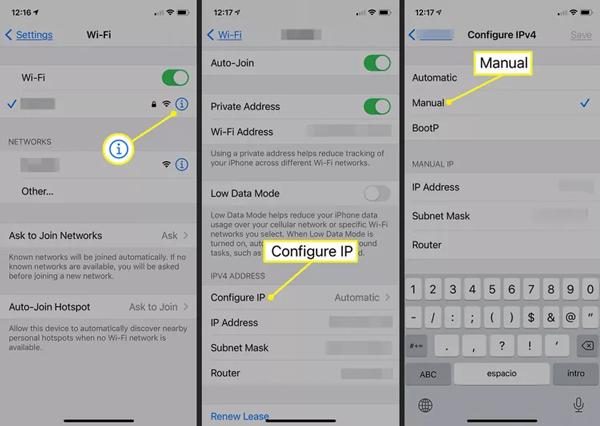
- Step 1. Take your iPhone and open the Settings app ( having a gear icon) and from the menu, go for the Wi-Fi option.
- Step 2. Next, you need to tap the small (i) next to the network and select Configure IP under the IPv4 address menu.
- Step 3. After this, select Manual and enter the network details manually, such as your IP address and DNS information.
On Android
For Android mobile phones, you can also change the IP address to a static IP on your network. To do this, follow the steps mentioned!
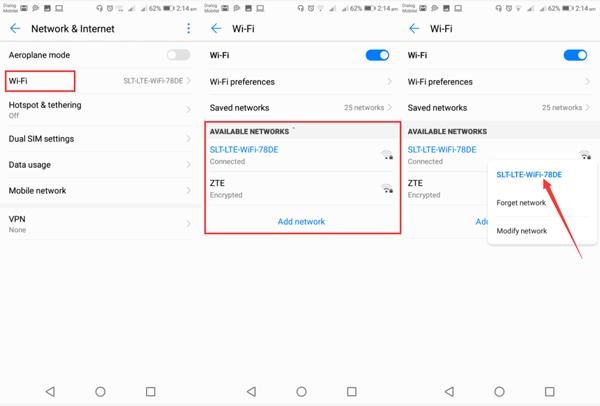
- Step 1. Just like an iPhone, firstly access your Settings and from there go to Network & Internet option > Wi-Fi.
- Step 2. Next, you need to tap the network that you want to change the IP address for and choose the Forget option there.
- Step 3. Now, you have to scroll down, and at the bottom, you will see the DHCP option. Click on it, and change it to Static.
- Step 4. Finally, just enter your Wi-Fi password and tap on the Save option. That’s all!
How to change your public IP address?
Your public IP address is the one key that unlocks the way to connect to the outside online world. Llike online games, websites, apps, etc. So, let’s see how you can change it so no one online will be able to track your online behaviours!
Restarting your modem or router:
The most common and simple way to change your public IP address is to restart your Modem or router. To do this, you just need to turn off the router, like unplug it from the wall, okay! Thus, after some time, like a few minutes, plug in the socket.
Then, to confirm whether your IP address has changed or not, you can open your Google browser and type What is my IP. Thus, you will get confirmed.
Using a VPN (virtual private network):
Next, keep in mind that you are changing your public IP address, so that no one can trace you online. So, you can also use a VPN for this purpose.
It doesn’t change your IP address but actually hides it. So, when you go online, the website you access sees the VPN server’s IP, not your own device IP. Thus, you can safely browse the data and even access the blocked apps in restricted networks.
Limitations and considerations
– Don’t think that restarting the router would always give you a new IP. This is because sometimes, your set connection has a lease agreement with the ISP. So, if that time doesn’t pass, you will not get a new IP.
– Furthermore, there is also a drawback to using VPNs, which is that they may slow down your Internet speed.
– Also, keep in mind to never accept cookies on websites. This is because even if you have changed your IP, the Websites owing to cookies may track you.
How to change the IP address on a router?
You can call the router a device that is basically a middleman between the Internet provider and your home devices.
- Step 1. First of all, you need to check whether your device is connected to the router or not.
- Step 2. Next, you need to open your device’s web browser, like Google. And in the search bar type your router’s current gateway address.
- Step 3. After this, you will see a login page. So enter your details like username, password, etc.. This would open your router’s settings, named Local IP network or simply Network, depending on your model.
- Step 4. Here, you will see your current IP address and find the option to change it. So, do so and save the changes.
What happens when you change a router’s IP?
- Devices will reconnect
- Short internet drop.
- Avoids IP conflicts.
- Adds extra security.
How to change the IP address without a VPN?
Because of the VPN’s drawback of slow Internet speed, you might look for alternative options. If so, then don’t worry! You can use the manual methods to change the IP address, which we have already discussed in detail in the above sections. However, there are other options available, for instance;
Use mobile data:
If you are using a Wi-Fi network, you can switch to your Mobile data. Now, here the trick is that both Wifi and mobile data have their own separate IP addresses. Thus, doing so will give you a quick approach to get a new temporary IP address.
Connect to a different network:
Furthermore, you can also do one thing, like change your Wifi network. For instance, you can go to your friend’s house and connect to that wifi on your device. It would also change the IP address.
Request a new IP from your ISP:
However, if you are not getting satisfactory results from all the above-mentioned methods. Then the last option is that you can directly contact the ISP. Thus, you can request them to change the IP address. However, keep in mind that if you have a static IP address, then it’s the only way to change it.
Risks and limitations of changing IP addresses for Kids’ safety
If you are a parent and are thinking of changing the IP address for the kids’ safety. Then you have to be familiar with its risks and limitations. So, you can find a better alternative to ensure kids’ complete digital safety.
False sense of security:
First of all, you need to correct your assumption that you have changed the IP address. Then you would remain safe from online predators or harmful websites.
No, that’s not true, you can’t completely rely on it, as websites or apps may still use cookies to collect kids’ personal details. So, they are always at greater risk.
Parental controls may stop working:
Furthermore, one thing to keep in mind is that when you change the IP address, actually, all the devices reconnect, right? So, in that case, if you have used any third-party parental control app for kids monitoring, then these also get blocked.
As the app wouldn’t be able to recognize the new IP, it can’t sync the data. Also, location tracking features would also fail.
Also, to ensure kids’ digital safety, the most important thing is that you must restrict your kids from getting exposed to inappropriate content. However, changing the IP address has no link with it.
So, if you want to protect your kids from online potential dangers. Then you have to look for other options, like using third-party parental control tools.
Combining IP address changes with a parental control tool
As mentioned earlier, changing an IP address may impact the functioning of parental control tools. However, in this regard, FlashGet Kids proves beneficial, as even if kids change their IP address to bypass rules, this app would still work. For instance,
Location tracking: Owing to this app, you can track the location of your kids even if their IP addresses change. Also, its geofencing features allow you to set specific zones. Thus, if kids get out of certain places, you will get an instant alert.



Screen time management: Also, kids’ excessive screen time is today a major concern for parents. So by using FlashGet Kids, you can set time limits on different apps for specific hours. Thus, if kids try to exceed the limit, you get an instant alert.
Website and app blocking to prevent unsafe browsing: Moreover, Flashget Kids also gives you the ability to blacklist the harmful websites or apps. Also, if kids try to access a newly downloaded app, you will get an instant alert. Thus, your kids would remain safe from getting exposed to inappropriate content.
Conclusion
In short, changing your IP address is a very good approach to protect your privacy and even access the blocked content in your region. Also, there are different methods available to change your IP address, whether you have a PC or a mobile device.
However, when it comes to kids, they don’t completely rely on changing IP addresses. As it wouldn’t give full proof security that your kids remain safe from harmful websites or predators. Thus, combining the parental control tool FlashGet Kids with mobiles would be a smart move.

