One of the best ways to level up your YouTube video, is adding in the right music to your content.
Music sets the proper mood for people, gets them into the story, and makes atmospheres. If you’ve ever wondered how to add music to YouTube video then you’re not alone.
Many creators want to add the right soundtrack as the perfect thing to personalize the videos.
If you’re a beginner or if you have started making (and adding) music can be what makes all the difference with the quality of your work.
In this guide, we’ll break down everything you need to know to successfully add music to YouTube videos and make your content sticky.
Why add music to your YouTube video?
Adding music to your YouTube video has many benefits that can help your video succeed.
First off, it helps you create a more emotional impact, to help set that mood or atmosphere in your video you are trying to achieve, to portray something uplifting, suspenseful or relaxing.
Making sure that the right music pairs with your content can help you to make a more immersive and engaging connection with your audience.
Another great factor that goes beyond emotional appeal is videos combining it with music can be a great way to boost engagement.
Viewers are more likely to stay engaged with videos featuring a great soundtrack, and many marketers will show that it makes videos more watchable.
And music will indirectly influence the likes, comments and shares on your video, which enables your video to gain a fuller audience.
Lastly, adding in music makes your video feel somewhat professional, more polished, more sophisticated.
Choose the suitable parental control tools for them.
How to add music to a YouTube videos
Once you know why you need to add music to the YouTube video, let’s see how to add music to a YouTube video.
If you’re new to video editing or just have some experience under your belt, adding the right soundtrack is easier than you thought.
Using YouTube’s built-in music Library
The right music for your YouTube video can make all the difference in engagement and grading on a pretty scale.
Luckily, YouTube provides creators with a simple resource to search and lean on royalty free music: the YouTube Audio Library.
No matter if you desire to add an energetic beat, or a dramatic effect the Audio Library offers a variety of choices in terms of music and sound effects to give to your content.
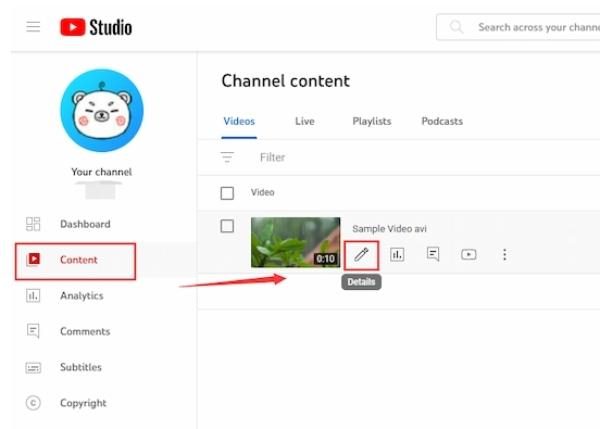
- Access YouTube and click on your profile icon then choose “YouTube Studio.”
- Then click on “Audio Library” (under Create) in the left sidebar.
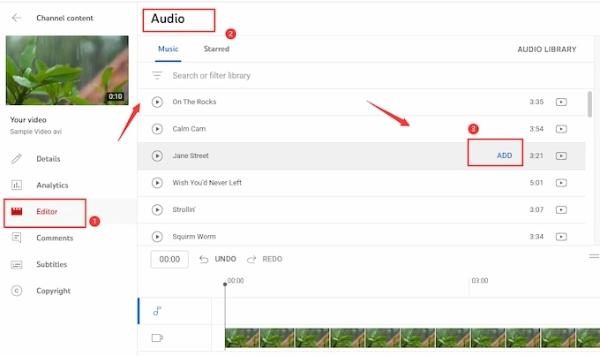


- Within the Audio Library, music can be searched or browsed with genre, mood, instrument and duration fields.
- You can click the play button near any track to listen before downloading.


- If you like something, click the “Download” icon next to it and it downloads to your device.
- Next upload your video to YouTube and during your editing process choose the downloaded music from your files and upload it to the video timeline.
Uploading your own music
When you upload your own music onto YouTube or use copyright content, confirm you have sufficient rights or permits.
If the music is copyrighted, you’re going to need a license from the copyright holder, or you’ll need to use royalty free or Creative Commons tracks.
If you don’t have the rights, YouTube’s Content ID system may flag your video, and have it muted or blocked. This is why it’s essential to check the licensing of your music every time.
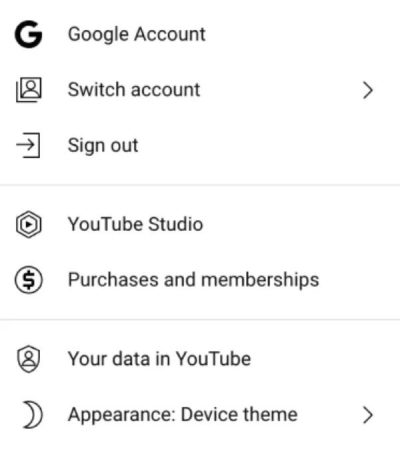
1. Head to YouTube, tap your profile icon, and then select “YouTube Studio.”


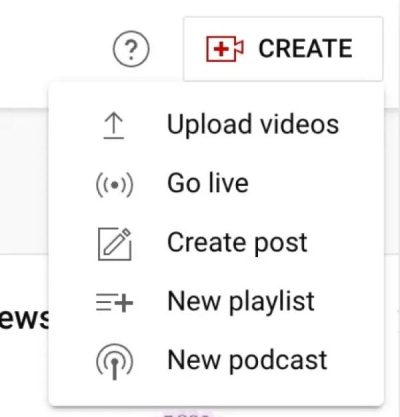
2. To add your video file, click ‘Create’ and choose “Upload Videos.”


3. When uploading, click “Add Music”, and select “Upload Music” to add your own audio file.
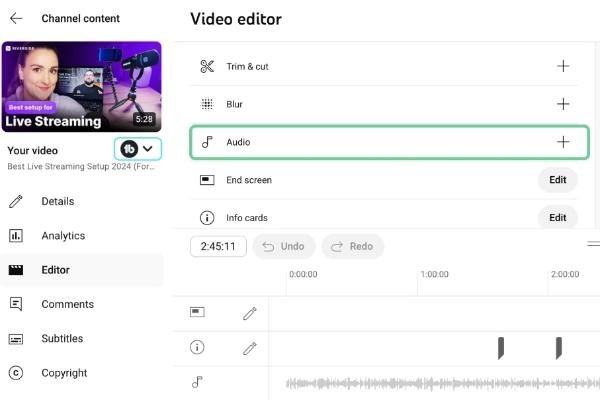


4. You can use the audio track in YouTube’s video editor to drag the course of the music to ensure it matches your video’s visuals.
5. When you synchronize, save your edit and complete the process of uploading.
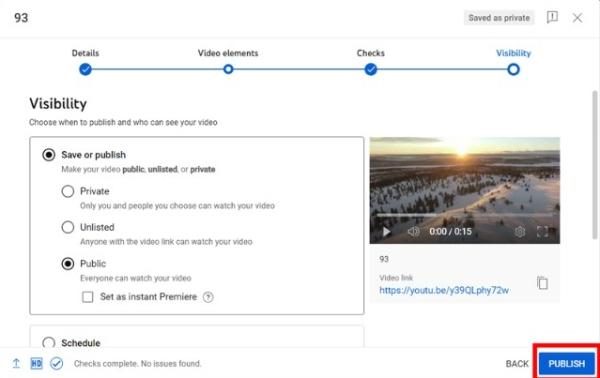
6. Once you are finished syncing and final adjustments, go ahead and hit “Publish” to put your video live with that music.


Using video editing software
If you want to put music in the YouTube video, you will need to utilize iMovie to do so easily.
iMovie is known for its user-friendly user interface and powerful features making it easy to add music to your video projects.
iMovie comes with the tools to add a background score or to sync your custom track to your videos to make them sound as good as they look.
- Open iMovie and simply choose “Create New” and then “Movie” to create a new project.
- In the main dashboard, click on “Import Media” and choose the video you wish to edit.
- Within the “Audio” tab you can browse the available music or drag your existent audio file through the timeline.
- Drag the audio track along the timeline to see the timing match video.
- Just click on the audio clip below along the timeline and tune its volume for the best sound level.
- After you’re happy with your edit, go to “File” > “Share” > “File” to export the video and then upload to YouTube.
Tips for choosing music for YouTube videos
While there is no secret sauce when it comes to selecting the music for your YouTube video, if you pick music that doesn’t set the mood of your video, your views and subscribers will dwindle.
As important as it is for your audio to be as high quality as possible, it is equally important to make sure the music you are using is copyright free.
1. Understand copyright laws and YouTube’s policies
Before adding music to your YouTube video it’s important to fully understand YouTube’s copyright policies.
If you’re using the wrong music, the system Content ID (which YouTube uses to automatically detect copyrighted content) can take down videos or monetize videos with the rights holder.
When choosing the music, it’s not only important to use music that is royalty free, but also music that is legally allowed to be used on YouTube.
2. Use YouTube’s audio library
YouTube’s Audio Library is the fastest and safest way to get music for your YouTube videos.
This is a collection of royalty free music and sound effects which you can use for your video purpose completely free of copyright penalties.
The library lets you filter music by genre, mood, instrument, and duration, and that can help you get precisely the right track for something you’re producing.
3. Explore free music websites
But if you’re looking for more options than YouTube’s library, there are plenty of free music websites out there providing music under Creative Commons licenses.
Free Music Archive, Incompetech and Bensound are brilliant websites to find royalty free music that you can download and can use in your videos.
There are a lot of these platforms and they all offer high quality music in every genre and mood possible so you can choose to match that music to the vibe that you’re trying to set.
4. Check licensing terms
Free music can be found in many sources, but you must check the licensing terms to use any tracks.
The rules differ for different types of licenses on how the music can be used.
Some examples are that some tracks were free for personal projects but payment (or permission) was required for commercial use.
In fact, Creative Commons licenses frequently require that you give proper credit to the creator of the music.
5. Match music to your video’s mood and theme
Having the right music to set the mood is very important when your audience is watching your video.
The music you choose to use can help partner with the mood you are trying to convey.
For instance, you’d use upbeat, fast paced music for an energetic content, like tutorials, vlogs, or travel videos or for slower, more ambient music the relaxing content or for cinematic videos.
Make it so the music won’t clash with your video’s visuals and stories.
Help regulate what music your child listens to on YouTube
It is important for not only a parent to regulate what your child watches on YouTube but also make sure they are watching age appropriate content.
Most particularly, music videos can include specific language or themes that you don’t want your child to encounter.



gives you a complete range of features that help you keep an eye on and manage what music your child listens to on YouTube, making it a safer online space for them.
Usage reports
Detailed activity reports about your child’s YouTube activity are provided by FlashGet Kids.
We have reports on which videos (music videos or otherwise) they have watched, and how much they spent on the app.
The transparency here helps you recognize any inappropriate content and even patterns in the type of music videos they access so that you can take action whenever need be.
Screen time limits
FlashGet Kids lets you set daily screen time limits, so your child isn’t spending too much of their day staring at a tablet or phone listening to music content.
The advantage of this is that it forces you not to overuse YouTube, ensuring you always get a balance between screen time and other activities.
You’re able to control how much time they’re spending with music, so they’re doing it in a way that serves their whole self.
Screen mirroring
FlashGet Kids with screen mirroring lets you view what your child is watching in real-time by mirroring their device’s screen into yours.
It lets you get a live feed of their YouTube activity, such as music videos they’re watching and can check for suitable content.
You can easily step in if you see videos you don’t approve of.
Keyword detection
Using advanced keyword detection, FlashGet Kids scans the titles, descriptions and comments of videos looking for harmful or explicit language.
This guarantees that your kid isn’t introduced to deplorable soundtrack lyrics or contents.
The app can block any music videos that contain flagged keywords so you can choose what they see.
App blocker
With FlashGet Kids, you can freely block access to YouTube, or any apps at all if you think necessary.
Another plus to this feature, your child can only access the music content that you’ve reviewed and approved first.
This means that you have total control over what they consume and protect them from any unwanted content as they listen to their favorite music.
Conclusion
Music on YouTube videos elevates emotional impact, raises engagement, and puts a professional flair on videos.
You can either make use of YouTube’s built in music library and upload your own tracks or use video editing software such as iMovie.
iMovie has simple ways to sync your music while FlashGet Kids has basic tools to block things your children listen to on YouTube.
Using usage reports, screen time limits, keyword detection, and other features from FlashGet Kids, you can make sure your child enjoys a safe online music experience.

