If you’ve just tuned into Twitch or seen others watching streams, you might be wondering what the appeal is. Twitch has become a massive platform for gaming, and live interactions from which millions tune in to watch their favorite creators play games and share stories, interacting with fans in real-time. One of the reasons these streams are so engaging is something called Twitch alerts.
Twitch alerts are simply put, notifications that appear on the screen when something happens during a live stream. These alerts may indicate when a streamer has been followed, subscribed to, donated, or cheered. Twitch alerts are a necessary part of a successful stream because it keeps the interaction flowing and encourages viewers to interact instead of just watching. Keep reading to learn everything there is to know about these alerts.
What alerts are there on Twitch?
Twitch alerts are notifications that pop up during a live stream when people do something during it. These alerts are to let both the streamer and his audience know when some important interaction takes place. Moreover, it allows the streamer to engage with his community directly.


Here’s an overview of the main types of Twitch alerts:
Follows:
When someone new follows a streamer’s channel, that triggers an alert. It allows for interaction between the streamer and the streamer’s audience by informing the streamer to thank new followers. This is important for new streamers since it’s all about getting a following as the first step to being successful.
Subscriptions:
A subscription is a way that a viewer can fund a streamer’s income every month. What this means is that when someone signs up they get a notification that pops up on the streamer’s screen and they get the opportunity to acknowledge the subscriber and say thank you. When it comes to streamers, the more subscribers you have, the more perks they often offer.
Donations:
Viewers can donate money directly to the streamers, which when they do is reflected and triggers alerts that will show up in the stream. This is how streamers support themself on Twitch, during donation alerts you get a notification that other users have donated, and they are on display for everybody to see.
Bits Cheer:
Bits are Twitch virtual currency. Cheers amount to Bits spent to cheer your streamer on — an alert appears to show support to them. This is also another way for streamers to get money while still being in the know of their most dedicated fans.
Hosts and raids:
Community-building actions include hosting and raiding. When another streamer decides to host or raid your channel, those streamer’s viewers will automatically be funneled to your stream. Host and raiding alerts are particularly good for brands or streamers who don’t have a big audience but want help expanding it.
Milestone alerts:
Another dream of some streamers is to have alerts go off when they hit some kind of milestone. Like the number of followers, they have or when they celebrate an anniversary from when they first started streaming. The alerts make the stream feel more celebratory and there’s a reason for the viewers to keep engaging.
Having Twitch alerts on the stream is key in making the stream more interactive and lively, providing viewers with a way to feel themselves being acknowledged for their support.
How long are Twitch alerts?
The question that many streamers, especially new streamers, have is, how long should they Display Twitch Alerts on their stream? The duration of alerts can be customized based on the streamer’s preferences, but there are some general guidelines:
- Follows: These are usually kept short, rather, since follow alerts happen often. Let’s talk about how long most streamers set their follow alerts for now and it dies right around 5–10 seconds. This ensures that the new follower doesn’t become a distracting alert to the streamer.
- Subscriptions and donations: More significantly, even these alerts usually are a financial contribution. On account of that, subscription and donation alerts may take a few seconds more to display around 10–15 seconds. That gives the streamer time to give a proper shout-out and thank their supporter.
- Bits cheer: The cheering with Bits alerts are anywhere from 5 to 10 seconds long based on the number of Bits the viewer spends. But, smaller cheers are still just a brief display of your screen to streamers, whereas larger donations of Bits could cause a longer or more elaborate alert.
- Hosts and raids: Somewhat longer side, around 10–15 seconds go between hosting and raid alerts. The actions can cause another stream to get new viewers. So, the streamer therefore wants to respond with some kind of action to give another streamer their thanks.
Find the right balance, if not, no matter how good you are, you will be stagnated on Twitch. Alerts should be lengthy enough for notice, but not with enough duration that interrupt the flow of the stream.
What alerts should I have on Twitch?
If you want to get a Twitch stream kicked off, you might start wondering which alerts to prioritize. Here’s a guide to help and you decide which alerts are essential for a successful stream:
- Follow alerts: This is one of the most important alerts there is. The channel will alert you every time a new follower comes around, and the streamer can thank them. Building this type of loyal audience is imperative.
- Subscription alerts: A subscription alert is a no-brainer if your channel is monetized. That’s because it’s a big deal. After all, it’s ongoing financial support. You could also use subscription alerts to get other viewers to subscribe.
- Donation alerts: If your stream accepts [donations], this alert is important. The token appreciates financial contribution, hence motivating viewers to contribute in the future.
- Host and raid alerts: Hosting and raiding is especially a great growth point for smaller streamers. With these alerts, we know that we will be able to properly thank another streamer for helping their channel.
- Bits cheer alerts: Bits cheer alerts are not mandatory for new streamers. Still, they’re a fun way to get viewers to cheer you on (with Twitch’s virtual currency). This alert becomes more important as the channel grows.
How to set up Twitch alerts?
The setup of Twitch alerts is something that might seem complicated to some people. However, it’s quite easy to do if you follow the right guide. Here’s a step-by-step guide to help you get started with their alerts:
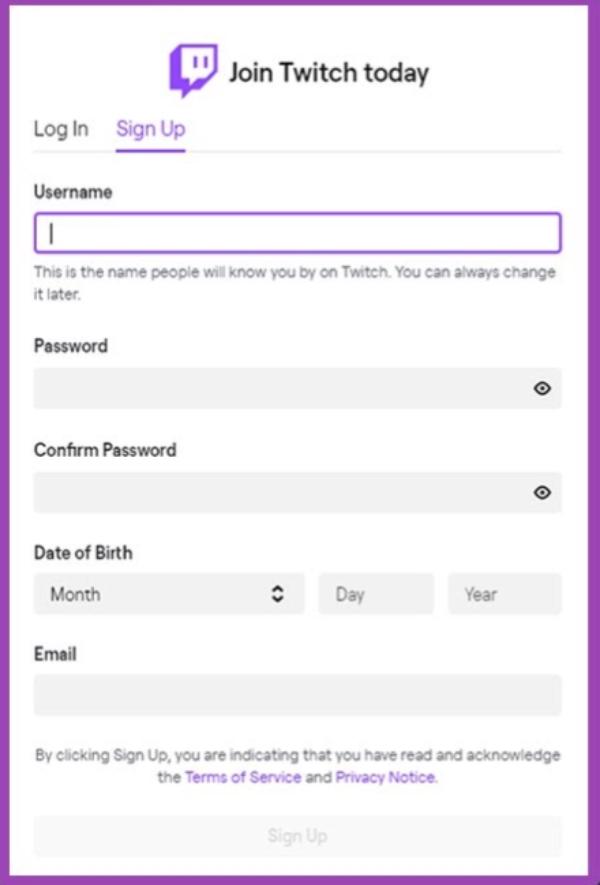
1. Create a Twitch account: It’s free to sign up and takes just a few minutes.


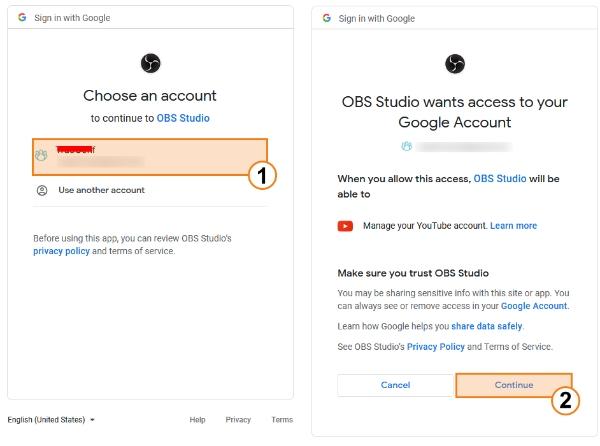
2. Download Streaming Software: You can choose OBS Studio or Streamlabs.
3. Set up an Alert service: To set up custom alerts you will need to create an account with one of these services.


4. Customize the Alerts: Pick a design for each type of alert (follows, subs, donations, etc.).
5. Copy the Alert widget: The alert service will give a unique URL or widget after the customization of alerts.
6. Add the Alert widget to streaming software: Create a new “Browser Source” on OBS, and paste the URL.
7. Test the Alerts: Check every alert to identify customization and performance errors with Twitch alerts.
How to hear Twitch alerts?
You can set up Twitch alerts, but making sure they’re heard is a completely different can of worms. If the streamer can’t hear the alerts that the streamer makes they won’t be able to react in real-time. So, this can hamper interaction with the audience.
Here are some tips to ensure you can hear their Twitch alerts:
- Use quality headphones: A good pair of headphones can make a big difference when investing. By doing this, you can hear all the sounds on the stream — alerts, etc. — without any feedback or echo from their microphone.
- Check the volume levels: For instance, if that’s Streamlabs or StreamElements, there’s usually a setting on your alert volume. But these should be loud enough to hear, but not loud enough to drown out the sounds of the stream.
- Adjust the sound balance: You want to find the balance between the sound of the game and the streamer’s voice and alerts. The alerts should be loud but not too loud, not tooting out everything. But many streamers do a quick sound check to make sure that everything is in balance before going live.
- Test Alerts before streaming: Just about every alert platform has a way to test your alerts before they go live. It will give you the chance to adjust the volume and timing of the alerts.
Are Twitch Alerts better than Streamlabs?
However, when setting up Twitch alerts, you will have a choice of a few other options. The two types of services you’ll be hearing about most often are Twitch’s built-in alert system and third-party services such as Streamlabs. But which one is better?
- Twitch Alerts: Twitch’s built-in alert system is easy and simple to use, which makes it a good option for novices. It is fairly easy to set up, and it’s built into the platform. Nevertheless, it is quite narrow in terms of customization.
- Streamlabs: Third-party alert service Streamlab is one of the most popular options out there. It features a variety of customization parameters including sounds and animated alerts. But Streamlabs also offers more – donation tracking, overlays, and chat integration – making it a good choice for more serious streamers.
Where is the best place to get Twitch alerts?
Free and Paid there are many places to find high-quality Twitch alerts. Here are some of the best options:
Streamlabs: Provided by Streamlabs you get a choice of free and paid alert templates. They’re easy to set up and integrate directly into Streamlabs software.
StreamElements: Another interesting platform for Twitch alerts. At StreamElements, you have free as well as premium alert packages that are really easy to use and customizable.
OWN3D: OWN3D is known for its Premium alert designs and is a one-stop shop for great quality alerts. While not cheap, they’re some of the best designs available on the market.
Visuals by Impulse: Visuals by Impulse are a great option if you want completely custom alerts. Though they’re much more expensive than other services, they focus specifically on creating unique, high-quality alerts.
Bonus: Can kids play Twitch?
If you’re a parent, one of your biggest questions is probably whether Twitch is safe for kids. Twitch is a fun and cool place to play, but also a risky one, especially for young users. Here are some things to keep in mind:
- Mature content: Not all Twitch streamers will make content safe for children. A lot of streams contain adult language, violent games, or simply adult content. This content is not something that some people would recommend a younger audience not to view. The thing is Twitch does have a “mature content” label that streamers can claim. Still, it’s not always enforced to the same extent.
- Live chat: One of the biggest disclaimers about Twitch is the live chat. However, streamers can moderate their chat, but that doesn’t stop inappropriate comments, bullying, and other harmful behavior. Also, we need to check the kind of chat your kid is experiencing.
- Parental controls: The bad news is that Twitch doesn’t have strong parental control options. But with a supervised account, you can set your child up, so you can see what they’re doing. Moreover, you can also rely on a third-party tool like FlashGet Kids to fill in for the missing parental control features.
Therefore, you’ll have to use FlashGet Kids to keep your kids safe on Twitch. Created specifically for concerned parents, this app is curated to offer a one-stop parental control fix. It’s a great way to get your child to learn online gaming and streaming without putting them at risk on Twitch-type platforms.

