Have you ever looked at your bank statement and found charges that you did not sign up for, making you wish that you could delete the subscription on your iPhone? You are not alone.
With our phones evolving into portable entertainment, work, and service centers, it’s not uncommon to sign up for multiple services without realizing they take money.
In this guide, we will learn how to delete subscriptions on iPhone quickly so that you can minimize unnecessary charges and get your finances back on track.
How to view Apple subscription on iPhone/Mac?
A subscription is an order in which a consumer pays a certain amount of money to repeatedly access a particular service.
On iPhones and Macs, you can subscribe to different services through App Stores, Apple Music, Apple TV+, Apple Arcade, and iCloud.
These subscriptions continue to be charged at the end of every billing cycle until you choose to freeze or cancel the subscription.
How to view subscriptions on iPhone
1. Go to the ‘Settings’ menu on your iPhone.
2. Click on your Apple ID in the upper right corner of the screen.
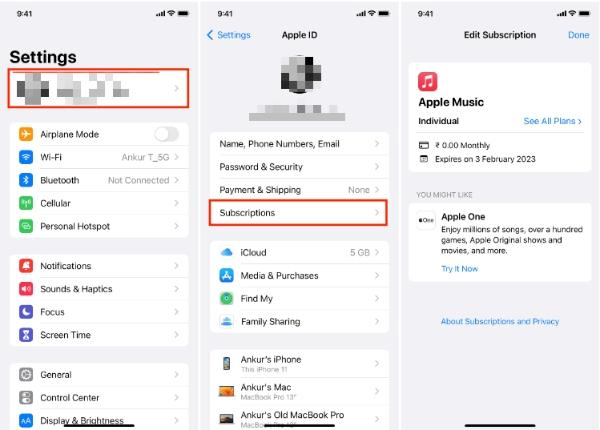


3. Scroll down and then click subscriptions.
4. This link opens in a new window.
5. It will list all your current subscriptions to the App Store and Apple services.
How to view subscriptions on Mac
- Locate the Apple application on your Mac and click it to open the App Store.
- On the left-hand corner, move your cursor to your name and click.
- Select Account Settings. You may be required to log in.
- Go down to the Subscriptions section and click on Manage next to it.
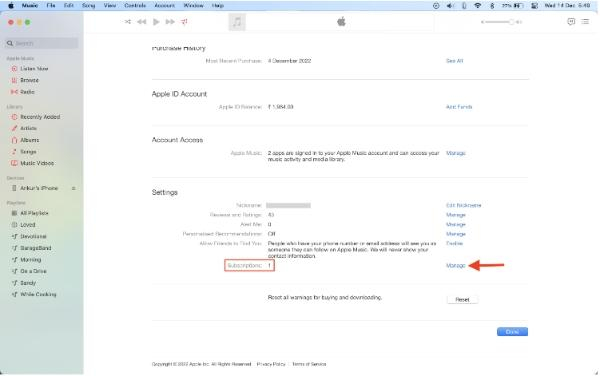


- Click for more in a new tab.
- The Mac App Store shows you a list of all the subscriptions you currently have subscribed to.
These instructions will help you track and control all Apple subscriptions on iPhone and Mac devices.
Simplify subscription control for family—safe, smart, and secure.
Why do people want to manage Apple subscriptions?
There are several reasons why people might want to manage their Apple subscriptions:
– Save money: Often, subscriptions stay unnoticed and slowly drain your pocket. It helps you remove services you do not need or where you can find cheaper services offered by other service providers.
– Avoid surprise charges: Occasionally, free trials are time-sensitive, and they collapse into paid forms once the trial period is over. Managing subscriptions ensures that one pays only for the services one regularly uses.
– Control spending: Most subscriptions have levels varying in prices and functionality of the features offered. Reviewing them allows a person to fine-tune his or her plan to be more suitable for his or her situation and means.
– Consolidate services: Some subscriptions could perform similar functions, or even the same, as those of another subscription. Reviewing these services enables you to optimize and eliminate some of the services.
– Switching services: A user may wish to unsubscribe from one service provider and subscribe to another provider that offers better service.
– Privacy concerns: Some customers might want to reduce the number of services that hold their payment details.
– Seasonal use: Some subscriptions may only need to be active during a particular time of the year; they, therefore, can be activated and deactivated as needed.
Step-by-step guide to deleting subscription on iPhone
Don’t lose your money to unused subscriptions! Here’s a step-by-step guide on how to delete subscriptions on your iPhone using two methods: Settings and the App Store.
Method 1: Using Setting
- Launch the Settings application on your iPhone. This is the application with the gray wrenches.
- Click on your Apple ID at the upper right corner of the screen. This will show your account details.
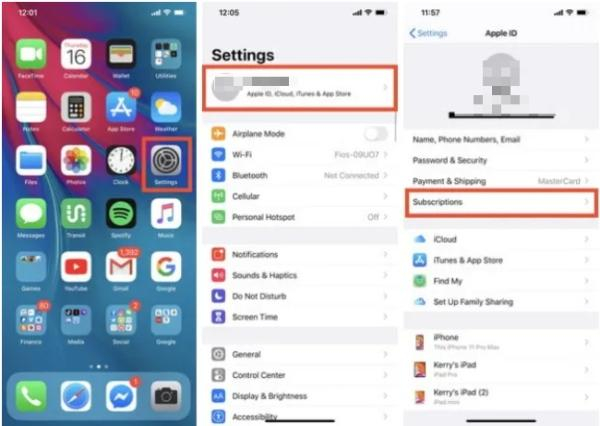


- Scroll down to choose Subscriptions. Here, you will be presented with a list of all your active subscriptions.
- Click on the subscription that you want to remove. This will take you to the subscription details page.
- Navigate to the bottom of the page and click on the “Cancel Subscription” link. But it may be placed at the bottom of the page or even below the fold.
- Click the “Cancel Subscription” link and confirm your selection. A pop-up message will ask you to decide on the action. Tap “Cancel” once again to continue.
- Congratulations! In this way, you can delete the subscription using your iPhone settings.
Method 2: Using the App Store
– Locate the App Store application on your iPhone and launch it. The app has a blue icon with the letter ‘A’ written in a stylized font.
– Click on the profile picture icon at the top right of the screen to open the account menu.
– Click on the menu options, then select “Subscriptions.” You may be required to enter your Apple ID login credentials here.
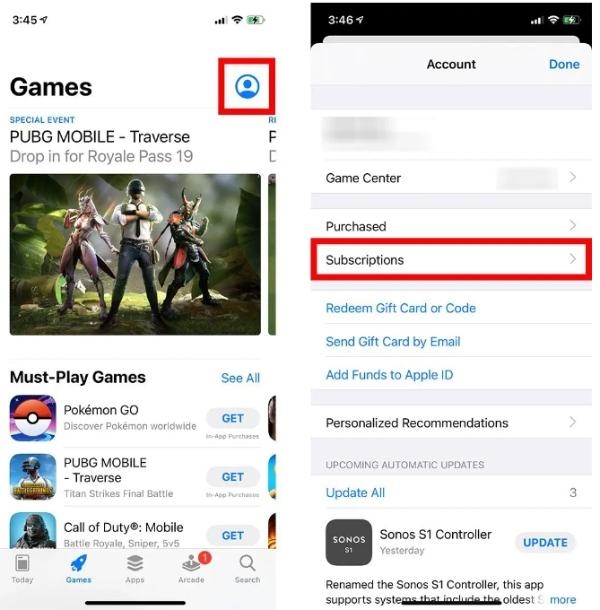


– Locate the subscription you want to remove from the list.
– Tap on the subscription. This will show the subscription details.
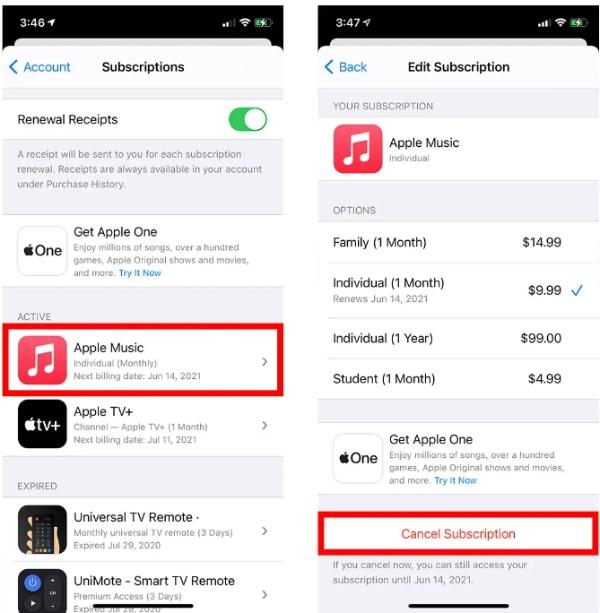


– Scroll to the bottom of the page and click on the “Cancel Subscription” link. It may be placed at the bottom of the page.
– To complete the action, tap on the “Cancel” message that will appear in the pop-up box.
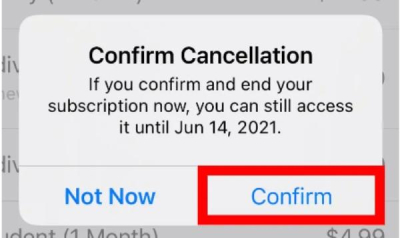


– Just like that! You have removed the subscription through the App Store.
Potential issues when canceling subscriptions on iPhone
While canceling subscriptions on iPhone is generally straightforward, there can be a few bumps in the road:
- Hidden subscriptions: Certain subscriptions, particularly those subscribed to via a third-party website, may not show up in the list of subscriptions associated with the iPhone.
- Delayed cancellation: A subscription does not necessarily end the moment one cancels it; the subscription remains active for the set period of the billing cycle.
- Confusing Interface: In very few cases, the subscription details page may not have a conspicuous button written: “Cancel Subscription.” This could be attributed to having an old app or an unusual type of subscription plan.
- Accidental resubscription: Readers may automatically subscribe as they continue using an application they may have unsubscribed from.
- Family Sharing complications: Leaving a subscription through Family Sharing can interfere with other family members.
- Refund limitations: Apple’s refund policy for subscriptions can be quite rigid, which can make it hard to get your money back from unwanted renewals.
- Incomplete cancellation: Some apps can only be unsubscribed through means other than iPhone settings, such as contacting the app developers.
- Auto-renewal confusion: Consequently, users may assume that they have unsubscribed only to discover that they have only paused the auto-renewal option and run up a bill.
How to delete subscription history on your iPhone?
Sadly, there is no direct way to delete your subscription history on your iPhone without the use of third-party apps.
However, the beauty of it is that expired subscriptions are deleted from the list after one year. Here are two alternative approaches you can take in the meantime:
Hide subscriptions
Removing unnecessary subscriptions clears the home interface’s sight without erasing the history. Here’s how to do it:
– Start the App Store application on your iPhone.
– Click on the profile picture icon on the top right of the app.
– From the menu, click on “Subscriptions.” You might have to sign in with your Apple ID here.
– Click on the subscription you wish to hide.
– Gently swipe left on the subscription. This leads to a button labeled “Hide”.
– Tap “Hide”. The subscription will be removed from your ‘Primary’ Subscription list.
Masking a fee doesn’t change its recurring nature or stop the service from billing you again. It just hides it from your active sight.
Create a new Apple ID
Obtaining a new Apple ID involves coming up with a fresh purchase history. Here’s what to keep in mind:
Data Loss: A new Apple ID implies that the App Store purchases, iCloud storage, and other Apple services are all new. You will need to reinstall all the apps that you once purchased and sync information such as photos and contacts.
Inconvenience: Sharing and using two different Apple IDs simultaneously in cases such as owning a work and a personal ID is inconvenient.
Potential payment issues: For the new Apple ID, you will be required to make new payment details.
Steps to create a new Apple ID:
- You should back up your iPhone information with iCloud or iTunes to avoid losing valuable data.
- Go to the Settings application on your iPhone and locate the current Apple ID at the top of the screen.
- Scroll down and tap “Sign Out.” You may be asked to enter your Apple ID password.
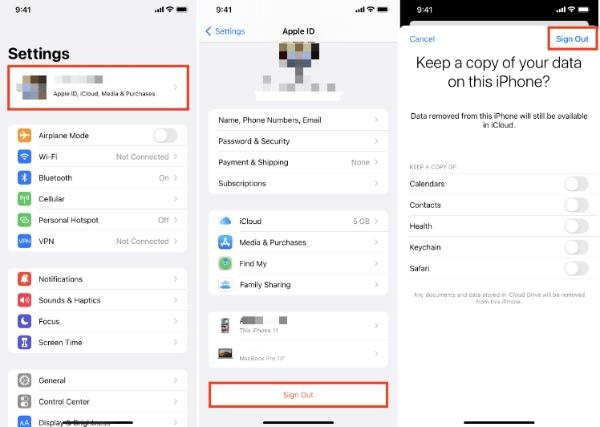


- After signing out, return to the main window of the Settings.
- Tap “Sign in to your iPhone.” Instead of signing in, select “Don’t have an Apple ID or forgot it?”
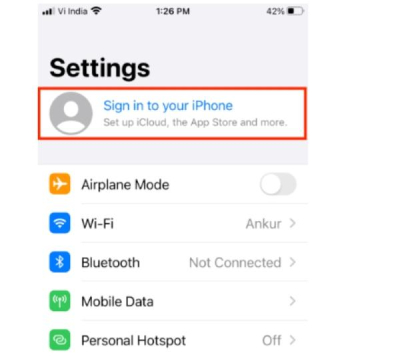


- Click on “Create Apple ID.”
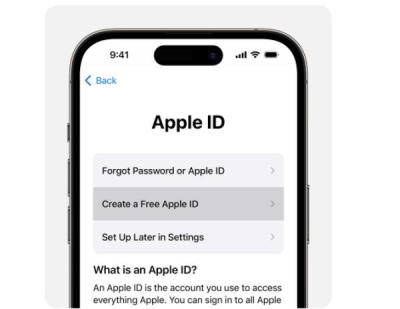


- Follow these steps to set up a new Apple ID on your device: Input your birthday, name, desired email, and password.
- Check your phone number and accept the terms of the contract.
- Your new Apple ID will now be created and ready for use.
What can I do if my kids have made subscriptions on their Phone?
Sometimes, kids make purchases in the app unintentionally or even with intent and end up charging parents’ bills a lot of money.
This frequently occurs when children are not fully conscious of the extent of their spending or do not realize that they are touching subscription buttons by mistake.
The attractiveness of the application interface, coupled with the ability to make purchases quickly, can lead to children signing up for services they do not understand.
To assist in addressing this, parents can utilize FlashGet Kids, a parental control app that allows for screen mirroring, hence aiding the parents in monitoring their children’s device usage more effectively.



Related key features of FlashGet Kids that can assist in managing subscriptions:
Real-time screen mirroring:
Parents can monitor their child’s screen use in real-time; thus, you can tell when a child has navigated to a subscription page or made an in-app purchase.
App usage tracking:
The app gives full reports to the parents on which apps their children use and for how long, providing them with insights into risky apps that may lead to unwanted subscriptions.
Remote app management:
Parents are able to block or restrict certain applications containing subscription options to stop kids from joining.
Parents may limit the amount of time that their children spend online in order to prevent them from coming across subscription offers and subscribing to them.
Safe browsing features:
It may exclude the possibility of visiting certain sites that can promote subscriptions or in-app purchases for children, which is quite valuable.
All these features combined allow parents to have a full set of instruments to control their children’s actions in the digital world and prevent subscriptions they do not want.
Conclusion
Learning how to manage or even remove subscriptions on your iPhone is a useful skill in the modern world.
Remember to audit these subscriptions periodically, which will help you save a lot of money in the long run.
Be as active as possible in managing your subscriptions, and do not hesitate to cancel any unnecessary services that you notice.
With these tools in hand, you now have what is necessary to regain the ability to manage the amount and experience of the apps you use. Happy unsubscribing!

