People use their phones to make recordings of life and important information that one might think might be relevant someday. From taping interviews to spying on children’s activities using parental control applications, there is so much more to learn about how to record on my phone.
In this guide, you will find out the best ways to record sound and call on your phone (both Android and iPhone) so that you don’t miss out on anything.
How to record on an Android phone?
Your Android phone is a portable sound system that can be used in case you have to record a lecture, an interview or when you feel like singing a melody.
Whether you need to capture a fleeting conversation or a strategic meeting, here’s a comprehensive guide to recording audio on your Android device:
Step-by-step guide to record audio on an Android phone
- Locate the Recorder app: Almost all Android smartphones have a preinstalled application called “Voice Recorder.” Find it in your app tray and double-click on it.
- Optimize recording settings: Most of these parameters are fine, but some phones might have additional settings to adjust the sound even further. Look for features like ‘Recording format’ and ‘Noise reduction.’
- Hit record: This is usually a large red button to initiate the process of recording the session. Open it up and let the audio go!
- Pause and stop: Most of the recorder applications have a pause and a stop button so that the user can record in whatever way they want. Take breaks if possible, and press the stop button once the recording is complete.
- Save and share: When you stop the recording, you can save it with any name you desire. You can also send it to your friends via instant messaging apps, email, or cloud storage.
In order to optimize your audio quality, you could follow the following tips:
- Minimize background noise: As much as possible, one should ensure that one works in a quiet place at all times. If outside, try to shield yourself from the wind.
- Position your phone wisely: Hold your phone in a way that it can hear more depending on whether it is a lecture or a band playing. Experiment with distance and angle.
- External microphone: If you want to record something professionally, you might try using an external microphone connected to the headphone jack.
However, the built-in recorder is quite helpful; third-party applications are richer in functionality.
Some of these may include high editing tools, noise elimination options, and compatibility with cloud storage services.
How to record on an iPhone?
Although iPhones are easy to use, the steps of making a sound recording on iOS differ from Android.
Apple cares a lot about the privacy of its users which impacts some of the recording features but the built-in application Voice Memos is sufficient to create clear voice memories.


Let’s explore the built-in recording features available on iOS devices:
- Voice Memos app: The built-in “Voice Memos” application is your go-to location for voice recording on your iPhone. Find it on your home screen or app library and open it.
- Tap to record: The entire wireframe is restrained and simple, with a large red button occupying most of the space at the center. You can tap it to start the recording process. It can capture audio and display a waveform in real-time.
- Pause and stop: To stop the recording for a while, press the pause button in the top left corner of the screen, which is two vertical lines. To stop the recording process entirely, tap the same button again.
- Save and edit: Once you’ve completed it, click on the “Done” button in the upper right corner of the screen. Here, you can name your recording and trim any unwanted sections by using editing icons.
Apple’s native Voice Memos app include options for editing the recordings as well as for sharing them across Apple devices using iCloud.
For instance, for the podcaster or musician, the Voice Memos app records files in various quality formats to satisfy the needs of the person using the app.
How to record calls on an Android phone?
There are times when a phone call contains information you would like to recall and not just for a few minutes.


Fortunately, you can record calls on your Android phone, so you can always refer to the conversation later.
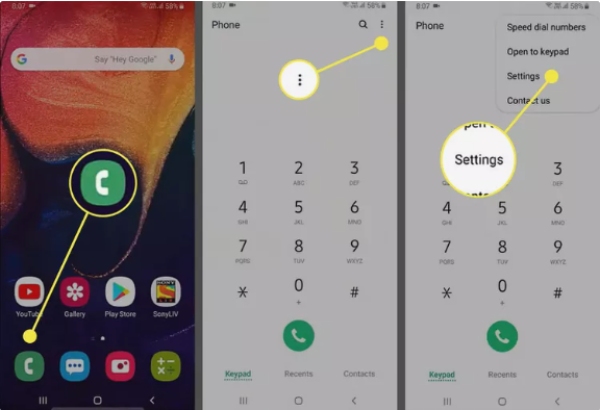
- Check your settings: However, not all Android devices are equipped with the built-in feature that allows for call recording. Go to your Phone app’s settings and search for features such as “Call recording” or “Recording calls.”
- Enable recording: If available, find the call recording feature in the settings, then activate it on your device. It may allow you to record all calls, calls from unknown numbers, or designated contacts.
- Record during the call: Once enabled, options to record might appear on the call screen during a call (typically a “Record” option). Tap it to start recording the dialogue immediately.
If your cellular phone does not come with an in-built recording feature, you will find numerous applications that can do the job.
Check out these applications and select the one that would most benefit you. However, when applying third-party apps, consider the permissions carefully and ensure that they reflect your privacy settings.
To ensure that there are no challenges when recording the call, you could also explore the following troubleshooting tips:
- Compatibility issues: Sometimes, you may face problems recording calls using a third-party app. You should ensure that the application is compatible with your phone model and Android version.
- Permissions: Make sure the app has permission to access your phone’s microphone and store files on your device.
- Incoming call recording: It is also important to note that some apps may restrict the ability to record incoming calls. Look at the features that the app offers and change them if there is a possibility for that.
How to record calls on an iPhone?
Dialing a call on an iPhone and recording it is a little more complicated in comparison to Android because Apple is very particular with their privacy settings.
Unfortunately, iPhones do not have a native application that allows the call to be recorded instantly.
However, there is always a way around using other devices or applications, which may have some restrictions.
Step-by-step guide to record calls on an iOS phone
Using another device:
- Dial your iPhone and put it on speaker mode.
- Put another phone, tablet, or computer with a recording app to get the sound.
- It is effective for incoming and outgoing calls.
Via built-in features (limited):
- During a call, hit the “Add Call” button to create a conference call.
- Pick your own number (like that of voicemail) or a service that records the calls.
- Connect the calls, and the service will keep a record of the call.
- This does not work for all carriers, and extra charges might be involved.
Using third-party apps:
- Similar to the conventional conference call method, applications like TapeACall Pro or Rev Call Recorder exist.
- Download the app and use it as a guide in setting up call recording.
- For incoming calls, you will need to connect the app’s recording line to the call.
- Most of these apps demand user subscription and may experience poor call quality.
Apple has blocked the direct call recording feature on iPhones, due to its respect to user’s privacy despite this could be unpalatable to some users.
Where are recordings stored on my phone?
After learning how to record on your phone, you might be curious about the whereabouts of those recorded moments.
It is also important to learn about the locations of these recordings within Android and iPhone devices, as well as how to navigate and work with them efficiently.
Android’s audio haven
In Android phones, the recordings are usually saved in the internal memory under a particular directory.
The exact point of recording can be different depending mostly on the type of the phone and the application being used.
Here’s a general guideline:
- Built-in recorder: Locate a folder known as “Recordings” or “Voice Recorder” inside your cell phone’s storage. You can access this storage via the “My Files” app or another file manager application that might come with your device.
- Third-party apps: These apps might create their own folders in the internal storage in which they save the recordings. Check the application settings or help for specific storage locations.
Once you find where your recordings are stored, then you can use your file manager app to organize the files.
Here’s what you can do:
- Play: Tap on the recording file icon to listen to it. Your phones default media player should be able to play most if not all the audio formats.
- Share: Every file manager has a “Share” button; this will let you send the recording through email or messaging apps or upload the file to the cloud services.
- Rename and organize: There are a couple of options to rename the recording files for ease of identification in the future. Some file managers also enable subfolders to create further sub-classifications of your recordings.
- Delete: If you no longer need the content of the recording, then you can easily remove it from its storage space.
iPhone’s recording ecosystem
On iPhones, recordings are stored differently depending on the type of recording:
- Voice Memos app: Voice recordings produced with the app already installed in the device are found within the “Voice Memos” app. You can get to them by opening the app and navigating to your recording list.
- Screen recordings: Screen recordings taken using the integrated screen recording tool are often stored in the device’s Photos application under a folder named “Screen Recordings.”
Both the Voice Memos app and the Photos app allow you to manage your recordings:
- Play and edit: Select one of the recordings to play it. The Voice Memos app comes with simple editing options such as cutting out unwanted parts.
- Share: The Voice Memos app and the Photos app already have built-in share settings. Recordings can be broadcasted by means of messages, emails, or directly uploaded to the cloud storage services.
- Delete: To delete a recording from your device, choose the desired recording and long press on it, then tap the ‘Delete’ button.
In any case, it would be advisable to transfer your valuable record to an external drive or such services as a backup for your safety.
This is important so that you don’t lose them if for instance, your phone is stolen, damaged or you do a factory reset.
Bonus tip: How to record the surroundings of your child’s phone?
While the tools above focus on recording audio directly on your phone, there’s another approach for monitoring a child’s device surroundings: parental control software.
There are a lot of options available on parental control applications that go beyond screen time and website blocking.
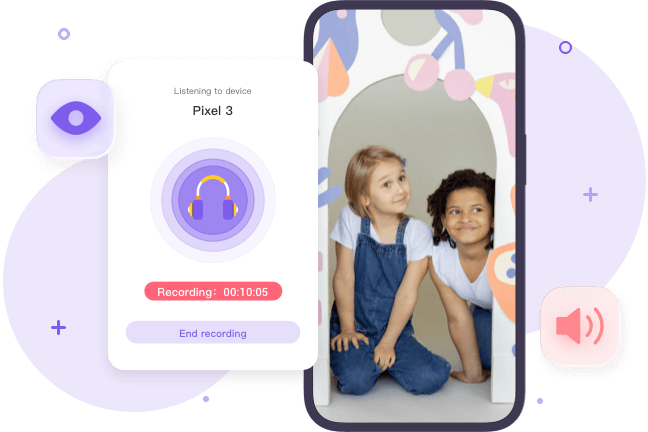
Of these, the features include the ability to turn on the microphone on your child’s device to record surrounding sounds without their knowledge.
This can be useful when perhaps you would like to know what their surroundings are like for instance when they are with friends or in a new place.


One such software choice is FlashGet Kids, a brand-new parental control application that expands on these functionalities.
While this app shares many similarities with other apps in terms of monitoring options, it also includes ambient recording features. Here’s a glimpse into some of its features:
- Web content filtering and app blocking
- Screen time management
- Location tracking
- Notifications monitoring
- Social media oversight
- Security recording of the audible environment
Ambient recording and monitoring using FlashGet Kids
Using FlashGet Kids, parents can listen to the surroundings of the child’s device and see threats that might not be visible from the call or message history.


Some of the steps you could take when preparing for ambient recording and monitoring using FlashGet Kids include:
- Download and install the FlashGet Kids app for parents on your phone from their official website, App Store, and Play Store.
- Register a FlashGet account to sign up and use the app. If you already have an account, please sign in to continue.
- Go ahead and download and install the FlashGet Kids app for kids on your child’s phone.
- Go ahead and bind the FlashGet Kids parental control app on your phone to the kid’s version on their phone. You’ll key in a 9-digit code from the parental control app onto your child’s phone.
- Follow the prompts on your kid’s phone to allow the app to access other phone features like the camera.
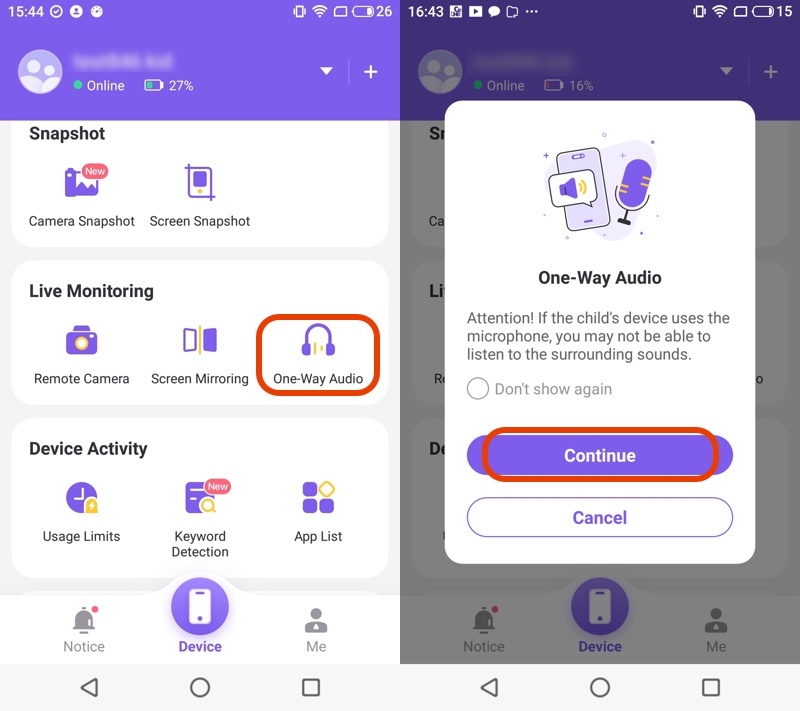
- Go to Live Monitoring on the parental control dashboard. Tap “One-way Audio” then “Continue.” You can then listen to the sound around the child.
- Click on “Record” to start recording. Click the option “End recording” to finish recording. All the recordings will be kept in “Me” > “My Recordings.”


Final verdicts
The convenience of recording on my phone is not just a luxury – it is a necessity for documentation, protection, and optimization.
Irrespective of whether one is an Android or iPhone user, there is always a way to record audio, calls, and other surrounding sounds whenever the need arises.
This is demonstrated by parental control apps such as FlashGet Kids, which show that these capabilities protect our family members.
It is crucial to comprehend how to use these features effectively without violating privacy and laws to make the most of our devices.

