As a parent, the safety and health of your children are paramount and that’s why it’s becoming increasingly important to learn new ways how to lock apps on iPad and iPhone. However, with today’s technological advancement that keeps shifting from time to time, moment-to-moment, it’s becoming increasingly difficult to implement every time-limit and safety feature on our kid’s devices. Fortunately, we have something amazing for you on how you can limit access to specific apps and also set time limits inside your kid’s iPad or iPhone Settings App. Keep reading to discover more on how to achieve this.
How to lock apps on iPad and iPhone?
There are several methods you can use to lock apps on your kid’s iPad and iPhone devices. Let’s discuss each of these methods below.
Method 1: With Screen Time ( iOS 12 or Later)
There isn’t a specific app locking feature on iPad and iPhone, but you can be clever a bit and use the Screen Time settings to curate the daily time limit for individual apps. Once the set time limit expires, the user will be required to enter a screen time passcode to continue using. This way, parents can set the maximum and minimum time duration to use an app for kids. The feature is particularly designed to help control the time kids can spend on various apps.
Step 1. Go to “Settings” > “Screen Time” > “App Limits” > “Add Limit.
Step 2. Create your Screen Time Passcode if you are yet to set it.
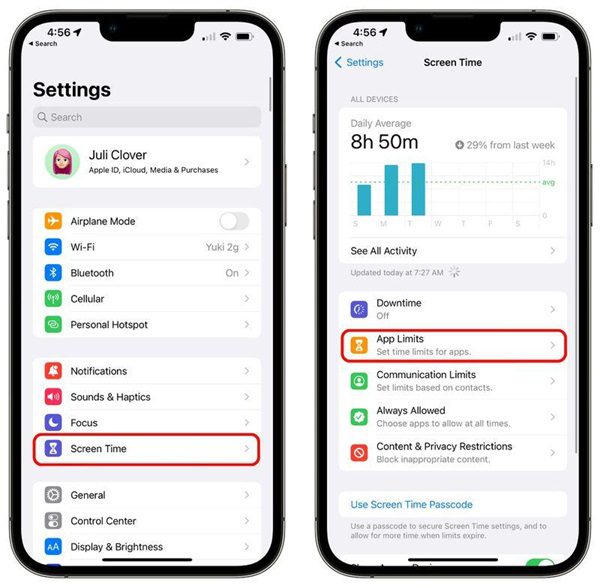


Step 3. Select certain app or a category of apps you want to set time limits.
Step 4. Then tap the “Next”.
Step 5. Customize the duration you want > tap “Add”.
Step 6. Make sure that the toggle button for “Block at End of Limit” is “On”.
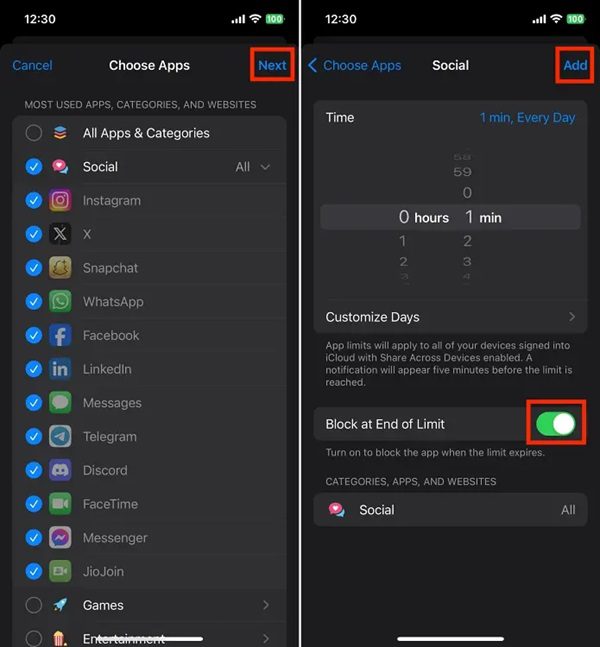


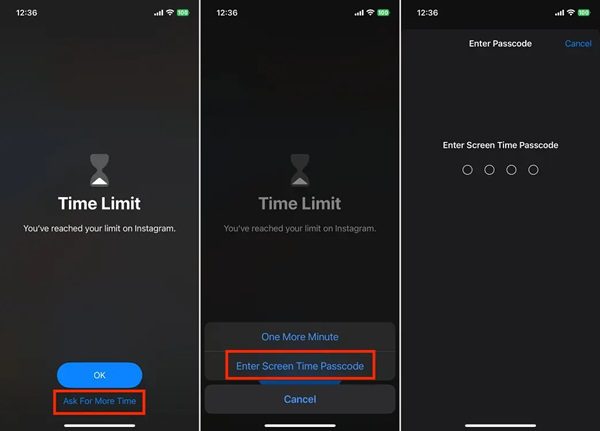
Every time your kid opens the selected app(s), the app will get locked automatically once the permitted usage is over. To continue using the app, the app will be required to provide the Screen Time passcode or request more time.


Method 2: Lock apps using Shortcuts (iOS 13 or Later)
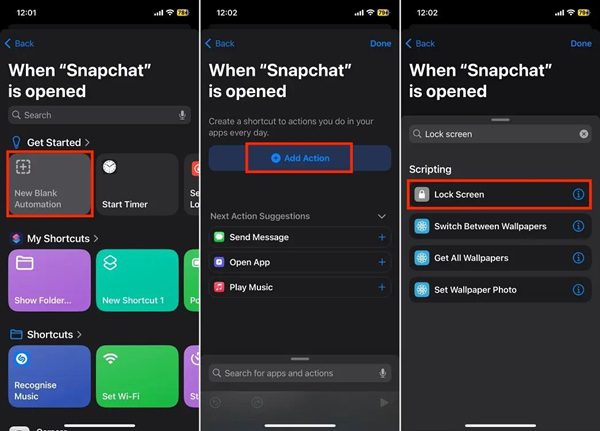
iOS 13 and later versions include a Shortcuts app that allows the user to create curated automated workflows and tasks. This is achieved by combining the various actions from different apps running on the device. Take for instance, iOS 16.4, apple has included a new Lock Screen feature in the Shortcuts app, which means that you can now easily create personal automation for locking your device screen. Every time your kid opens the selected app, their device will automatically lock.
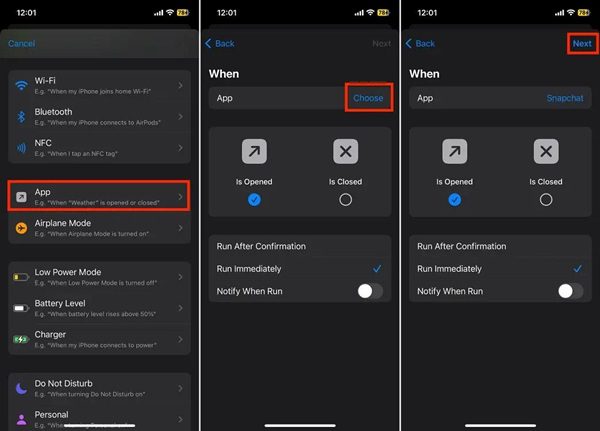
Step 1. Open your Shortcuts app > go to the “Automation” section.
Step 2. Scroll down > “App” > “Choose” the app.
Step 3. Ensure the “Is Opened” and “Run immediately” options are marked then tap “Next”.


Step 4. Tap “New Blank Automation” > Tap “Add Action” on the next screen.
Step 5. Search the “Lock Screen action” > Select it > Tap “Done”.


Method 3: Lock apps via Restrictions ( iOS 11 or Earlier)
You can give this method a try if you’re on iOS 11 or an earlier version for locking first-party apps.
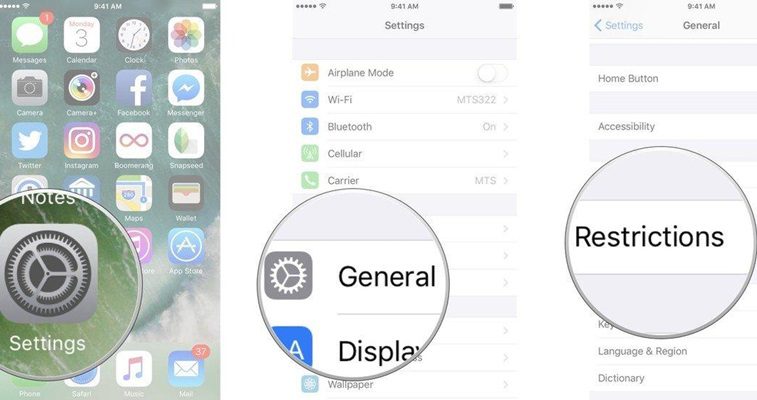
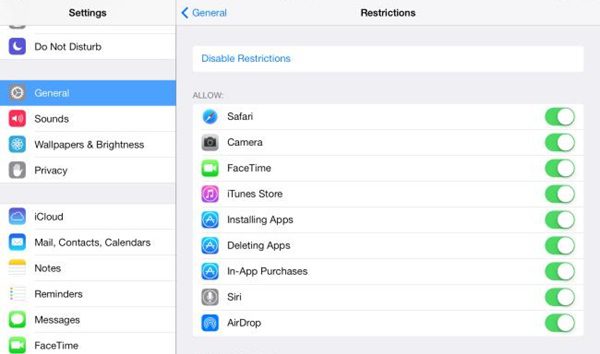
Step 1. Go to “Settings” > “General” option > “Restrictions” > then “Enable Restrictions”.


Step 2. Enter your passcode once prompted.
Step 3. Select the app you want to restrict from appearing on the screen. You may opt to disable Restrictions to all apps.


Method 4: Lock apps with Face ID & Passcode (iPhone X or Later)
Step 1. Go to “Settings” > open “Face ID & Passcode”.
Step 2. Key in your iPad’s Passcode and tap “Other Apps”.
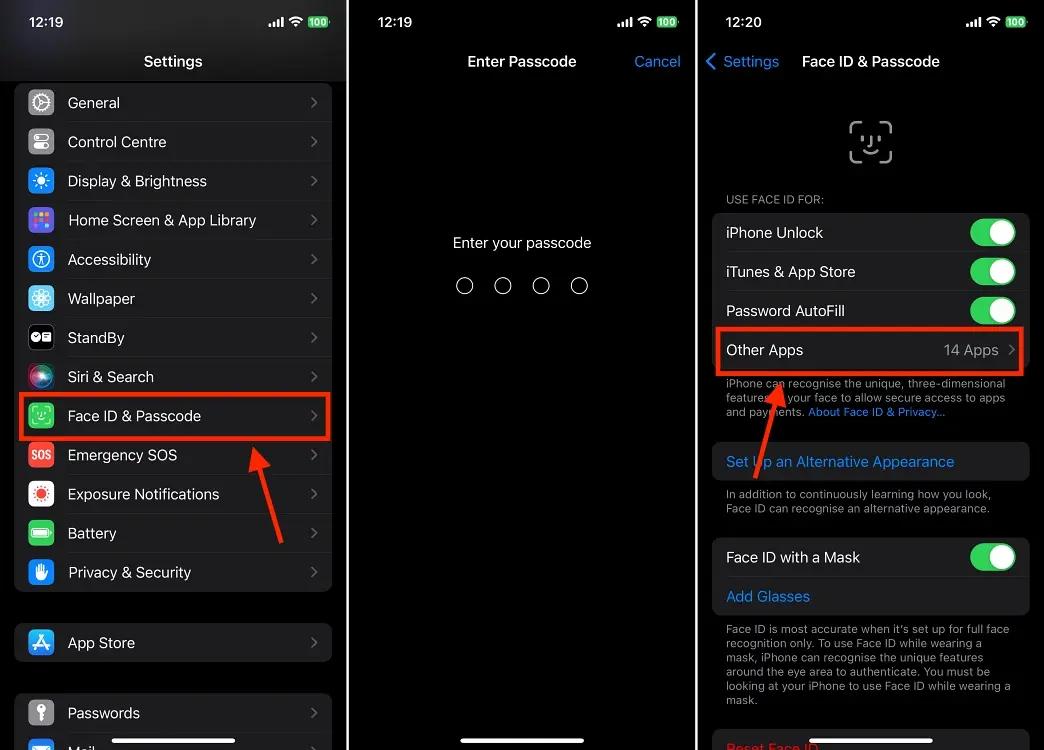


Here, you’ll be able to see all the apps that will require you to use “Face ID” Proceed and toggle on the specific app that you want to restrict/lock.
Method 5: Use Touch ID to lock apps (iPhone SE,iPhone 8,iPhone 8 Plus)
Although the new iOS version comes with newly advanced features, you can still use Touch ID feature to lock your iOS 11 device application.
Here’s how to use your fingerprint to lock apps on your iOS device.
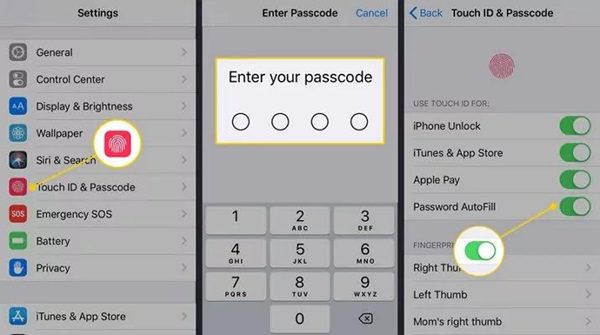
Step 1. Set up the Touch ID by entering your fingerprint details on your device.
Step 2. Go to “Settings” > “Touch ID & Passcode” > enter your passcode.
Step 3. Switch on the toggle buttons for the specific apps you’d like to lock using your Touch ID.


How do I lock one app on my iPad and iPhone?
Using Guided Access (iOS 11 or Later) can be very helpful to control single-app navigation. This feature is designed to help users lock a single app on the screen thus preventing another person from navigating to the Home Screen, activating Siri, or even opening another app.
To start using the Guided Access feature, kindly perform the following setting adjustments.
- Access the “Settings” > “Accessibility” > “Guided Access”.
- Toggle “On” the Guided Access switch. Then, you can set up Passcode or Time Limits as you will.
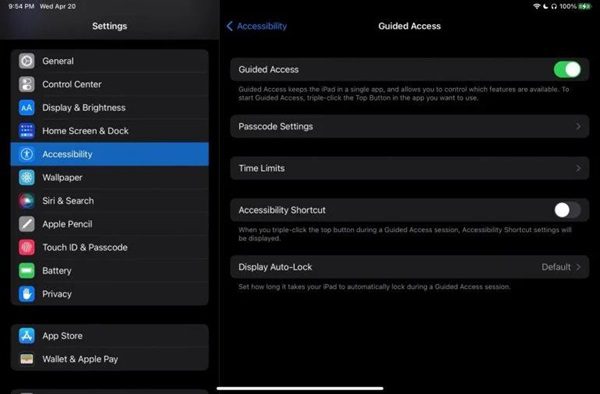


Now, launch the specific app that you wish to lock on the screen. Triple tap on the Home button or the side button for devices with Face ID. This opens the Guided Access menu/configuration panel.
How to lock apps on iPad and iPhone with third-party apps?
Under certain circumstances, you may find it necessary to prevent other users from accessing or running certain applications on your device due to licensing limitations or security concerns. For that very reason, you may opt to use a third-party app to lock your apps on iPhone and iPad. Google Smart Lock and AppLocker are two great options you may consider.
Google Smart Lock
The Google Smart Lock app for iPad and iPhone devices uses your device security key to offer extra security above the two-factor authentication. Learn how to set up your Google Smart Lock App on your iPad & iPhone devices here.
Step 1. Download and install Google Smart Lock app on your iOS device.
Step 2. Sign in using your Google account.
Step 3. Set up your security key on the Google account through the following steps:
- Head to myaccount.google.com
- Choose security or 2-Step Verification.
- Choose your Security Keys.
- Pick the iOS device that you used to sign into your Google Smart Lock app and proceed with the prompts as shown in the image below.
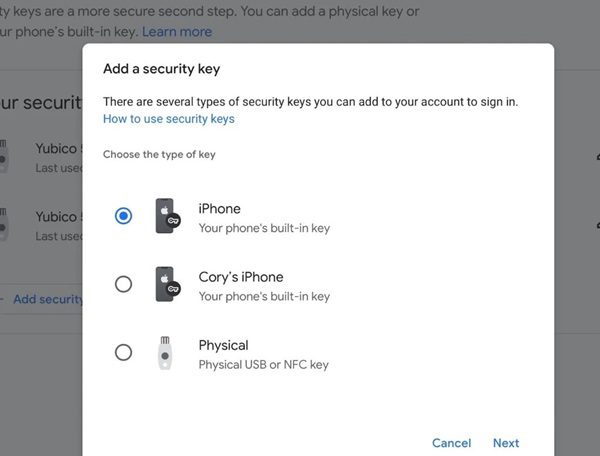


In some devices,this setup is done automatically for you. So, if you see your device already appearing in the Security Key section, then all has been done for you.
Once your Google Smart Lock is registered in your Google Account, you’ll stop receiving phone calls, text messages, and even 2FA when logging in to the device. Instead, you’ll receive a push notification on your device prompting you to complete the login process.
AppLocker
The AppLocker app is a dedicated app that uses password to protect the individual apps on your iPhone, Mac and iPad devices.
Step 1. Download and install the AppLocker app on your iOS device.
Step 2. Start the app and set up the password.
Step 3. Select the app(s) category you want to protect/ keep private.
Step 4. Select apps to ghost from the phone using a password.
If someone tries to access the locked app, they’ll be prompted to enter a password to proceed.
Note: AppLocker also supports Bluetooth ID, Touch ID, and Network ID.
How to use locked apps on iPad and iPhone?
Technically, locking an app means restricting access by others and not yourself. Since you’re the one who set the passcode, you have direct access to the app by simply entering the passcode when prompted at any given time.
To access a locked app, open the app > tap “Ask For More Time” > “Enter Screen Time Passcode”.
You can now proceed and unlock the app for one hour or even 15 minutes and use it before expiration. You can also unlock it all day as long as you’re sure no unauthorized access can happen for the rest of the day.
Bonus: How to lock apps on kids’ Android from iPhone?
Do you know that you can use your iPhone device to lock apps on your kid’s Android device? Yes, with the FlashGet Kids parental control app, you can easily track kids’ live locations, restrict the screen time your kid spends on their devices, monitor apps and content they access, and many more.


There are simple 3 steps to start using the FlashGet Kids parental control app.
- Download and install FlashGet Kids on your iPhone device. It also requires downloading a kid’s version on kids’ devices.
- Sign in to your FlashGet Kids account.
- Link the parent’s device to the kid’s device with a verification code.
Then you can block apps and set screen time limits on the kid’s Android device.
Step 1. On the app’s dashboard, tap “Usage Limits” > “Screen Time Limits” > “Add limits”.
Step 2. Select the “Limit Type” to be configured. It could be “Available Time Limits” or “Timespan Limits”.
- Available Time Limits: Set up the maximum your child can access the device.
- Timespan Limits: Set the specific timespan so that the child cannot access the device.
Step 3. Now you can customize your time limits to “Every day” timespan. Then “Save” the changes.
Conclusion
Locking the apps on your iPad and iPhone is essential for maintaining the privacy and preventing unauthorized access. Whether you want to limit access to certain apps for children or prevent unauthorized users from accessing sensitive data, the above methods are available to help you accomplish your goals. It is also necessary for parents to learn some effective ways to limit specific app usage for kids.

